

Night City is all about style: Our Cyberpunk 2077 Clothing Guide will not only explain how to improve existing Clothing Items with suitable Mods but will also show you where to find Legendary Clothing Sets or how to create your personal style.
In this Cyberpunk 2077 Guide you will learn:
- Where you can find Clothing Vendors, and from which Fast Travel Dataterms you can reach them
- Which Vendors sell which Clothing Mods and Crafting Specs for clothes
- Which useful effects the Clothing Mods have at which quality level
- How to get Johnny Silverhand’s Clothes
- Where you can find the nine Legendary Clothing sets
- Blue or different-colored bars with a double arrow symbol include texts and sometimes tables, which are folded for clarity. Click or tap on the bars to open them. When using mobile devices, slide your finger to the left to fully view the tables.
Clothing Vendors & Locations in Cyberpunk 2077
You can get clothes from the 12 Clothing Vendors with rarity levels ranging from Common to Legendary, as well as Clothing Mods and Crafting Specs that allow you to craft various clothing items. The location of the vendor determines which Mods, Crafting Specs, and Clothing Items are available for sale (apart from the basic offerings).

Clothing Vendor
| No. | Area | Name | Fast Travel Dataterm |
|---|---|---|---|
| 1 | Watson, Northside | Clothing Vendor “Ded Zed” | Pershing Street |
| 2 | Watson, Little China | Clothing Vendor “Stylishly” | Drake Avenue / Metro: Med Center |
| 3 | Watson, Kabuki | Clothing Vendor – Street Booth | Kennedy North / Sutter Street |
| 4 | Westbrook, Japantown | Blossoming Sakura Clother “Saeko’s” | Sagan & Diamond |
| 5 | Westbrook, Charter Hill | Clothing Vendor “Avante” | Lele Park |
| 6 | City Center, Downtown | Jinguji | Halsey & Milk |
| 7 | City Center, Corpo Plaza | Appel de Paris “Avante” | Reconciliation Park |
| 8 | Heywood, Wellsprings | Clothing Vendor “Stylishly” | Cannery Plaza / Palms View Plaza |
| 9 | Santo Domingo, Arroyo | Clothing Vendor – Street Booth | Metro: Wollesen Street / Megabuilding H4 |
| 10 | Santo Domingo, Rancho Coronado | Clothing Vendor “Stilyshly” | Mallagra & Manzanita |
| 11 | Pacifica, West Wind Estate | Clothing Vendor | West Wind Apartments |
| 12 | Badlands, Red Peaks | Clothing Vendor – Street Booth | Trailer Park |
Cyberpunk 2077 Crafting Clothes
If you don’t want to rely on the quality of randomly obtained clothes, craft them yourself to get a certain style. Similar to weapon crafting, new clothes are made from item components (obtained either as loot, through purchase, or by disassembly). Of course, this is only possible when you own the required Crafting Specs.
V needs high Attribute stats in “Technical Ability” to craft items effectively. To craft Legendary Clothing, you will need an Attribute level of 18 as well as the unlocked “Exceptional Talent” perk. For other crafting specs, you should craft ammunition and other items as often as possible to progress in the Crafting Perk Tree:
- From level 6: Crafting Specs for clothes of the quality level “uncommon”
- From level 9: Crafting Specs for clothing of the quality level “rare”
- From level 13: Crafting Specs for clothing of the quality level “Epic”
- From level 18: Crafting Specs of the quality level “Iconic/Legendary”
Learn more about Crafting and the Technical Ability Attribute in our Attributes and Skills Guide.
The city’s vendors also offer Crafting Specs whose quality level depends on the Vendor’s location and V’s progress in the main story: Vendors with Crafting Specs of lower quality levels are accessible earlier than others in the game, and they generally represent districts with poorer residents.
Quality levels of offered Crafting Specs by District
| Quality of the Crafting Spec | Costs | District |
|---|---|---|
| Uncommon | 1.500 €$ | Watson, Westbrook |
| Rare | 3.000 €$ | all |
| Epic | 5.000 €$ | all except Watson |
| Legendary | 20.000 €$ | City Center, Heywood |
Should the chosen Vendor not have the desired items on sale, wait 24 hours (fast-forward function in the menu) and visit him again to see what new items are available. Alternatively, save before visiting a Vendor and reload if the Crafting Spec you are looking for isn’t on sale.
- You should save before visiting a clothing store in the city center or Heywood for the first time. In the game version 1.11, the clothing vendors are bugged, which causes legendary Crafting Specs to be available in the Vendor’s offer only once during the first visit, and never again afterwards!
Vendor Offer for Clothing Crafting Specs
Attention: The Vendor number refers to the Vendor List above.
| Crafting Spec Description | Slot | Vendor |
|---|---|---|
| “5hi3ld Superb” Combatweave Aramid Breastplate | Upper Body (Outer Torso) | 3 |
| Formal “Golden Mean” Skirt with Aramid Seams | Legs | 2,5 |
| Spotted Flexi-Membrane Bustier | Upper Body (Inner Torso) | 2 |
| Green Viper Double-Nanowave Pencil Dress | Upper Body (Outer Torso) | 1 |
| “Hebi Tsukai” Cashmere Nano Fiber Shirt | Upper Body (Outer Torso) | 4 |
| Mox Gas Mask with custom protective layer | Face | 1 |
| “Red Leopard” Button-Up with Composite Insert | Upper Body (Inner Torso) | 3,5 |
| Durable “Lime Speed” Modular Helmet | Head | 2,5 |
| Durable “Smiley Hard” Loose-Fits | Legs | 1,4 |
| Synthetic “Sunny Ammo” High Tops | Feet | 3 |
| Arasaka Tactical Techgogs | Face | 3,4 |
| “Darra Polytechnic” Tactical Balaclava | Head | 1,4 |
| Reinforced Biker Boots | Feet | 2 |
| “Abendstern” Polycarbonate Wedge Heels | Feet | 4,12 |
| Upgraded Farmer Hat with Gauge | Head | 9,12 |
| “Denki-Shin” Thermoset Hybrid Crystaljock Bomber | Upper Body (Outer Torso) | 2 |
| “Bái Lóng” Formal Pants with Reinforced Neo-Silk | Legs | 10,11 |
| Glitter Laceless Sturdy-Stitched Steel-Toes | Feet | 1,11 |
| Classic Aramid Denim Shorts | Legs | 3,12 |
| “Milky Gold” Trench Coat with Bulletproof Triweave | Upper Body (Outer Torso) | 5,9 |
| “Ten7o Bada55” Polycarbonate Bandana | Head | 3 |
| “Psycho” Flexiweave Longsleeve | Upper Body (Inner Torso) | 1,11 |
| Durable Synsilk Blazer | Upper Body (Outer Torso) | 10,12 |
| Puncture-Resistant NUSA T-Shirt | Upper Body (Inner Torso) | 4,9,10 |
| Stylish Turquoise Sport Glasses | Face | 2,10,11 |
| Trilayer Steel Ocuset | Face | 5,9 |
| “Geisha” Flexi-Weave Cargo Pants | Legs | 7 |
| Padded “Denki Hachi” Hybrid Weave Bra | Upper Body (Inner Torso) | 12 |
| Gold Punk Aviators with Coated Glass | Face | 6,7 |
| “Graffiti” Thermoset Synweave Keffiyeh | Head | 7 |
| Laminated Security Hardhat with Headset | Head | 11 |
| Menpō With Protective Padding | Face | 12 |
| “Midday Glow” Polycarbonate Dress Shoes | Feet | 10 |
| “Cyab” Multiresist Evening Jacket | Upper Body (Outer Torso) | 6 |
| “Green Graffiti” Armor-Coated Athletic Shoes | Feet | 8,9 |
| “Paris Blue” Office Shirt and Vest with Reinforced Seams | Upper Body (Inner Torso) | 6 |
| Stylish Leather Flat Cap with Light Armor Layer | Head | 10 |
| Stylish “Ten7o Daemon Hunter” Coat | Upper Body (Outer Torso) | 11 |
| “Blue Brick” Reinforced Hotpants | Legs | 8,9 |
| “Silverock” Bulletproof-Laminate Biker Vest | Upper Body (Outer Torso) | 8 |
| “Deadly Lagoon” Armored Syn-Silk Pozer-Jacket | Upper Body (Outer Torso) | 7 |
| Composite Geisha Combat Shirt | Upper Body (Inner Torso) | 7 |
| “Gold Fury” Neotac Bulletproof Pants | Legs | 8 |
| “Militoxic” Ceramic-Layer Combat Exo-Jacks | Feet | 7 |
| Durable “Emerald Speed” Polyamide Beanie | Head | 6 |
| Chic “Pink Dragon” Skirt with Fiberglass Sequins | Legs | 6 |
| “Uniware Brass” Office Pants with Membrane Support | Legs | 7 |
| Enhanced “Aoi Tora” BD Headset | Face | 6 |
| Enhanced “Daemon Hunter” Slip-On Sneakers | Feet | 6 |
| “Sun Spark” Thermoset Chemglass Infovisor | Face | 8 |
| “Mírame” Reinforced Cowboy Hat | Head | 8 |
| “Daemon Hunter” Resistance-Coated Tank Top | Upper Body (Inner Torso) | 8 |
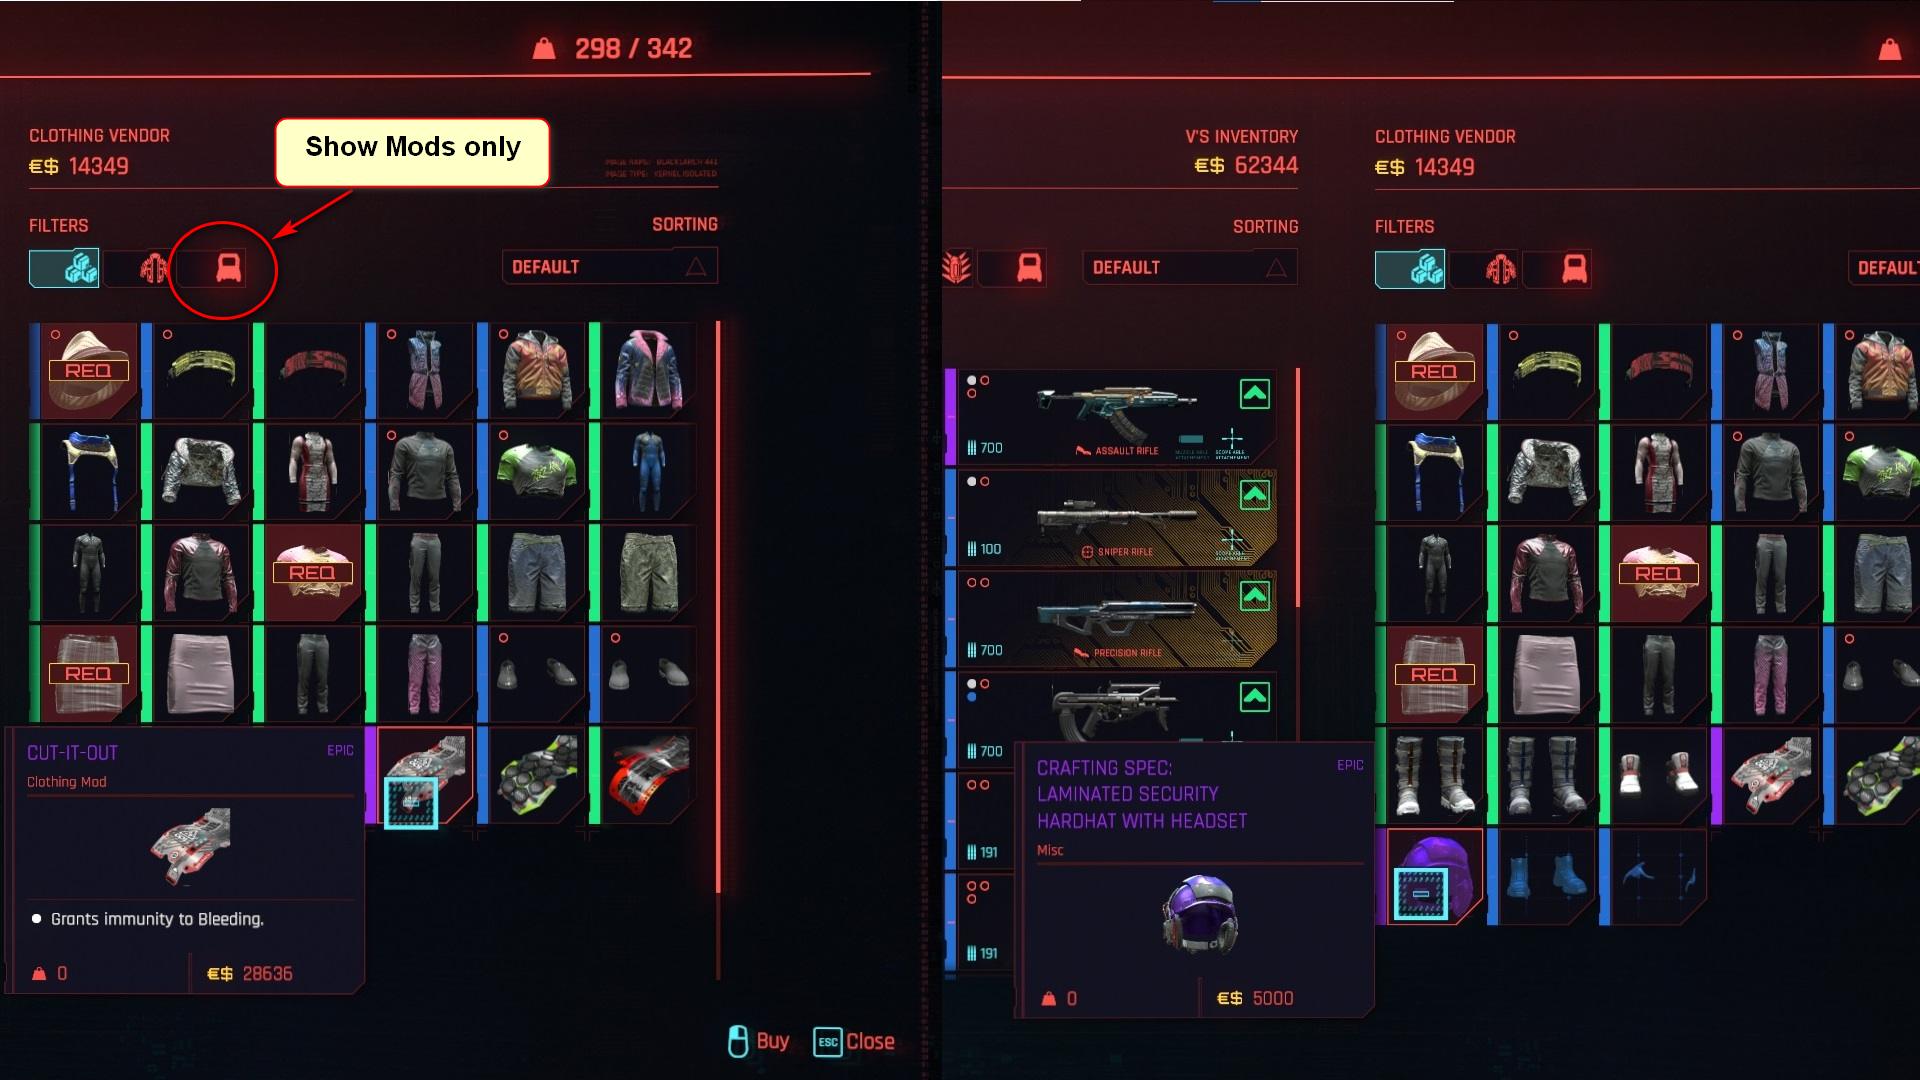
Cyberpunk 2077 Clothing: Mods
There is a good method outside of upgrading your favorite clothes if you want to avoid a jumbled, inconsistent look: Look for clothes with Mod Slots. V’s clothes always stay up to date through the use of Clothing Mods with increasing quality levels matching the level and mission challenge. In addition, some Mods offer immunities to different types of Damage or expand your gameplay options beyond conventional stats like better Critical Hit Chance, more Damage, or lower Damage Intake.
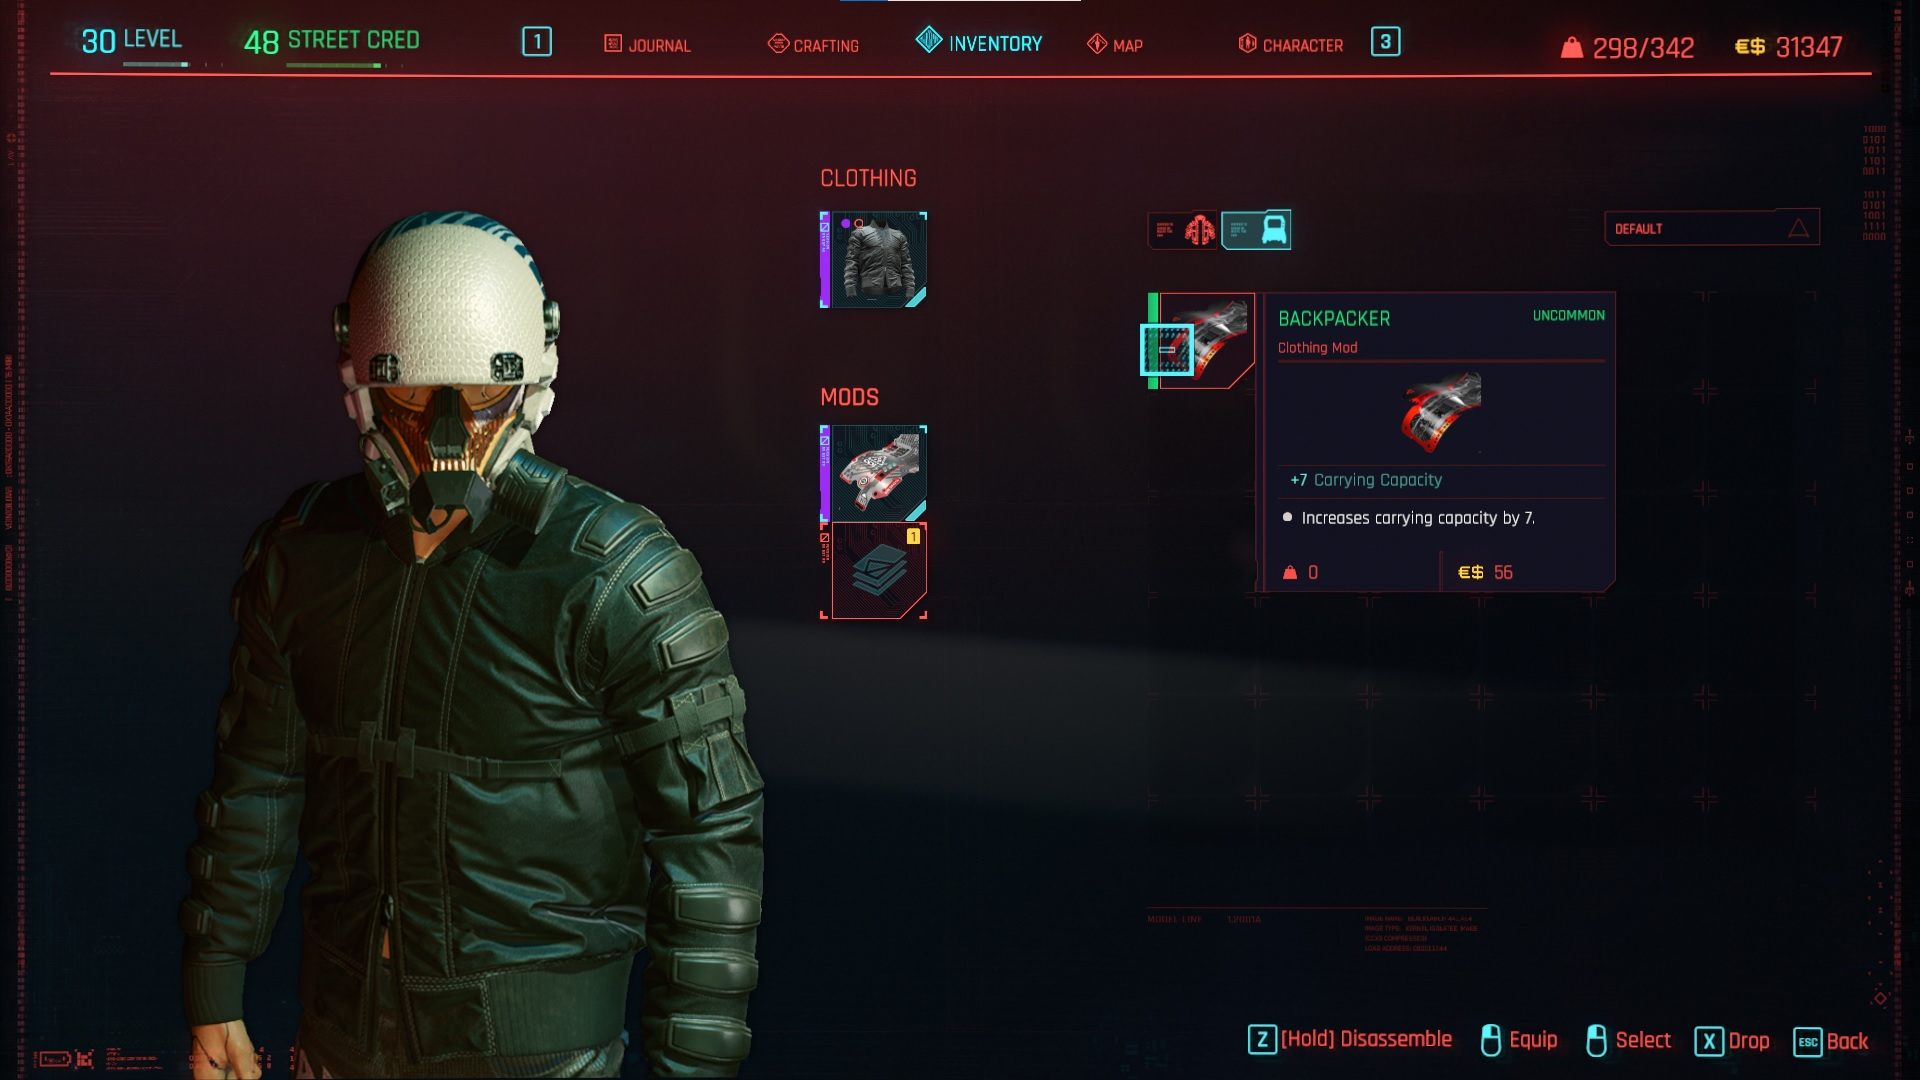
Whether a piece of clothing has Mod Slots is indicated by one or more dots at the top left of the clothing icon in the inventory, which is colored in the color of the Mod quality level (if mods are already present) – otherwise, they remain empty. A clothing item can hold up to four Mod Slots. To change mods of a Clothing item, click on the clothing icon in the inventory. You can swap installed mods by clicking on the desired mod and the one selected from the list of available mods that are not in use yet.
- Replacing an already installed Clothing Mod will destroy the currently equipped Mod! The only way to prevent this is to use the “Waste Not Want Not” perk (Technical Ability 16) from the Crafting Tree.
Standard Clothing Mods like “Armadillo” (more armor), “Backpacker” (greater carrying capacity), or “Resist!” (less damage from status effects) are available at all Vendors in uncommon quality. The supplies of Night City’s Vendors are relatively limited, but Clothing Mods can often be found in clothes worn by enemies, as loot, or inside crates and chests. We have listed the locations for Mods that the Vendors Offer in all available quality levels in our Cyberpunk 2077 Clothing Guide. Clothing Mods not listed in the Vendor Offer can only be found as loot in the game world.
Overview of all Clothing Mods
| Mod Name | Effect | Bonus | Vendor |
|---|---|---|---|
| Antivenom | Grants immunity against poisons. | – | 4 |
| Armadillo | Increases Armor. | +2 to +150 and additionally +20 % per rarity level | all Shops, 1-6 |
| Backpacker | Increases the carrying capacity. | +5 | +7 | +9 | +11 | +13 | all Shops, 1-6 |
| Boom Breaker | Reduces damage from explosions. | -5 % | -8 % | -11 % | -14 % | -17 % | – |
| Bully | Increases Critical Damage. | +30 % | 6 |
| Coolit | Grants immunity against burning. | – | 2 |
| Cut-it-out | Grants immunity against bleeding | – | 3,6 |
| Deadeye | Increases Critical Hit Chance and Critical Damage. | +15 % / +30 % | 2,5,6 |
| Footloose | Increases Evasion. | +0,2 | +0,3 | +0,4 | +0,5 | +0,6 | – |
| Fortuna | Increases Critical Hit Chance. | +15 % | 6 |
| Osmosis | Increases maximum oxygen capacity. | +5 | +6,5 | +8 | +9,5 | +11 | – |
| Panacea | Grants immunity against poisons and electric shocks. | – | 6 |
| Plume | Reduces fall damage. | -5 % | -8 % | -11 % | -14 % | -17 % | – |
| Predator | Grants bonus damage against enemies with medium and high threat level. | +25 % | 4,5,6 |
| Resist! | Less Damage from negative status effects. | -5 % | -8 % | -11 % | -14 % | -17 % | all Shops, 1-6 |
| Showtime | Grants bonus Damage against enemies with medium and high threat level. | +5 % | +6,50 % | +8 % | +9,5 % | +11 % | – |
| Soft-Sole | Enables silent landing. | – | 2,3,5 |
| Superinsolator | Grants immunity against electric shocks. | – | 3,4 |
| Tenacity | Reduces Stamina cost for melee attacks. | -5 % | -6 % | -7 % | -8 % | -9 % | – |
| Vanguard | Reduces stamina consumption when blocking melee attacks. | -5 % | -8 % | -11 % | -14 % | – 17 % | – |
| Zero Drag | Increases movement speed. | +10 | +13 | +16 | +19 | +22 | – |
Johnny Silverhand Set
True Johnny Silverhand fans just have to wear his cool clothes! Fortunately, they are given away for free during the main and side missions, so you can spend your precious money on other things. All recovered clothes are of the quality level “Rare/Iconic” and can be improved through upgrades.
But that’s not all: as soon as you pick up one of Johnny’s clothes, a Crafting Spec will appear in your item recipes at the same time. Use the appropriate components and the rare clothing item as the main ingredient to craft a higher-quality variant of it.
- If you collect all pieces of the Johnny Silverhand set, which consists of his aviators, shirt, pants, and shoes, you will be rewarded with the Trophy/Achievement “Breathtaking” – you can learn more about all Cyberpunk 2077 Achievements in our Trophies Guide. The name of this Achievement is a reference to Johnny’s actor Keanu Reeves, who appeared on stage at Microsoft’s E3 presentation in 2019, right after Johnny was introduced as a major character. Reeves explained how “breathtaking” the upcoming Night City gaming experience would be, to which a fan in the audience responded with, “You are breathtaking!” Reeves returned the compliment, which became a viral meme.
Johnny’s Aviators
- Location: received automatically during the mission
- Slot: Face
- Mission: Chippin’ In
- Stats: 40,2 Armor
If you have allowed Johnny to take over V’s body in the 4th part of the side mission “Tapeworm” (after meeting Hanako Arasaka during the parade), the 3rd act of the game will start with the side mission “Chippin’ In”.
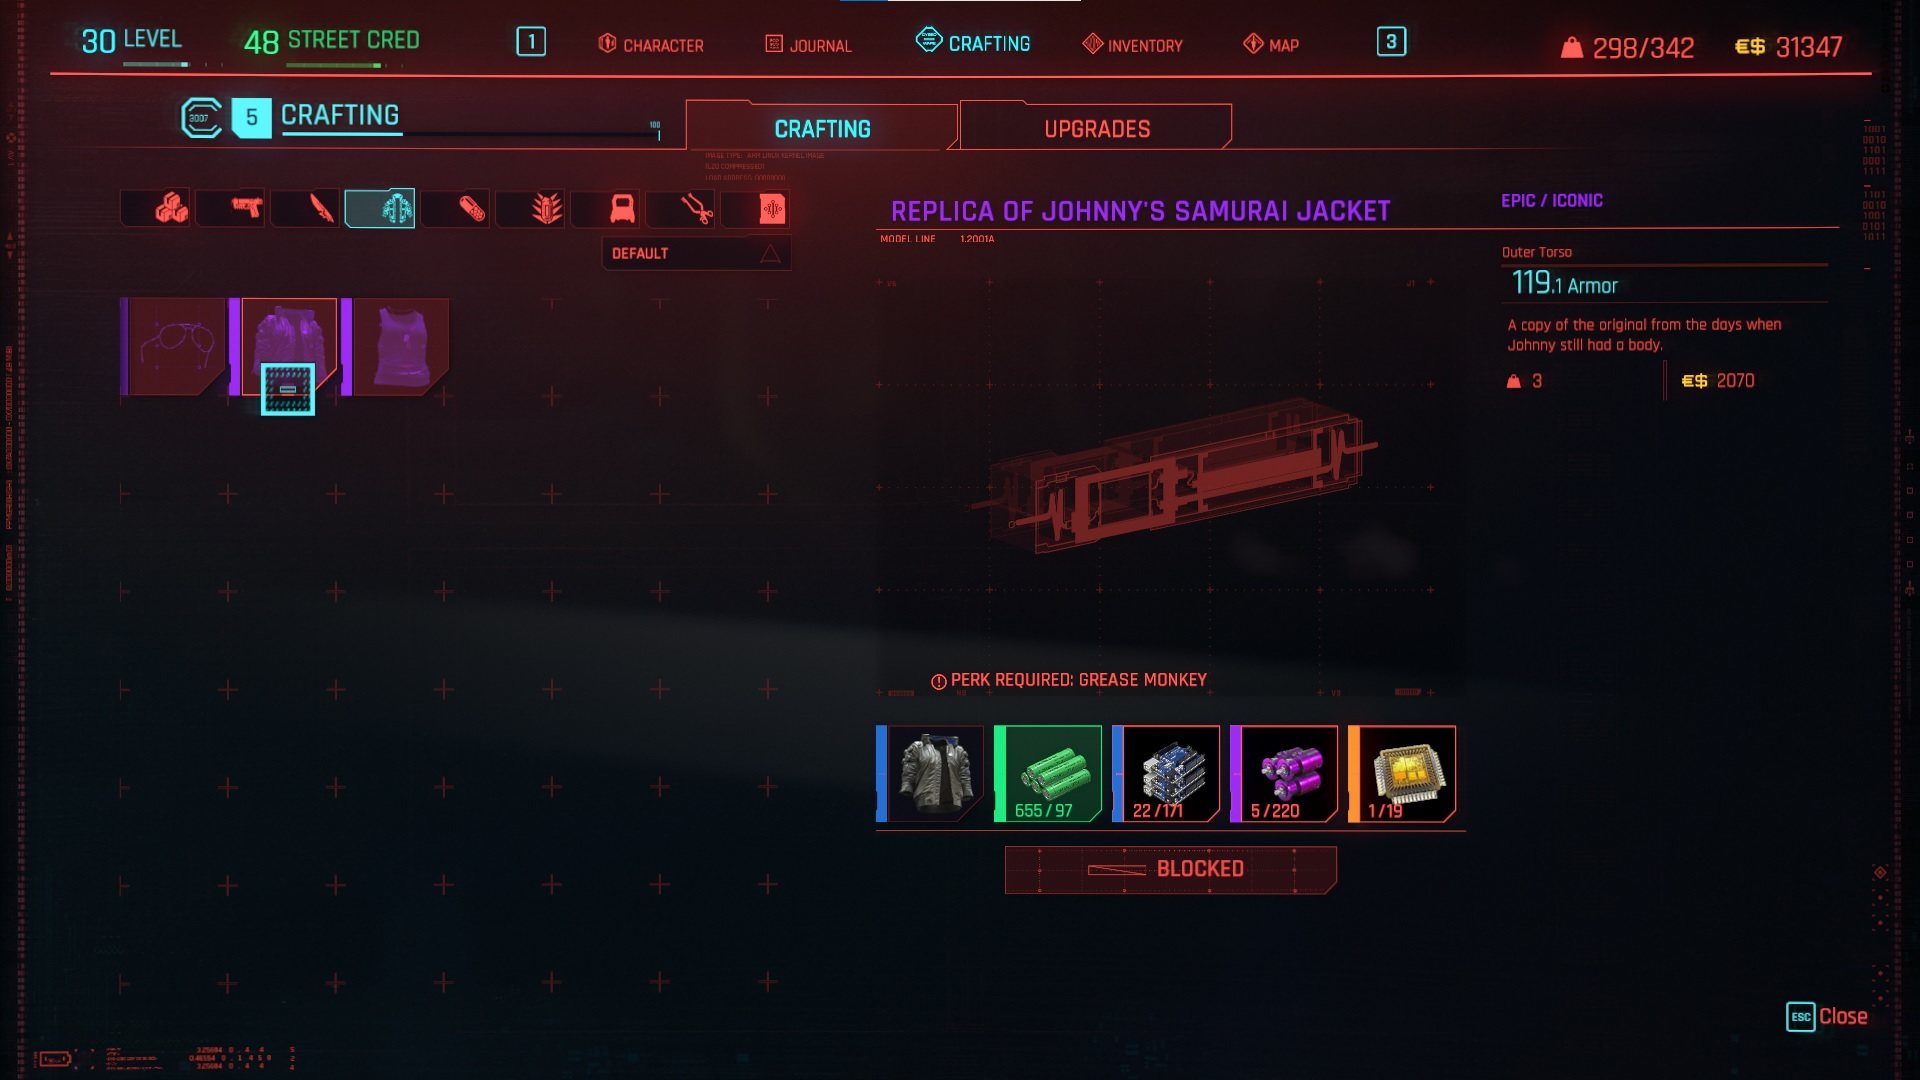
Copy of Johnny’s Samurai Jacket
- Location: received automatically during the mission
- Slot: Upper Body (Outer Torso)
- Mission: Chippin’ In
- Stats: 102,9 Armor, reduces damage from negative status effects by 8%.
- Note: A copy of the original, which was worn back in the days when Johnny still had a body.
Meet Rogue in front of the Afterlife in the “Chippin’ In” side mission, during which she talks about the jacket. Take the jacket from the trunk of Rogue’s car after the meeting and add it to V’s wardrobe.
Johnny’s Tank Top
- Location: received automatically during the mission
- Slot: Upper Body (Inner Torso)
- Mission: Tapeworm
- Stats: 105,2 Armor, damage reduced by 5 when blocking
- Note: It would look like a generic fanboy shirt without the dog tag.
Complete the side mission “Tapeworm” to get this shirt. “Tapeworm” consists of a total of four parts that start after completing the main missions Automatic Love, Transmission, Life during Wartime and Search and Destroy.
Johnny’s Pants
- Location: In a pink suitcase on the left side of the door in the bedroom of the apartment
- Slot: Legs
- Mission: Psychofan (Gig, The Glen)
- Fast Travel Dataterm: El Coyote Coyo
- Minimum Level: 33
- Stats: 79,0 Armor
- Note: Real leather for a real rocker boy.
You receive the gig “Psychofan” from Fixer Padré in the district Heywood (The Glen), about a hundred meters to the left along the street from the fast travel dataterm “El Coyote Coyo”. Technical Ability 17 is required to open the apartment door comfortably – as an alternative, go to the stairwell on the right and up to the roof, from where you can jump onto the balcony on the floor below. Samurai fans should take a good look around the apartment, because Johnny will comment a lot on the posters.

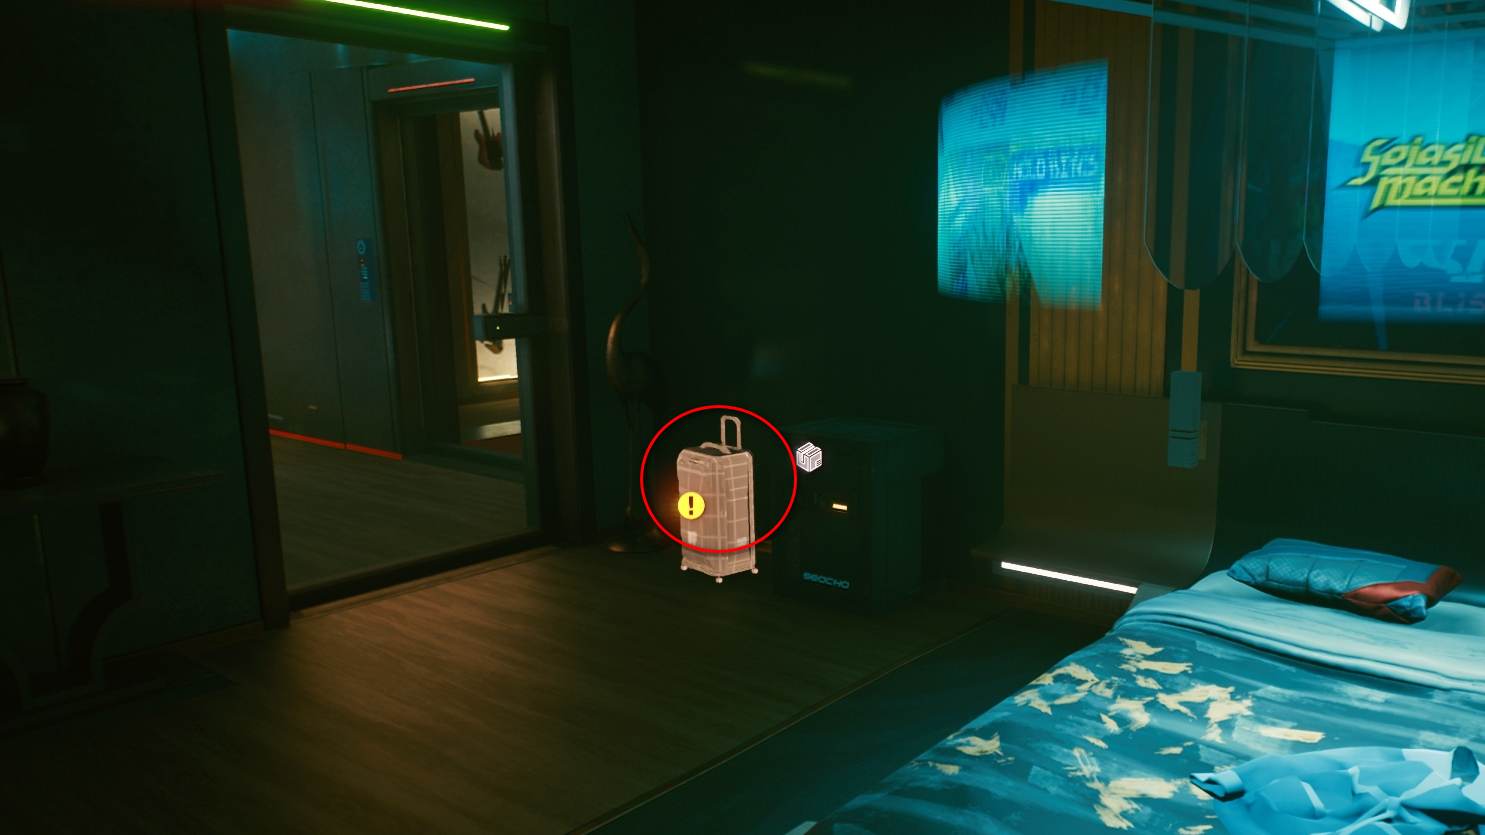
Johnny’s pants are inside a wheeled suitcase next to the left bedroom door on the 1st floor of the apartment. Break the door to the shrine room on the 1st floor (also Constitution 17) or scan the photo right next to the bed in the bedroom to get the door code. Grab Eurodyne’s guitar and complete the mission after that.
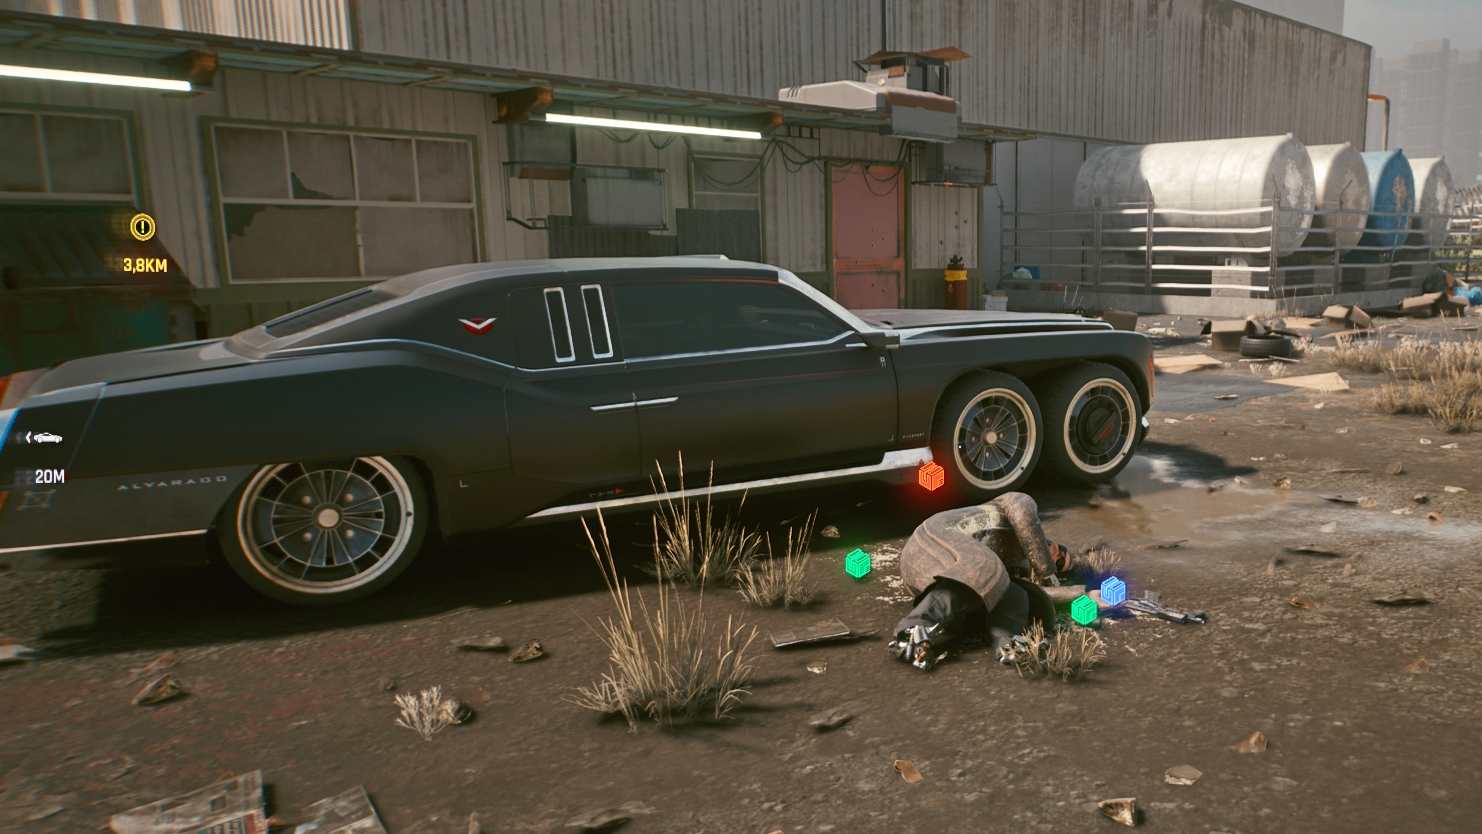
Johnny’s Shoes
- Location: Inside the cabinet, where you also find the mission item you’re looking for
- Slot: Feet
- Mission: Family Heirloom (Gig: Charter Hill)
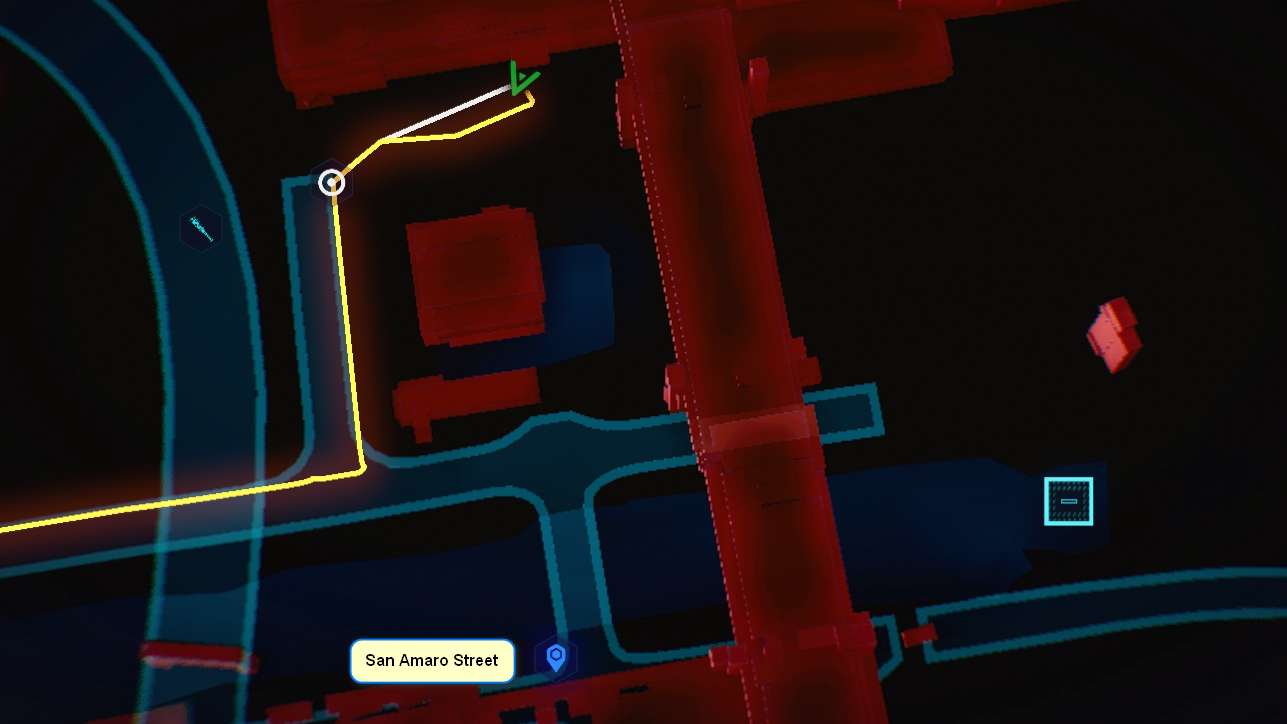
- Fast Travel Dataterm: San Amaro Street
- Stats: 62,3 Armor, +15% Critical Hit Chance
- Note: Follow in the footsteps of a legend – literally.
You receive the mission “Family Heirloom” from Fixer Rogue after completing the main mission “Ghost Town” in the Heywood district (Charter Hill). Go left from the fast travel dataterm “San Amaro Street”, cross the bridge, follow the road to the left and turn right towards the red and white skyscraper to receive the call from Rogue. Gain access to the parking garage through the door (Constitution 13) or go around the building and open up the steel door (Technical Ability 10). Otherwise, you’ll have to enter the area (guarded by several enemies) via the underground parking garage entrance.
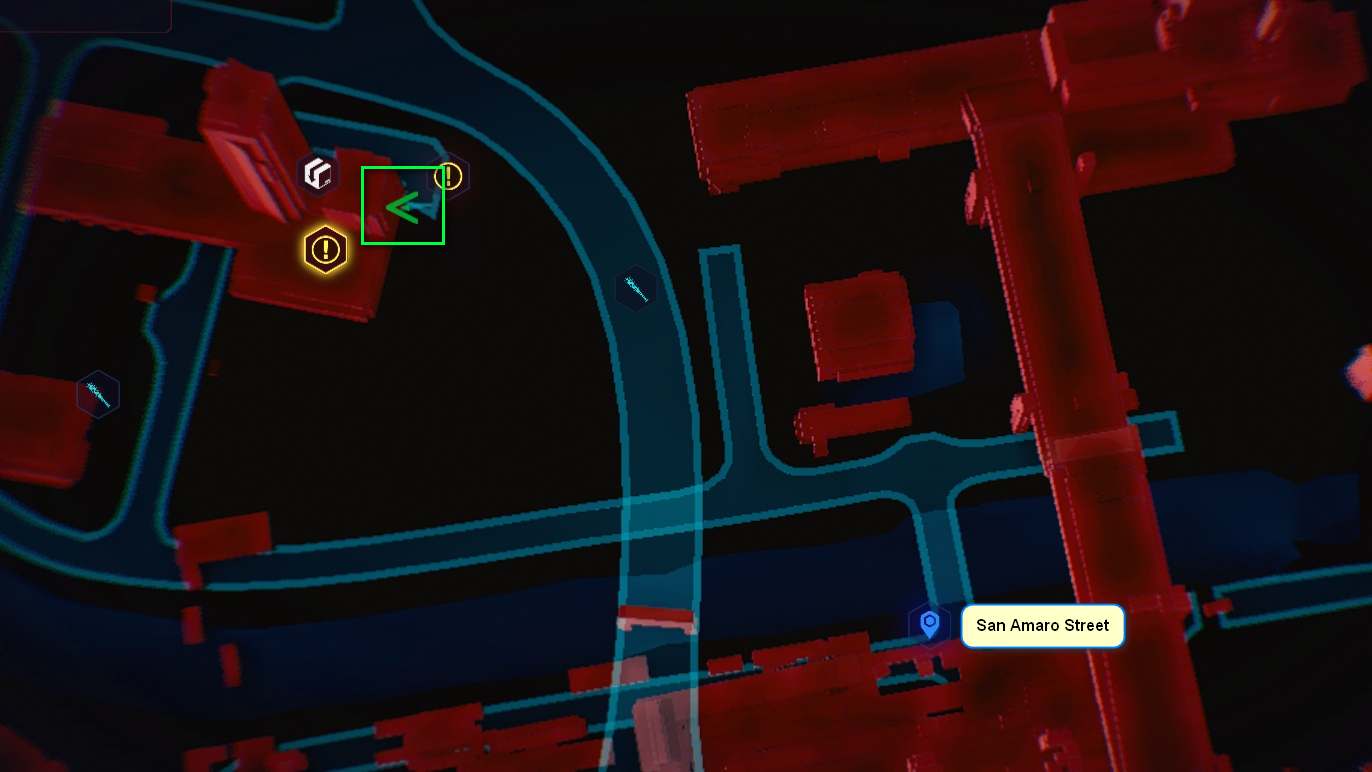
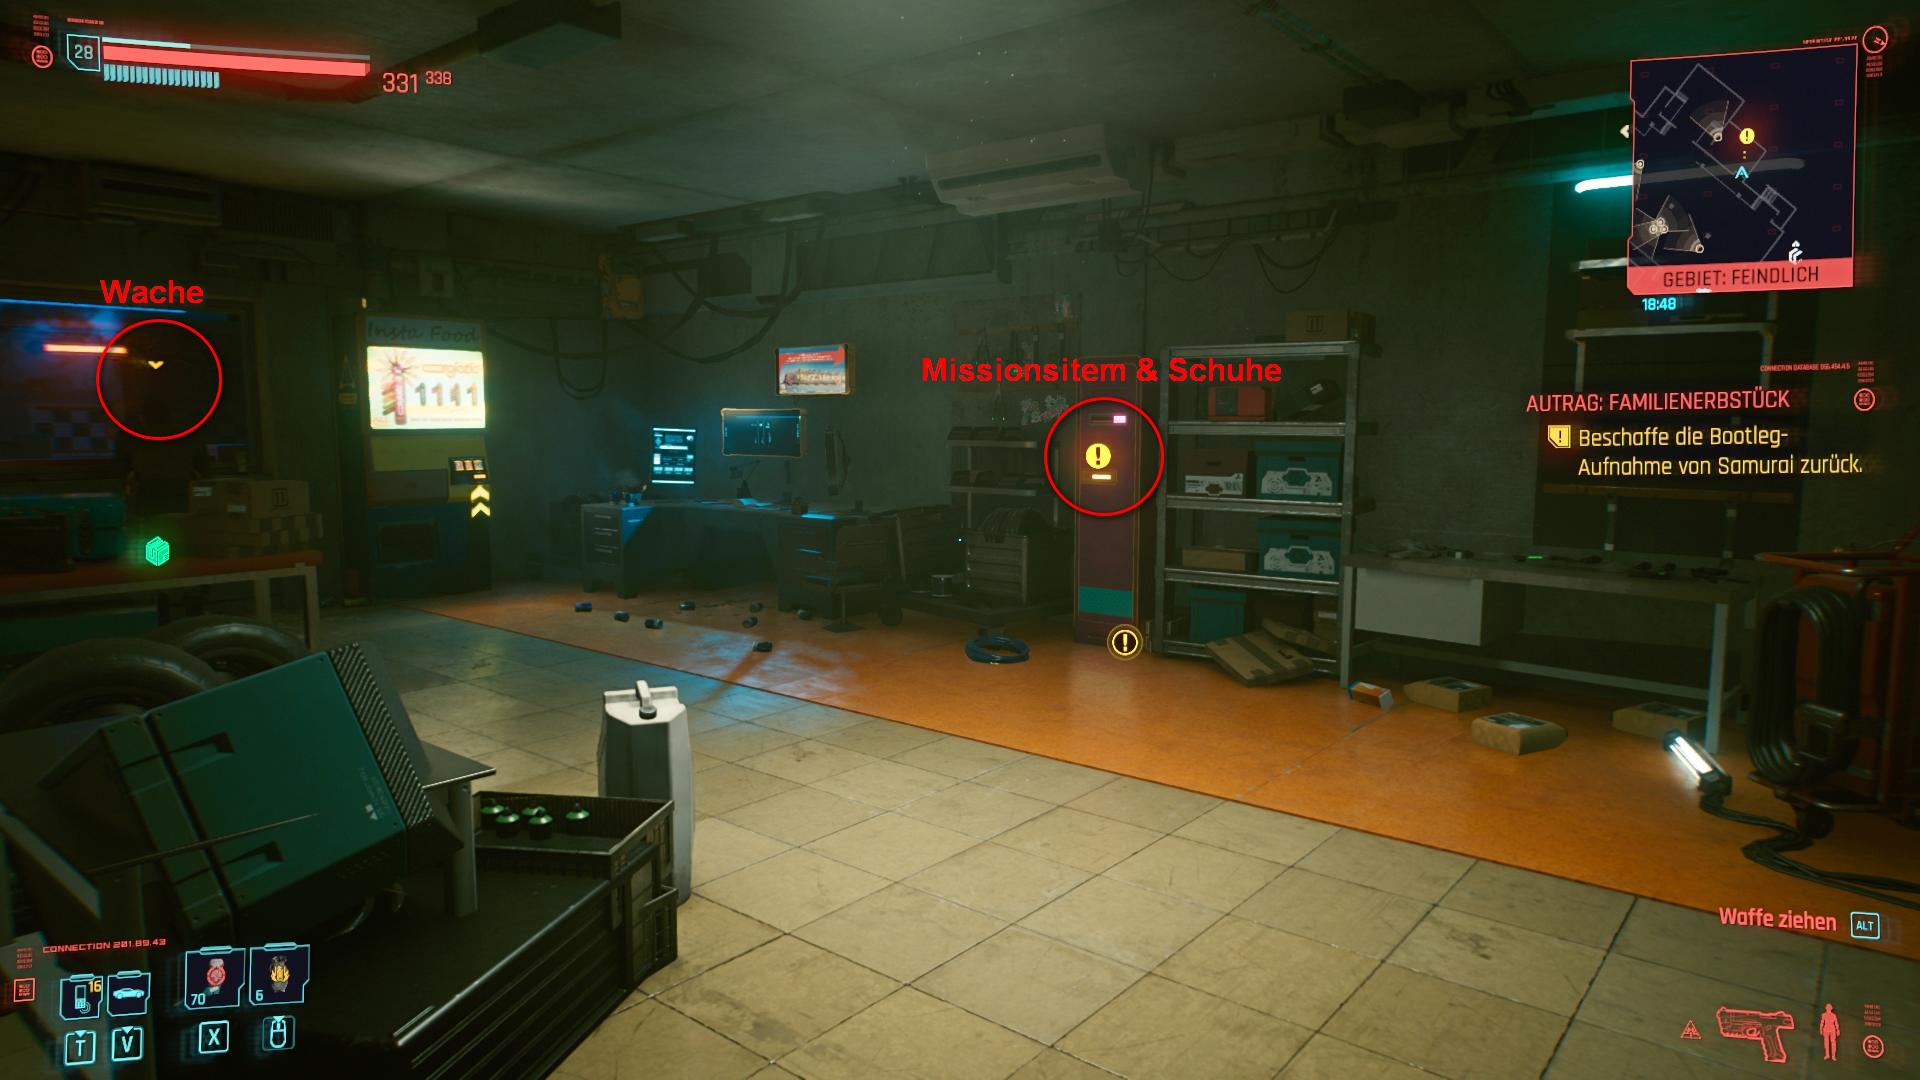
Sneak along the wall and disable the security cameras to get into the workshop without any fighting. Distract the guard in the workshop with a TV hack and finish him off silently. Collect the missing samurai recording, the car key and Johnny’s shoes from the closet. Use the vehicle parked nearby for your getaway after eliminating the guard and the camera. Return the vehicle as well as the samurai recording to get a bonus from Rogue.
Johnny’s Weapon (Malorian Arms 3516)
- Location: On Grayson, after the fight
- Mission: Chippin’ In
- Weapon Type: Power Pistol
- Stats: 4 Mod Slots, 285.5 SPS, 115-141 Damage, 2.22 Attacks Per Second, +81-99 Thermal Damage, 1.20 Headshot Damage Multiplier.
- Note: A custom-made model for Johnny Silverhand. The man had good taste.
- Rarity: Legendary/Iconic
On the container ship “Ebunike” during the side mission “Chippin’ In” you will have to fight an old acquaintance of Rogue called Grayson. Take Johnny’s gun, the Malorian Arms 3516, from him after the fight. Read more about the legendary weapons in our big Cyberpunk 2077 Weapons Guide.
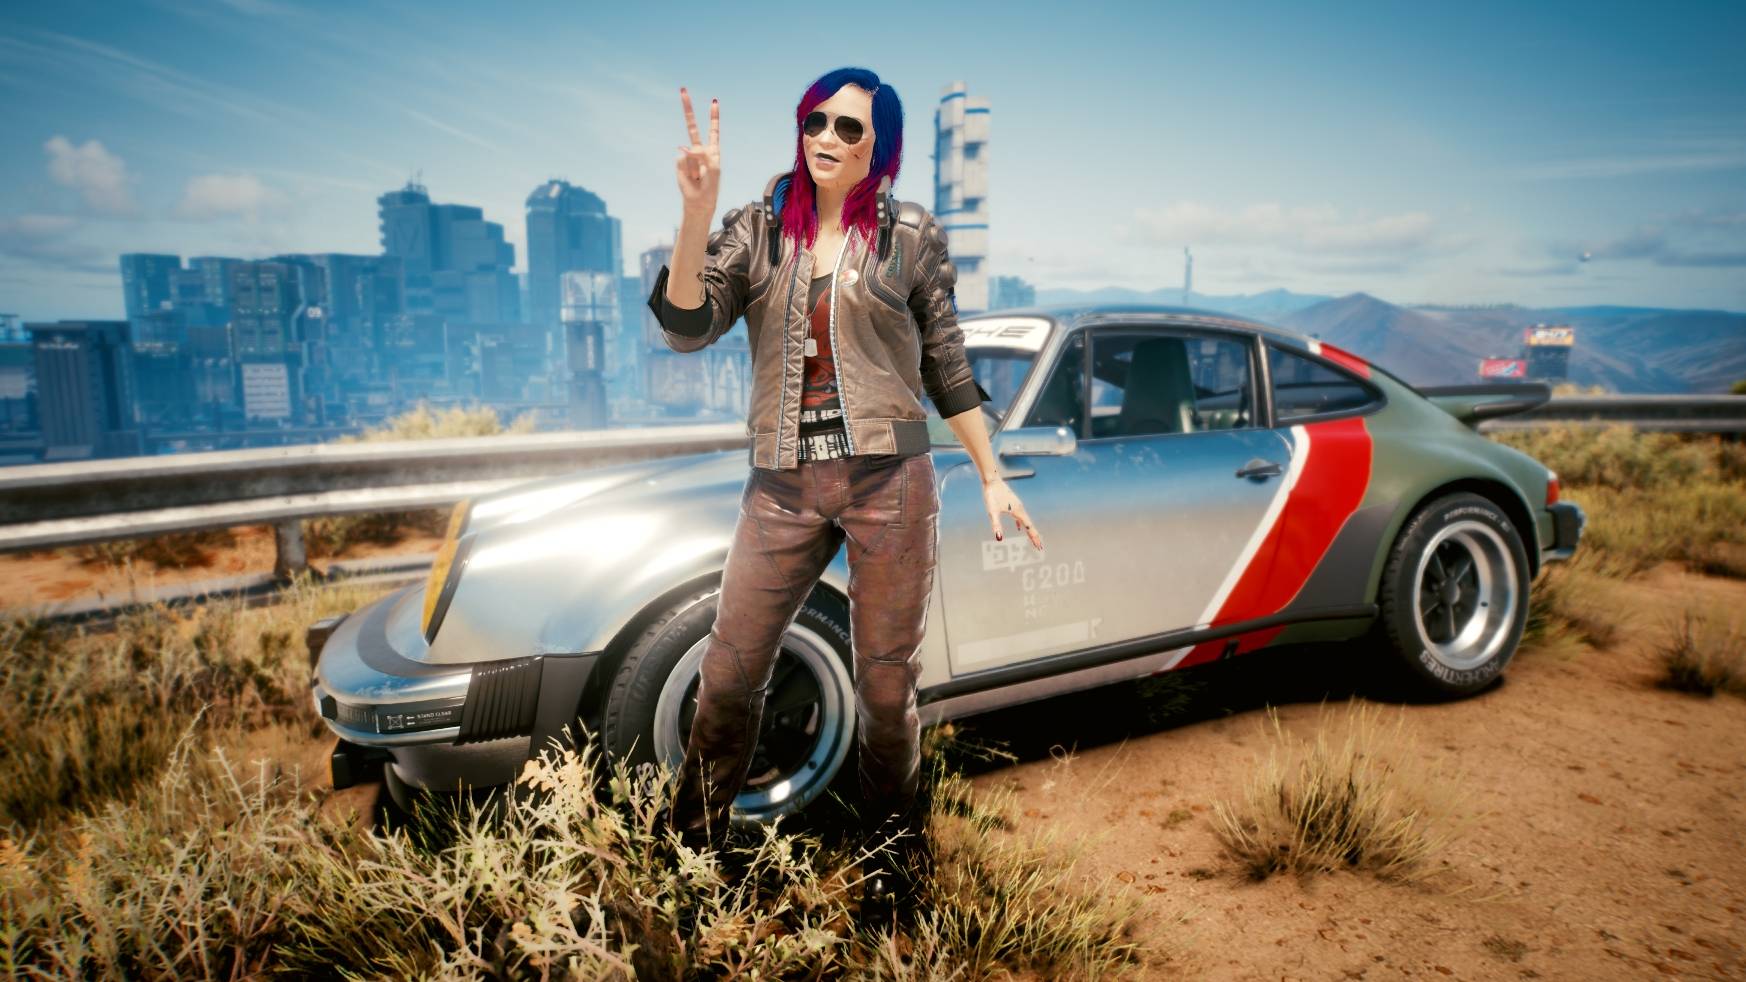
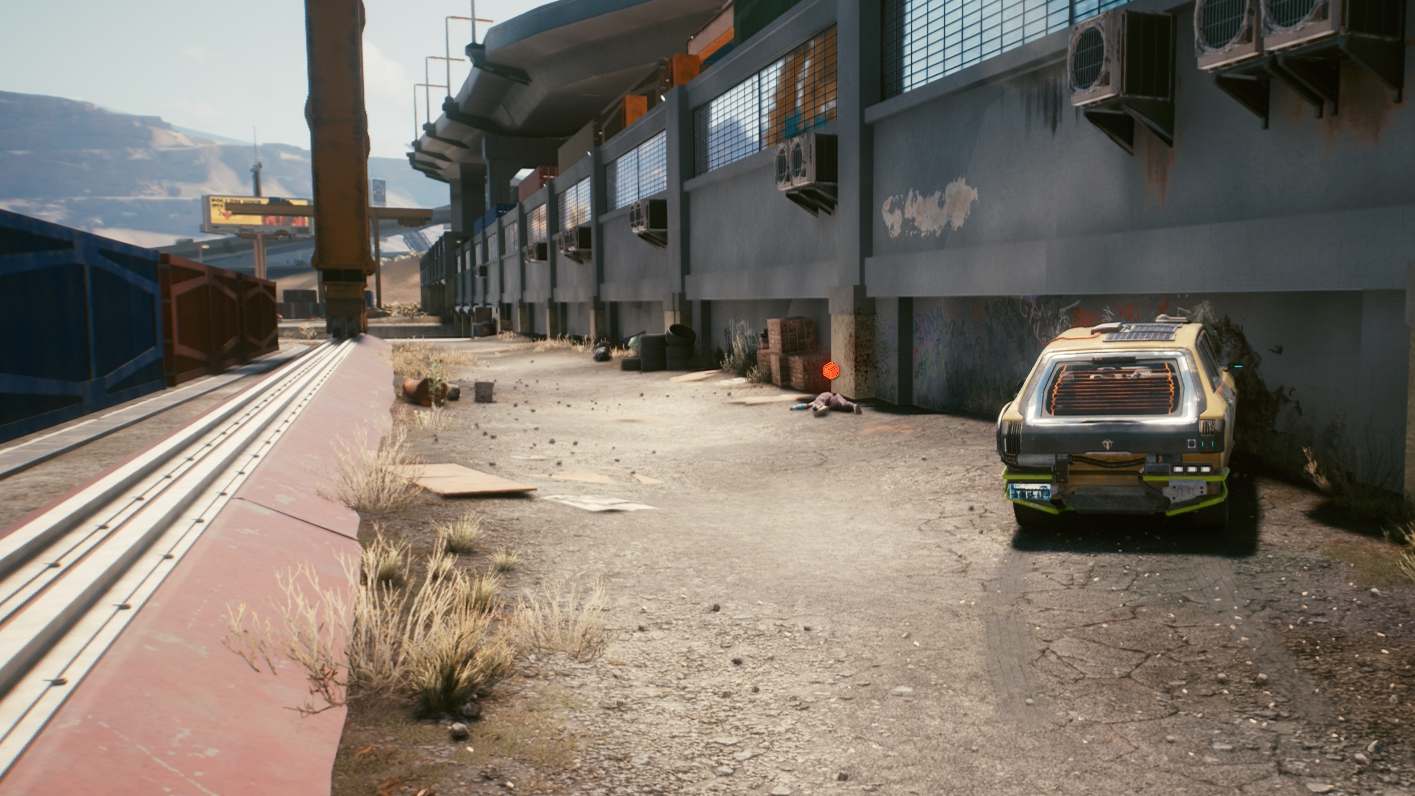
Johnny’s Car (Porsche 911 II (930) Turbo)
There is only one way to get Johnny’s unique Porsche 911: Spare Grayson after the fight in the side mission “Chippin’ In”. If you do so, he will thank you by giving you the key to a container. Use the container crane controls on the cargo ship “Ebunike” to drop the container on the ground. Open it and hop into the car to add it to V’s carpool.
Check out our Cyberpunk 2077 Vehicle Guide to see how you can get up to 13 free cars and bikes in Cyberpunk 2077!
Cyberpunk 2077 Clothing: Legendary Clothing Sets
Nine unique clothing sets are hidden throughout Night City and its surroundings. Some of the clothes require a certain level or Attribute, but you can put on most of them as soon as you pick them up.
- The stats shown in our guide serve as an example and are taken from clothing items we found while playing as a V in the level range 28-30.
- The stats and slot counts of each clothing item vary depending on Vs level. We recommend the following strategy if you want more slots or different stats for a specific item: Save before approaching the location of the desired item, and keep reloading the save file until you are happy with the newly generated stats and slots.
If you are paying a visit to an area, it is always worthwhile to pick up the clothes while you’re already on site. These clothes are usually equipped with several Mod Slots – if the additional stats do not suit your needs, simply plug in another Clothing Mod. The locations marked on the map and in the guide are sorted roughly in chronological order of the game’s progress: Since Watson is the only district you can access in Act 1, we will start there.
Map of all locations of legendary outfits

Badge / Police
The “Badge” set consists of four pieces of equipment, all used by Night City police officers on the field. Their commitment to the citiziens lead to an unpleasant end.
- “Give it up, punk. I don’t want to hear some sob story about how it was “society” that drove you to this. I just want to see that gun on the ground. Right now…before I give you an extra nostril.”
(Sgt. Max Hammerman, NCPD)
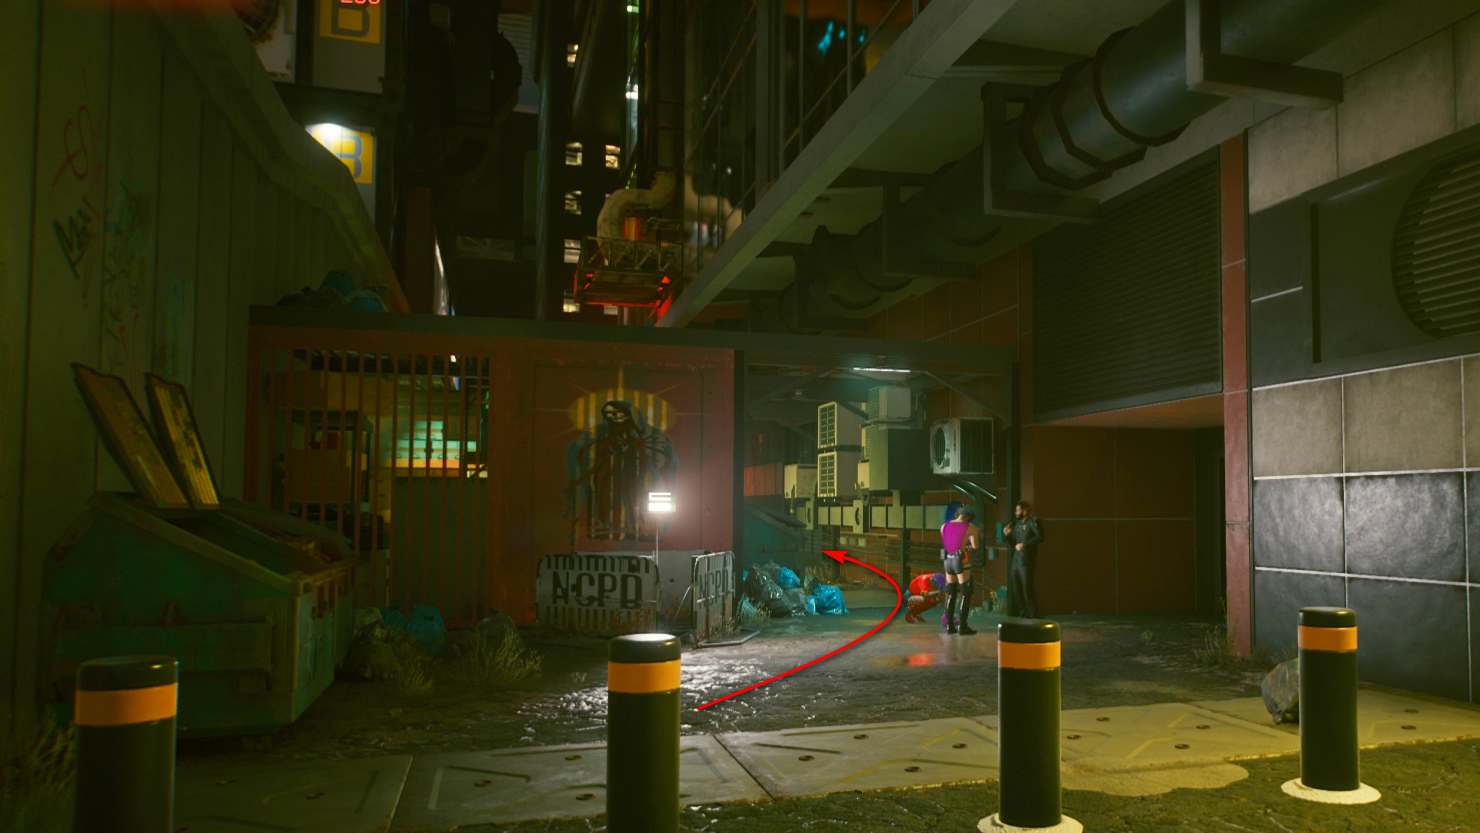
1. Holo-tinted Badge Goggles
Starting from the Fast Travel Dataterm, walk along the road to the southwest and turn to the northeast at the crossroad. Turn left at the marked point, right into the side street, and follow the road until you find a few gangsters having a street party. Pass them on the left and you will already see the parked NCPD vehicle with two killed policemen lying nearby.
- Area: Watson, Northside
- Fast Travel Dataterm: Martin Street
- Slot: Face
- Stats: 46,5 Armor
2. Anti-Puncture Neotac Pants with Composite Lining
Run along the street to the west and jump over the wall on the right sidewalk, the one between the street and the sidewalk. The dead cop lies in a corner inside the house. Several yellow-white neon arrows point towards that house and the dead cop – they are hard to miss, and are already noticeable from the street.
- Area: Watson, Little China
- Fast Travel Dataterm: Metro: Farrier Street / Goldsmith Street
- Slot: Legs
- Stats: 53,6 Armor, +30 % Crit Damage, +10 Movement Speed (3 Mod Slots)
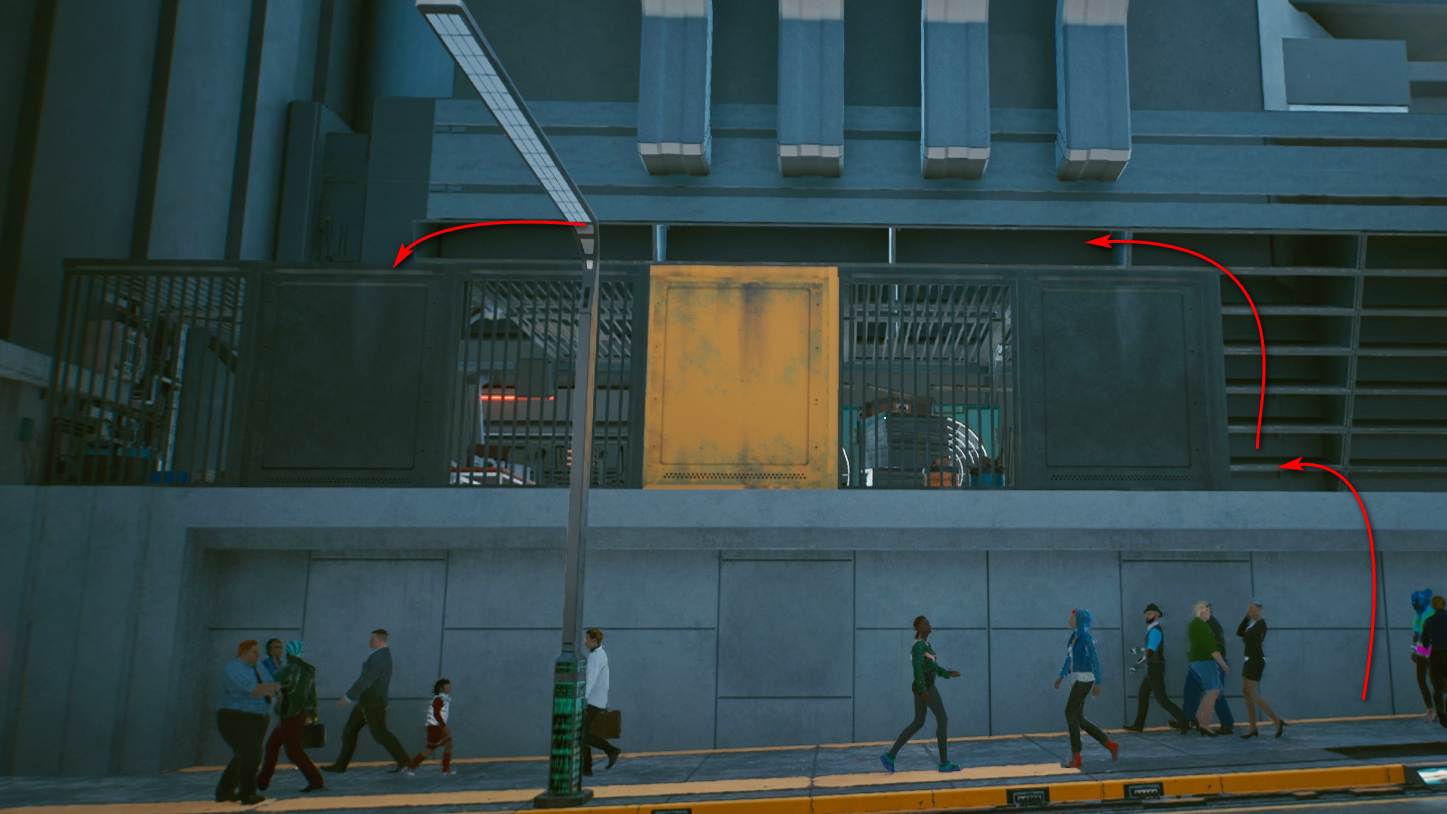
3. Heavy-Duty Aramid-Reinforced Badge Coat
Use the Fast Travel Dataterm and walk a few meters northwest along the road until you see three police cars parked on the roadside with their lights flashing. The police officer with the sought-after jacket lies by the car next to the garage. A dead 6th Street gang member right by the road is wearing the same jacket, but it may have different stats. Just pick the one that appeals most to you.
- Area: Santo Domingo, Rancho Coronado
- Fast Travel Dataterm: Almunecar & Jerez
- Slot: Upper Body (Outer Torso)
- Stats: 119.4 armor, 5 % lower Stamina Consumption when blocking Melee Attacks, 5 % less Damage from Explosions (4 slots) or 112.7 Armor, + 5 Carrying Capacity, 5 % less Damage from negative status effects (4 slots)
4. Waterproof Badge Combat Boots
Head southeast from the Fast Travel Dataterm straight into the settlement, and then go up the hill to the police car parked on the road. Go up the stairs on the right side of the road and climb the orange ladder. On the roof, you will see two dead cops, which will provide you with the boots you are looking for – each with different stats.
- Area: Santo Domingo, Rancho Coronado
- Fast Travel Dataterm: Rancho Coronado East
- Slot: Feet
- Stats: 70.5 Armor, +15 % Critical Hit Chance (2 slots) or 56.8 Armor, +10 Movement Speed, -10 % Stamina Cost for melee attacks
Corpo / Corporate
The Corpo set, which consists of five pieces, allows V to get a taste of the corporate life – or it may serve as a reminder of their past.
- “All the money ain’t worth frack. You play this game for power. The power to get things done; to make big decisions; to affect things. You make a phone call, and the next thing you know, you’re telling the president of some bushleague Euronation that he’d better play it your way, or he’s history.”
(An Unidentified Corporate)
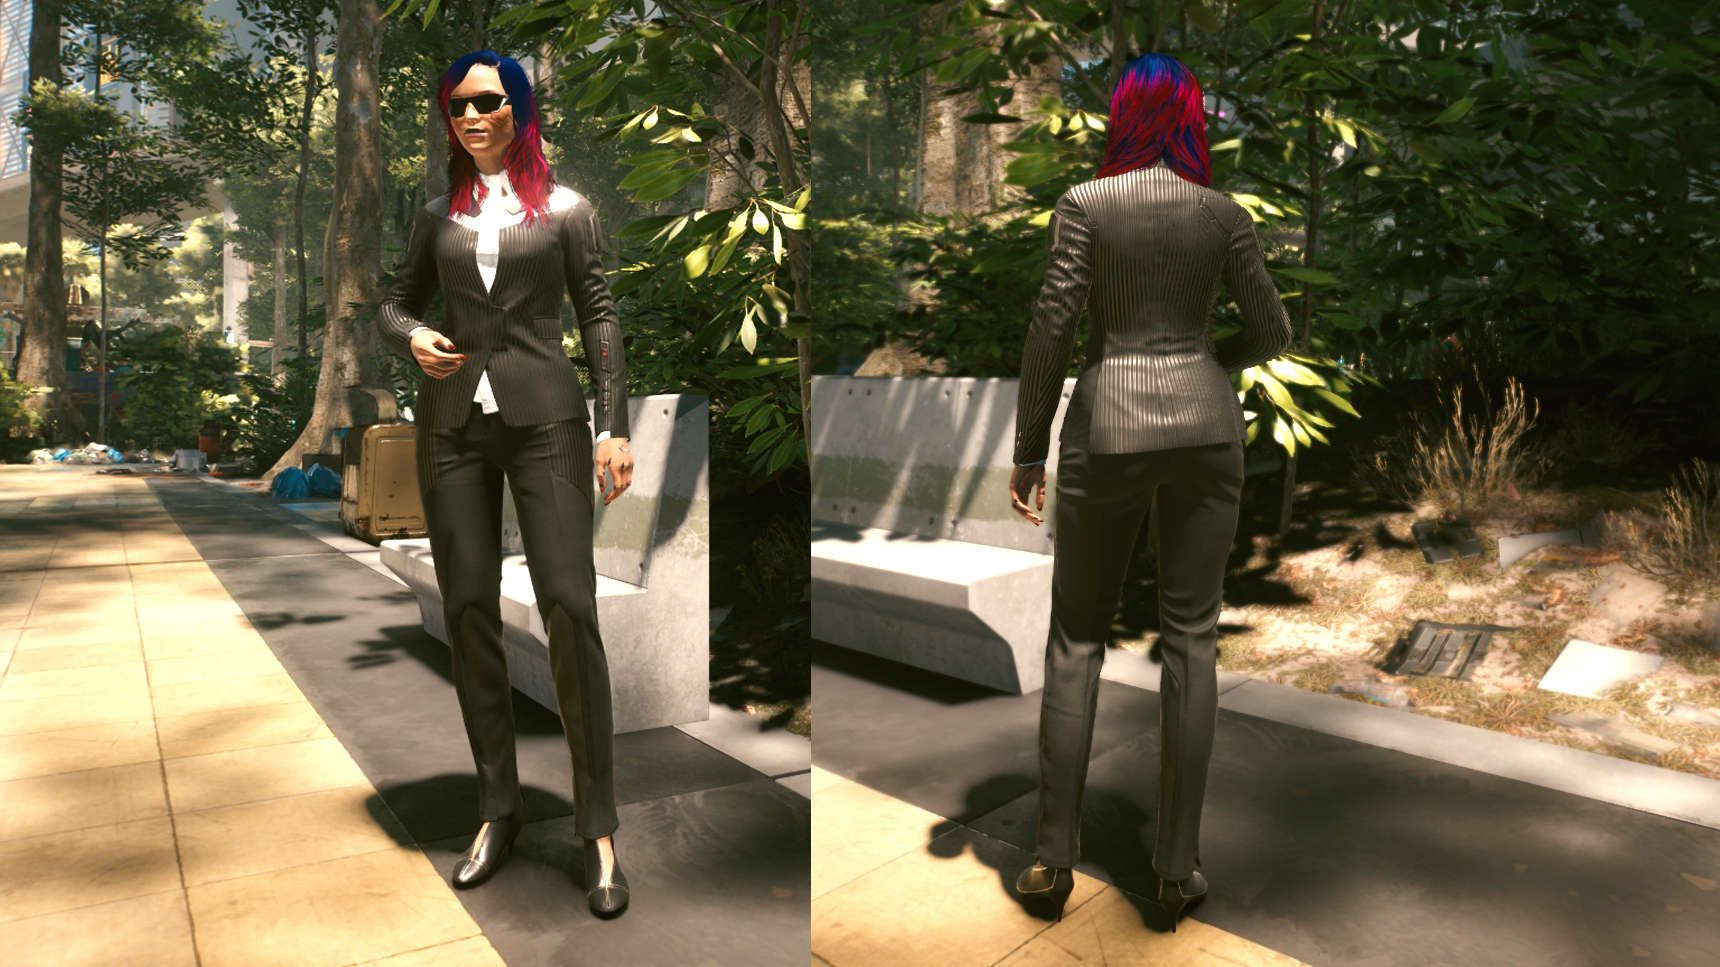
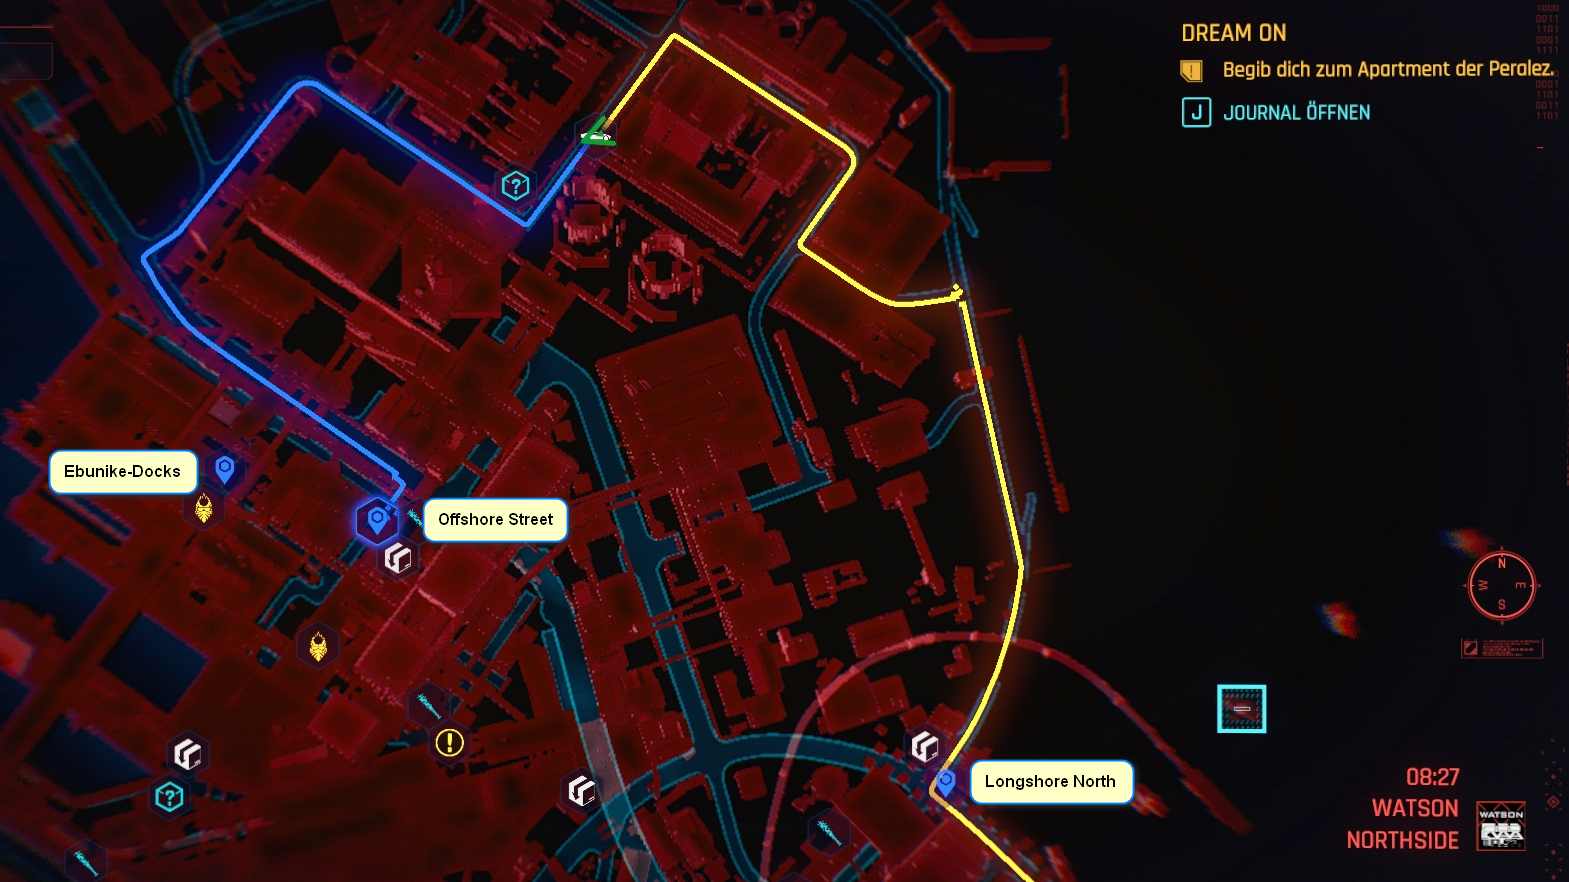
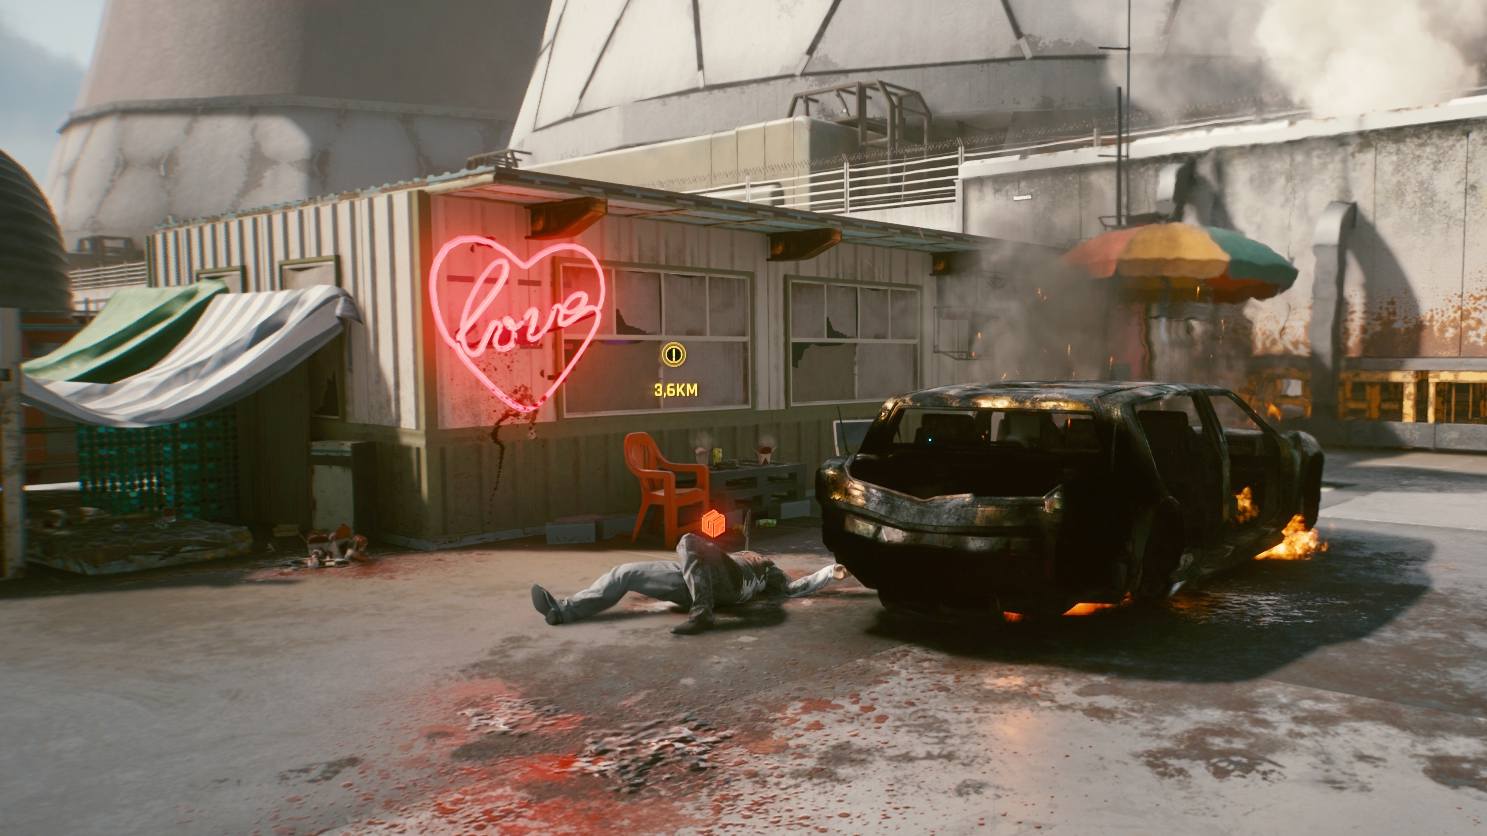
1. Corporate Blazer with Bulletproof Lining
Starting from the Fast Travel Dataterm, circle around the industrial area and stop at the indicated point slightly north of the left cooling tower of the nuclear power plant. The small ramp leads up to a concrete footing. The dead corporate man lies to the left of a burning vehicle, in front of a corrugated metal building with a “LOVE” neon sign attached to it.
- Area: Watson, Northside
- Fast Travel Dataterm: Offshore Street / Longshore North
- Slot: Upper Body (Outer Torso)
- Stats: 105,5 Armor, -5 % Damage from Explosions (3 Slots)
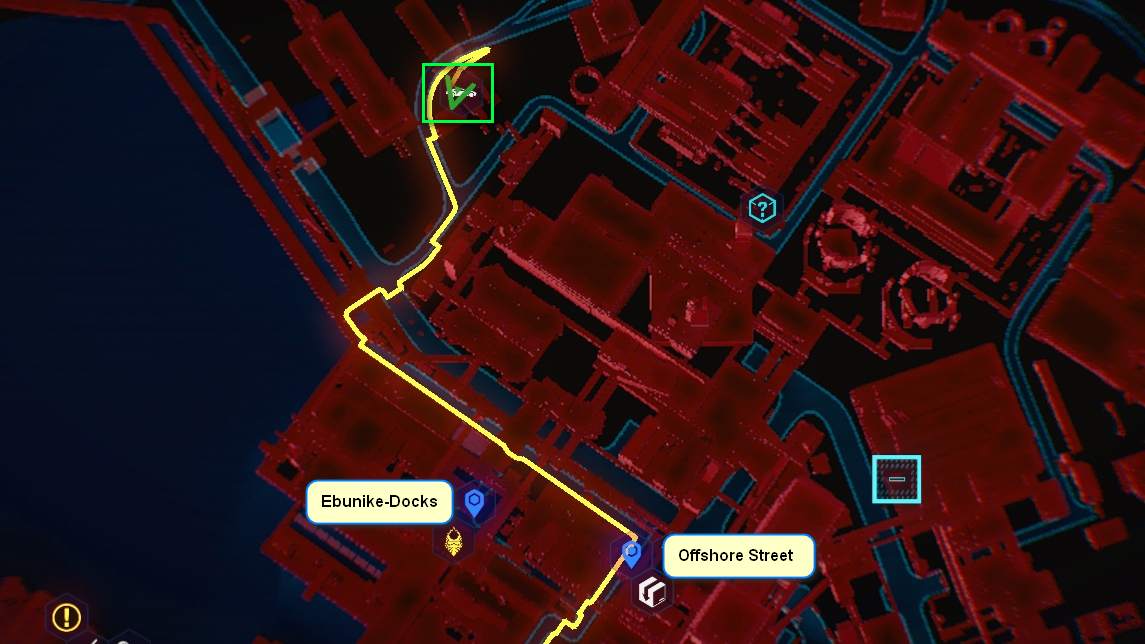
2. Breathable Reinforced Corporate Slacks
Drive west from the Fast Travel Dataterm and take the road to the northeast. Follow the road up until the entrance to the site and turn left onto the gravel road once you pass the building on the left. A black corporate vehicle is parked in the yard of this smaller dump, with the wearer of the corporate pants lying next to it.
- Area: Watson, Northside
- Fast Travel Dataterm: Ebunike Docks / Offshore Street
- Slot: Legs
- Stats: 58,7 Armor, +15 % Crit Hit Chance (1 Slot)
3. Ergonomic Reinforced Corporate Pumps / Evening Shoes
This location will only be unlocked after you complete the side mission “I fought the Law”. Follow the road west from the Fast Travel Dataterm and turn north at the first opportunity. There are several burning Militech vehicles in the parking lot of a factory building, and the corpse with the shoes you’re looking for lies in front of them. Female Vs will find corporate pumps here, male Vs get corporate evening shoes.
- Area: Westbrook, Charter Hill
- Fast Travel Dataterm: San Amaro Street
- Slot: Feet
- Stats: 70,4 Armor, – 5 % Stamina cost of melee attacks (2 Slots)
4. Carbonweave Silk Corporate Shirt
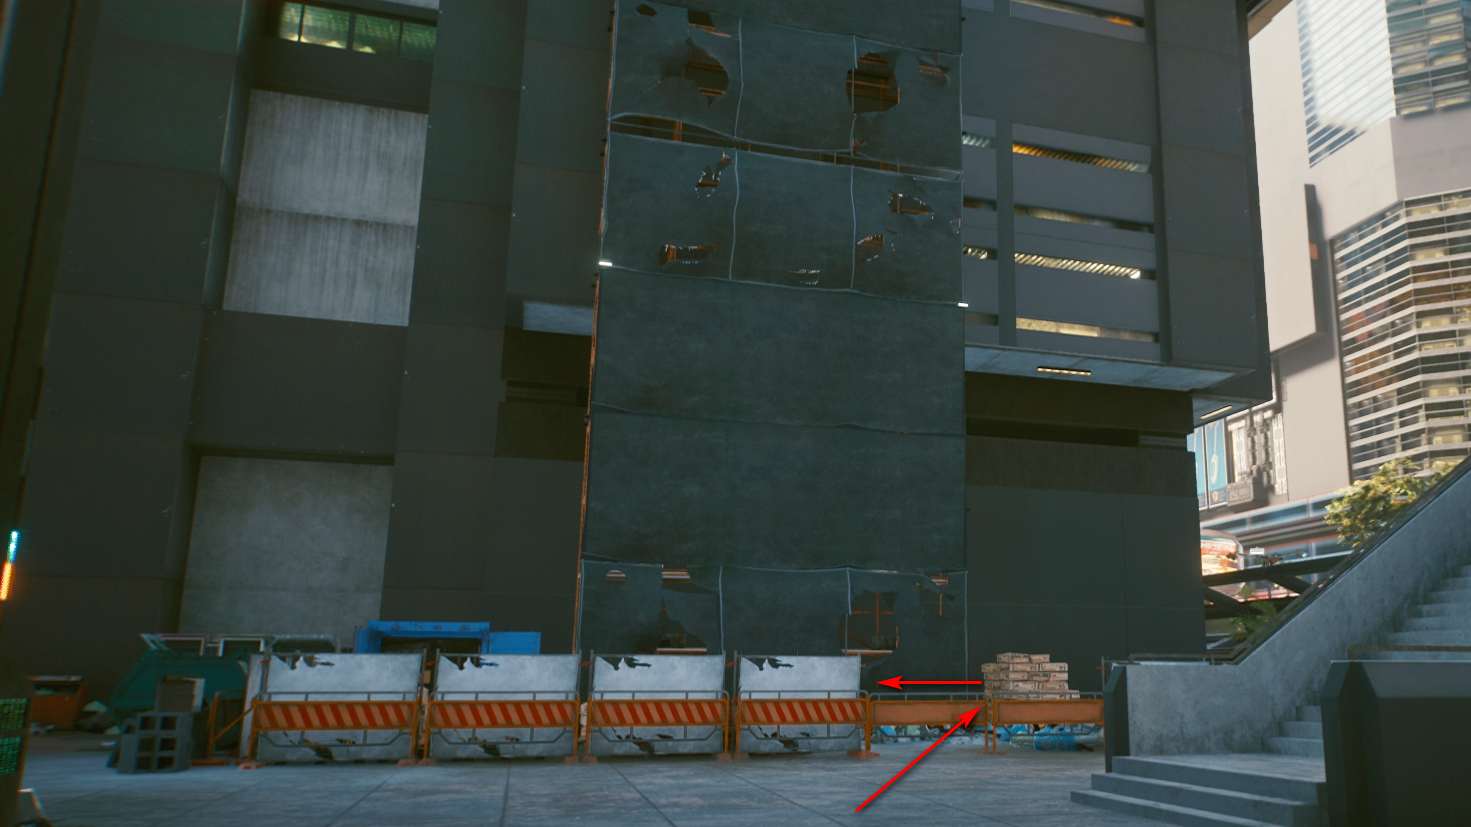
Take the road north from the Fast Travel Dataterm and turn west until you reach the club “7th Hell” on the right side (there you will also complete the mission “An Inconvenient Killer“). Opposite the club entrance stands a building with a small construction site in front of it. Behind a disguised scaffold lies the corpse with the corporate shirt.
- Area: Border to Heywood, The Glen / City Center, Downtown
- Fast Travel Dataterm: Senate & Market
- Slot: Upper Body (Interior Torso)
- Slots: 112,7 Armor, + 5 Carrying Capacity, -5 % Damage from Explosions, -5 % Stamina Consumption when blocking Melee Attacks (4 slots).
5. Tactical Hybrid-Glass Corporate Glasses
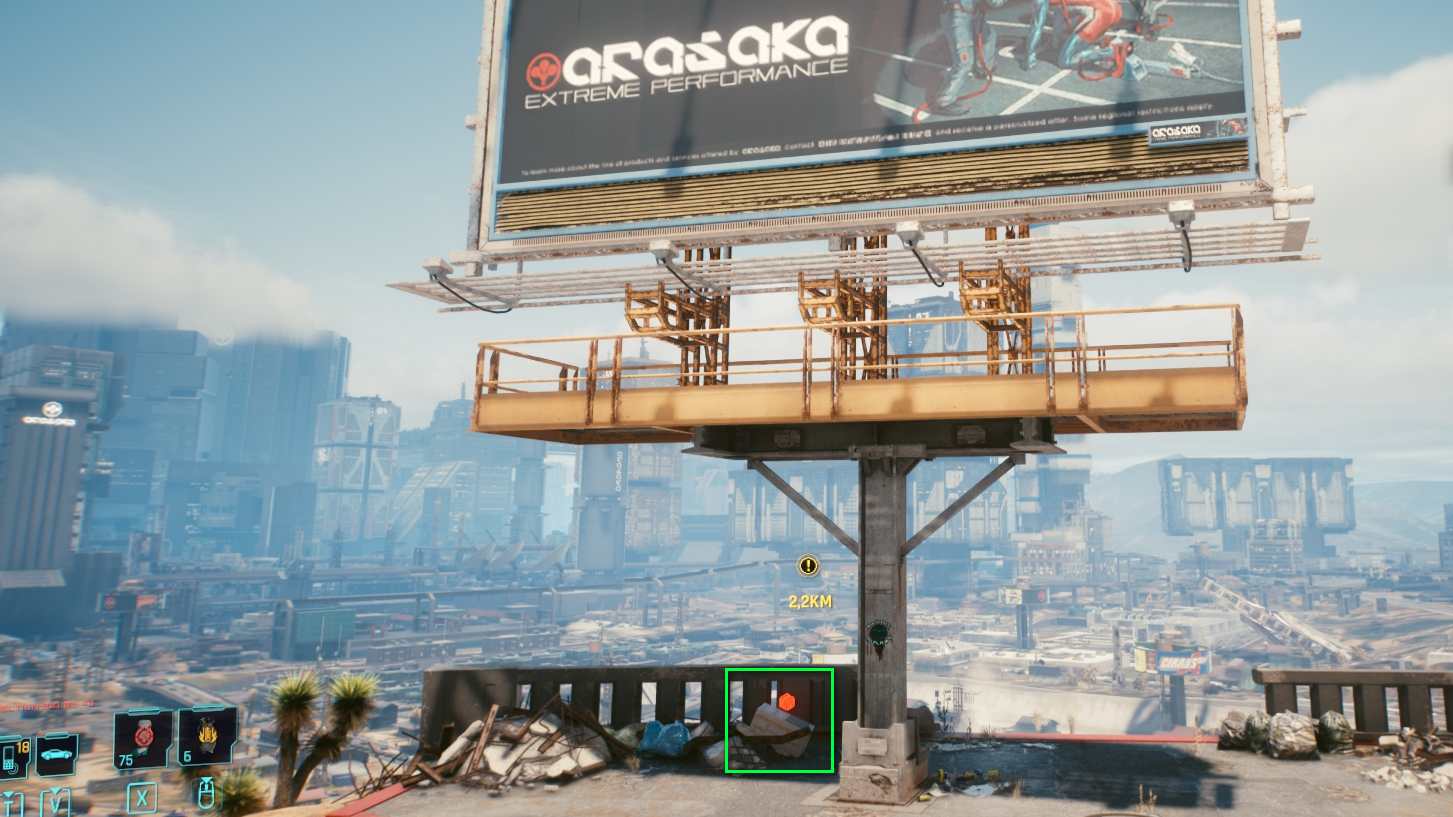
The corporate glasses can be found at two locations: The first glasses are hidden south of Rancho Coronado: Use the Fast Travel Dataterm “Rancho Coronado East” and place a marker on the highest point of the switchback road on the left side (south of the area). After a short drive down the highway, you’ll reach a large billboard. The glasses are inside a box underneath the billboard.
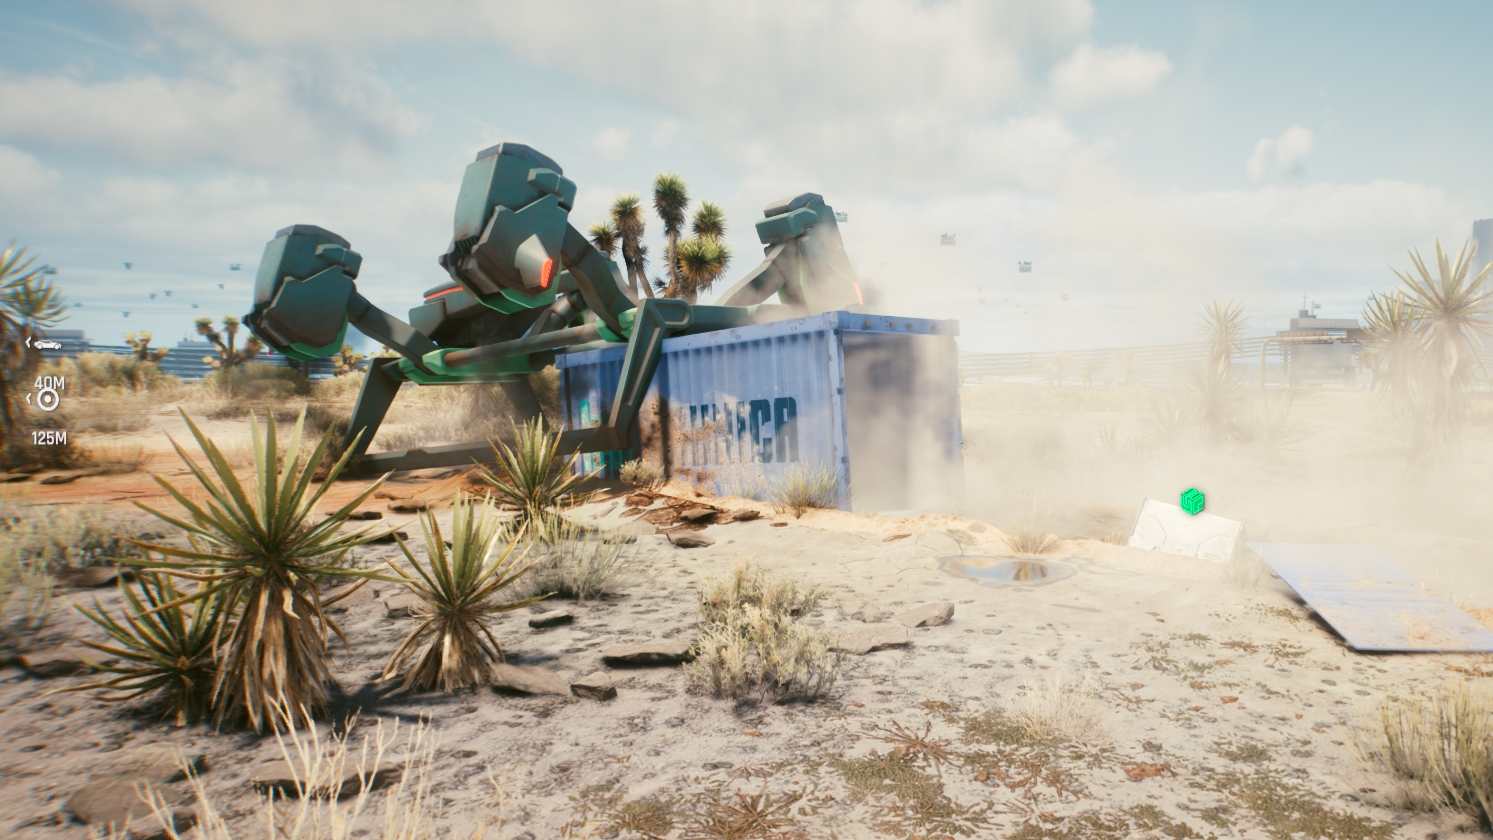
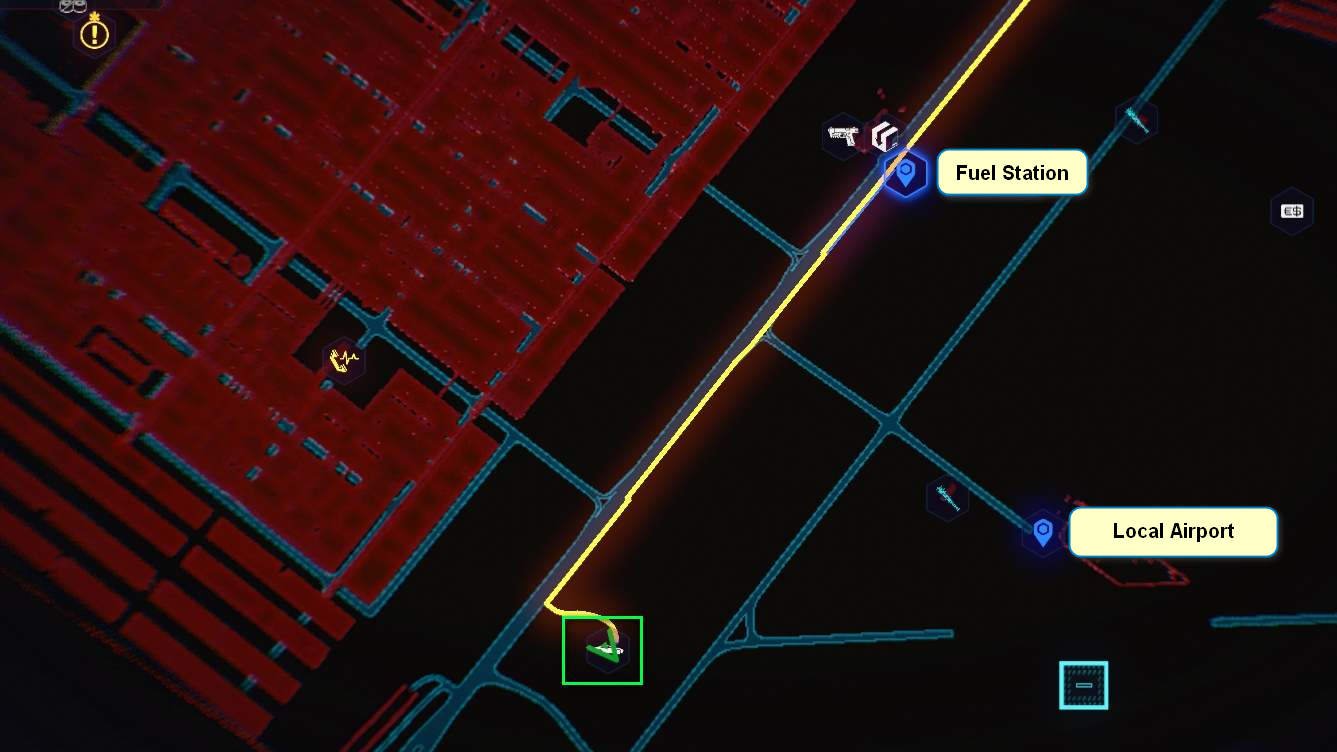
The second location is south of the gas station in the Badlands, where the main mission “Life during Wartime” ends: Follow the road south until you spot a crashed cargo drone on the left side of the road. You will find a corpse with the glasses inside the cargo container.
- Area: Santo Domingo, Rancho Coronado or Badlands, Biotechnica Flats
- Fast Travel Dataterm: Rancho Coronado East or Fuel Station
- Slot: Face
- Stats: 40,7 Armor, +10 % Bonus Damage against high threat level enemies, +10 % Bonus Damage against medium threat level enemies (2 slots) or 50.3 Armor, +30 % Critical Damage (2 slots).


Fixer
To follow in the footsteps of Night City’s stylish fixers, V needs a suitable outfit – and this one truly stands out compared to most of the other outfits!
- “Don’t give me this “Robin Hood” stuff. I’m doin’ a job, no more. I give people what they want, an’ they pay me out. Maybe I even a few scores here and there, but that’s good for business. I got a slogan… “How much you pay me?”
(Phil “Nacho” Hernandez, Fixer)
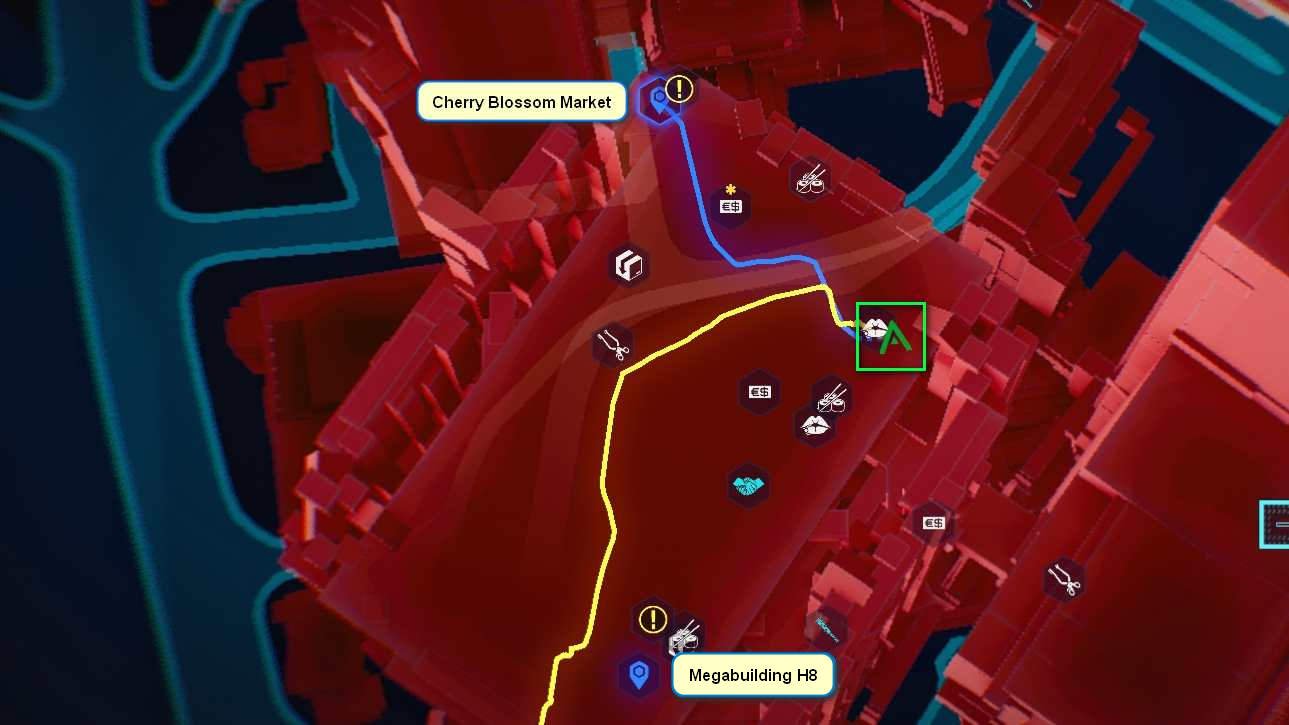
1. Protective-Layer Fixer Skirt / Pants
This item requires you to make a trip to Jig-Jig Street. Climb the dumpsters in the alley to the right of the male joytoy and climb up the corrugated metal roof tiles. Use the crates and the roof to reach the fire escape ladder that leads to the top floor. Climb up that yellow ladder. In the small room, you will find the body with a fixer skirt for female, and fixer pants for male Vs.
- Area: Westbrook, Japantown
- Fast Travel Dataterm: Cherry Blossom Market
- Slot: Legs
- Stats: 67,6 Armor, -5 % Fall Damage (1 Slot)

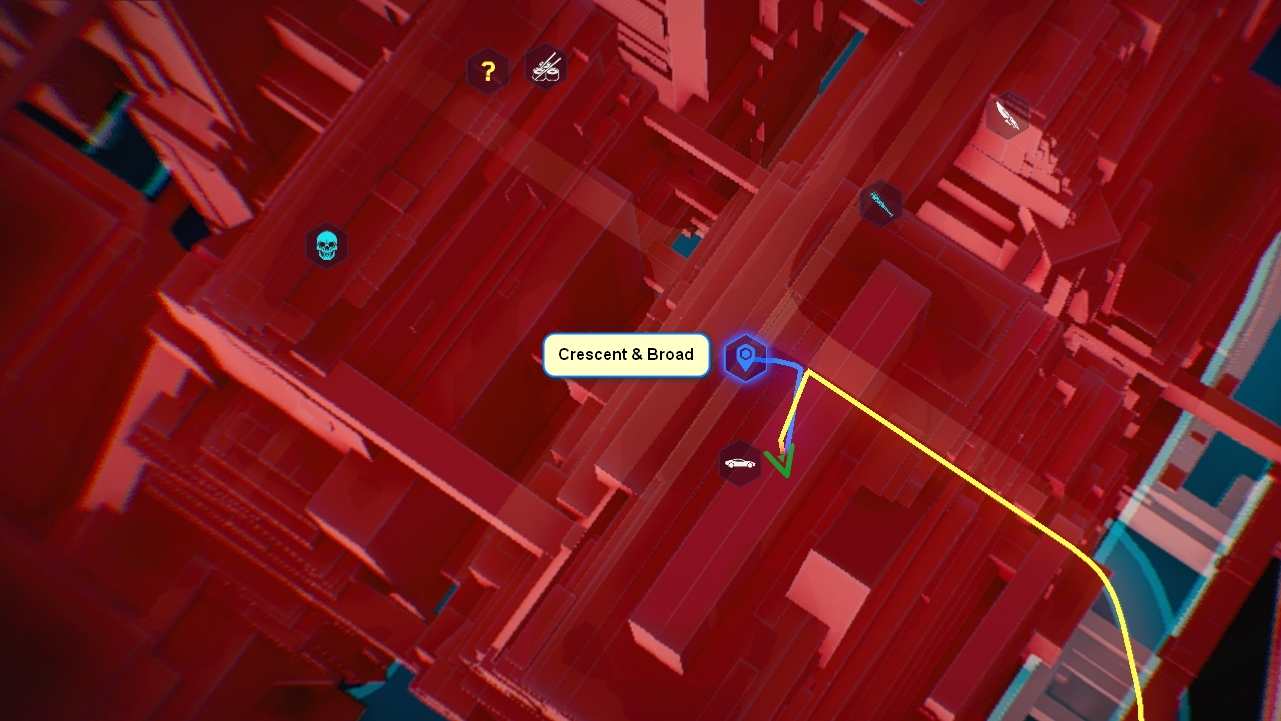
2. Elastiweave Fixer Pumps / Shoes with Reinforced Seams
Go to the Fast Travel Dataterm “Crescent & Broad” and walk a few meters to the left. You should reach an underground parking garage entrance very soon. You’ll see a blue van on the left side in front of the entrance: The body in the driver’s seat has the shoes. Female V gets pumps, male V gets shoes.
- Area: Westbrook, Japantown
- Fast Travel Dataterm: Crescent & Broad
- Slot: Feet
- Stats: 60.5 Armor, + 20 Movement Speed (2 slots)

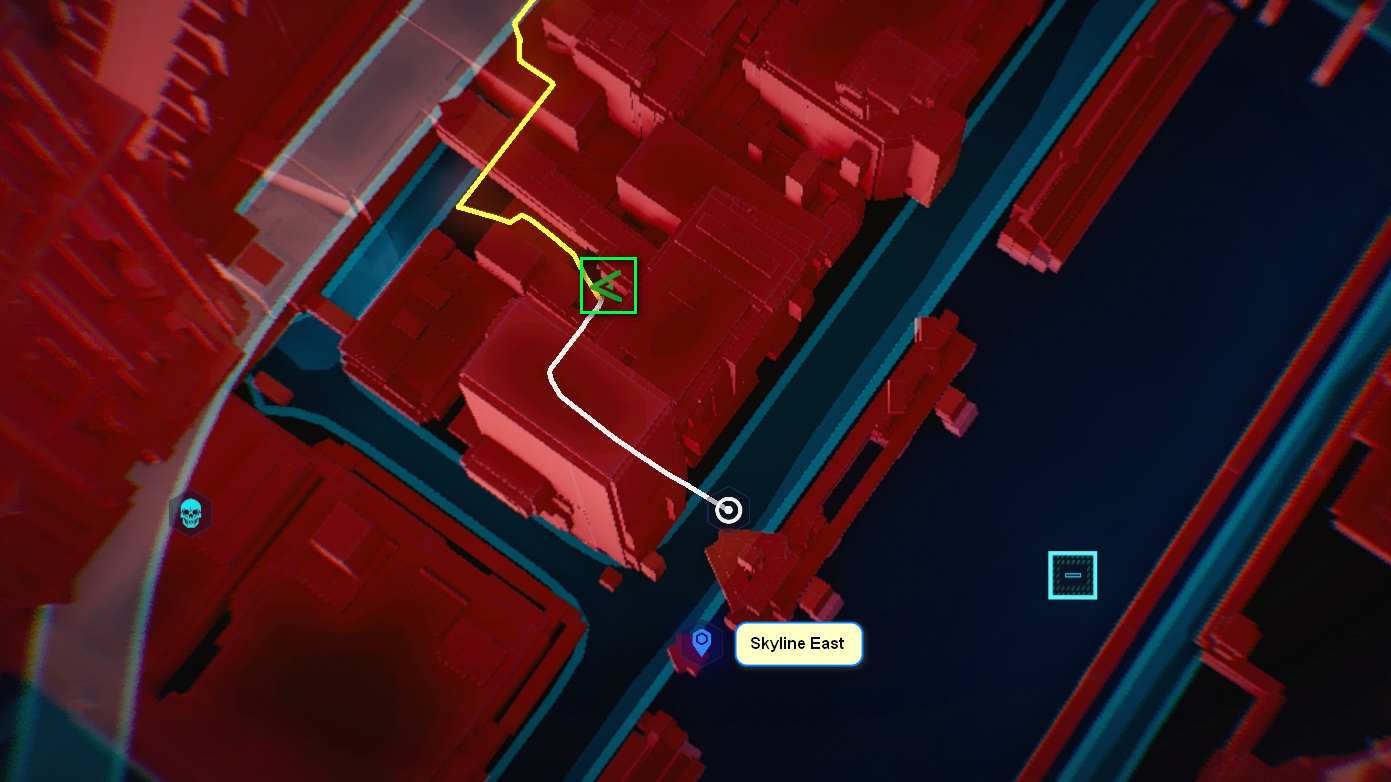
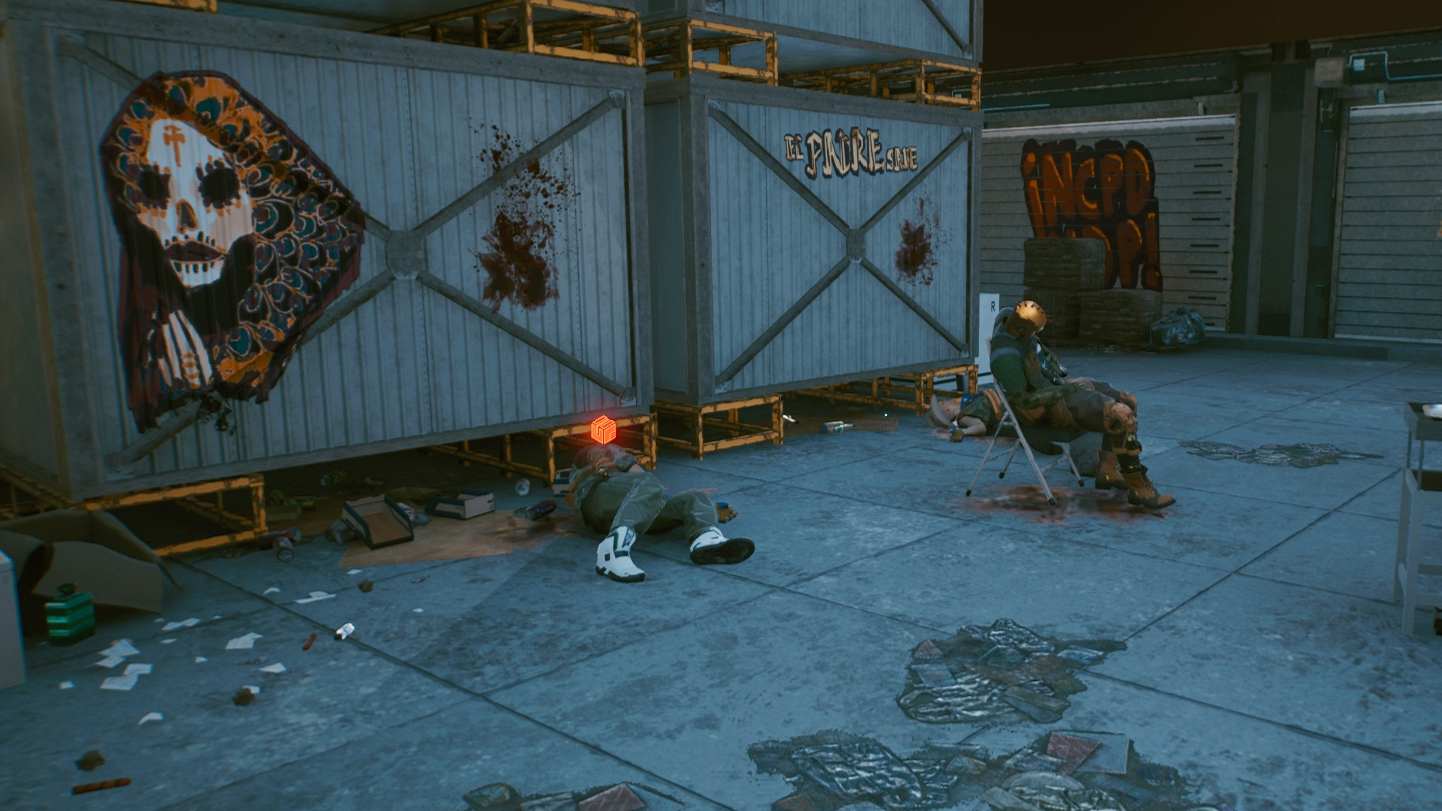
3. Heat-Resistant Aramid-Weave Fixer Bustier / Shirt
Cross the street from the Fast Travel Dataterm and take a few steps to the right, until you reach an alley with three Valentinos having a conversation. Walk past them and turn immediately to the right after that. Head towards the colorful posters at the end of the alley. There are several containers with Valentino tags and two corpses in front of them: The top lies near the corpse on the ground.
- Area: Heywood, Vista del Rey
- Fast Travel Dataterm Skyline East
- Slot: Upper Body (Interior Torso)
- Stats: 125,9 Armor, -8 % Damage from Explosions
4. Polycarbonate Opti-Enhanced Fixer Glasses
Drive down the road southwest from the Fast Travel Dataterm until you reach the crossroad from where you can see a row of blue and green cargo containers in front of a company building. Go behind the cargo containers to the broken car. The woman’s body lying to the left side of the car carries your desired fixer-glasses.
- Area: Santo Domingo, Arroyo
- Fast Travel Dataterm: Rancho Coronado South
- Slot: Face
- Stats: 41,8 Armor, +6,50 % Bonus Damage against enemies with high and medium threat level, +5 Oxygen Capacity.

5. Trilayer Aramid-Weave Fixer Skirt with Jacket / Coat
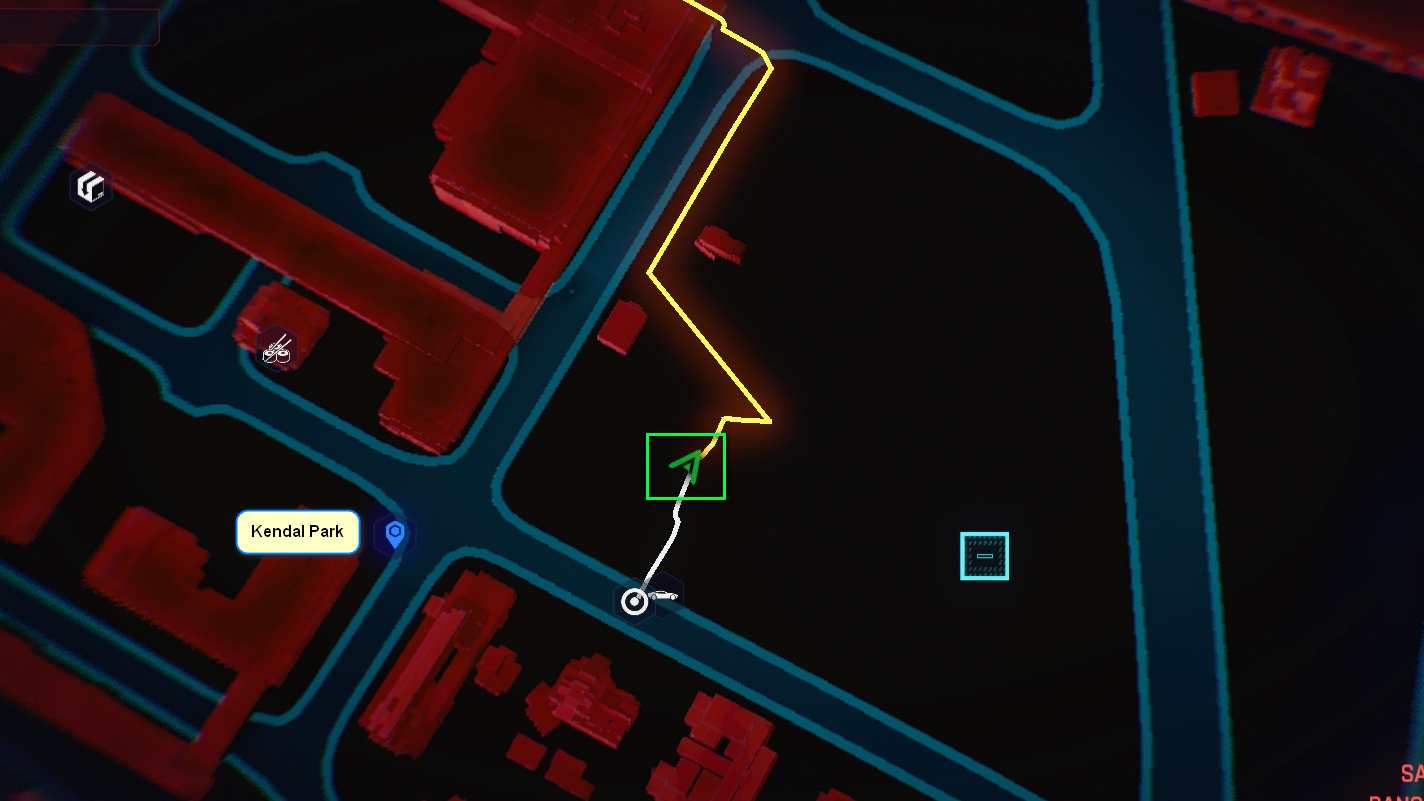
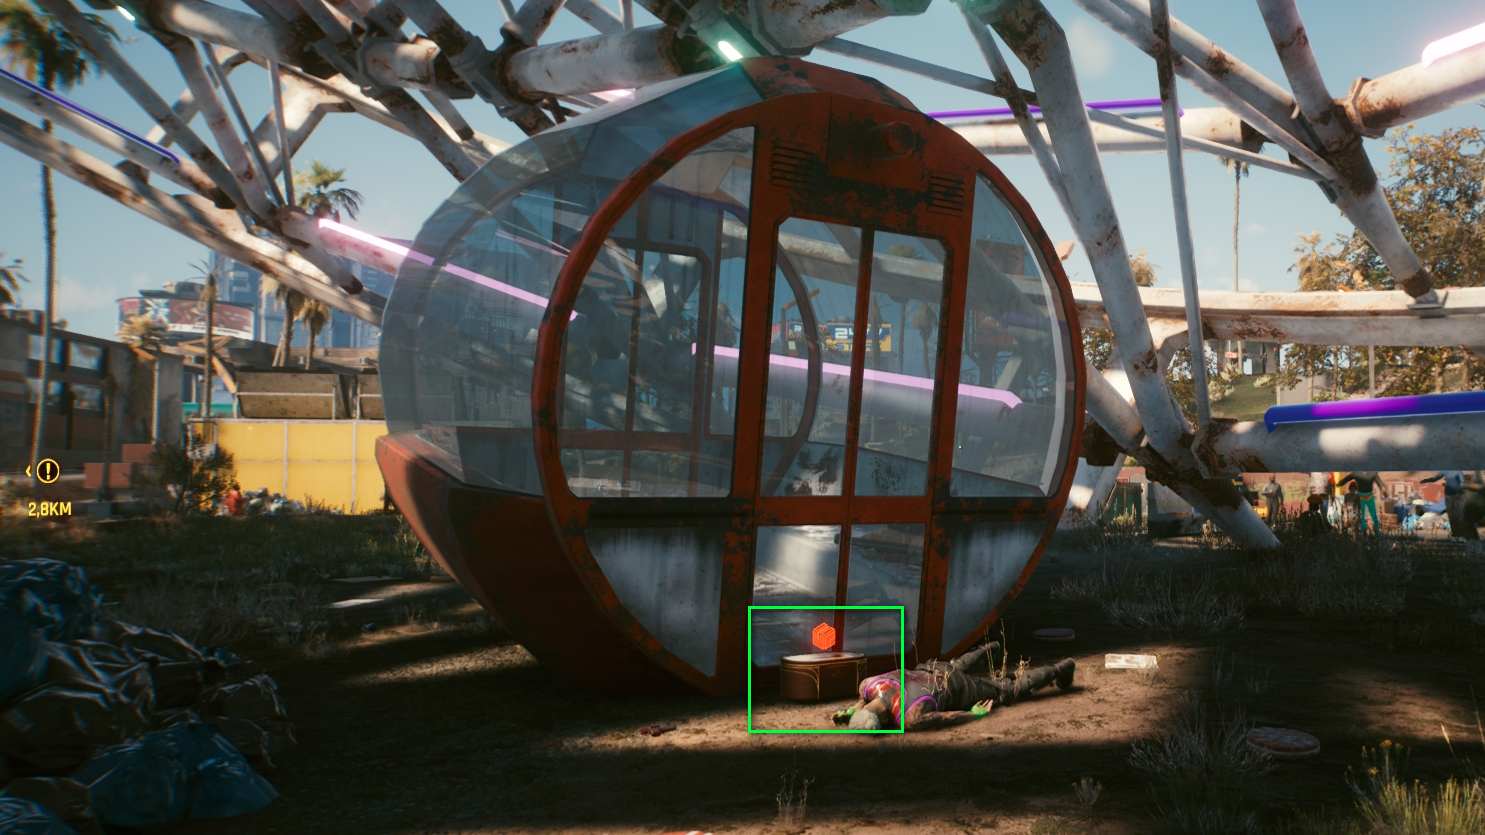
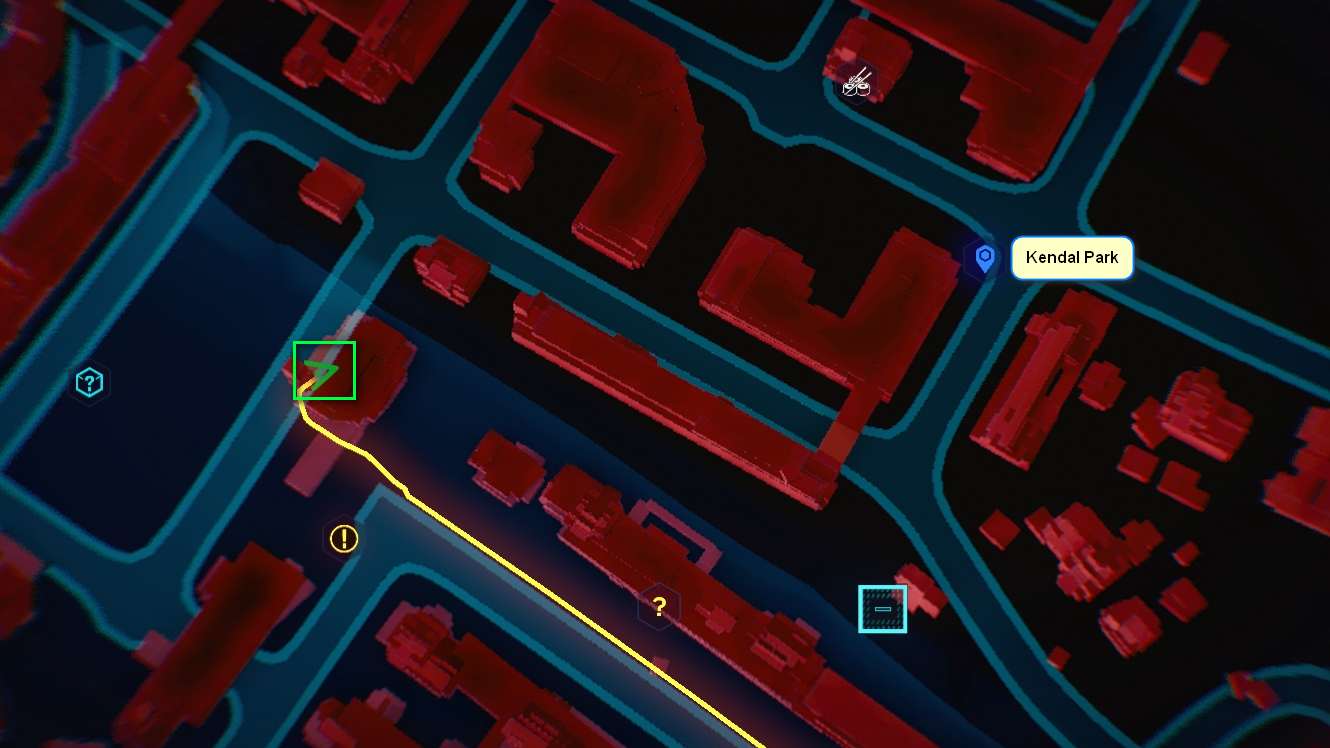
Starting from the Fast Travel Dataterm, go to the point where the broken Ferris wheel touches the ground. There lies a corpse in front of a red gondola. The outfit is waiting for you inside the small crate behind it. Female Vs collect a dress, while male Vs pick up a coat.
- Area: Santo Domingo, Rancho Coronado
- Fast Travel Dataterm: Kendal Park
- Slot: Upper Body (Outer Torso)
- Stats: 112,7 Armor, + 5 Carrying Capacity, + 0.2 dodge, -5 % Damage from Explosions (4 slots).
Media / Journalist
The brave journalists of Night City also get to wear an unique outfit designed for the demands of their profession. However, it seems that only four pieces of clothing from the actual six-piece set can be found in the game at the moment: The shoes and a garment for the outer torso are missing. We will update the guide if the upcoming patches fix that.
- “I used to watch those reporters on the TV news. They wore those chill trenchcoats and were always broadcasting from some exotic place like Mozambique or Saigon. They went right into the Central American warzones with the cybergrunts and they got the story even when shooting was maximally fierce. That’s the part I like, the danger.”
(Lyle McClellan, Network 54)

1. Anti-Piercing Tactical Media Cargo Pants
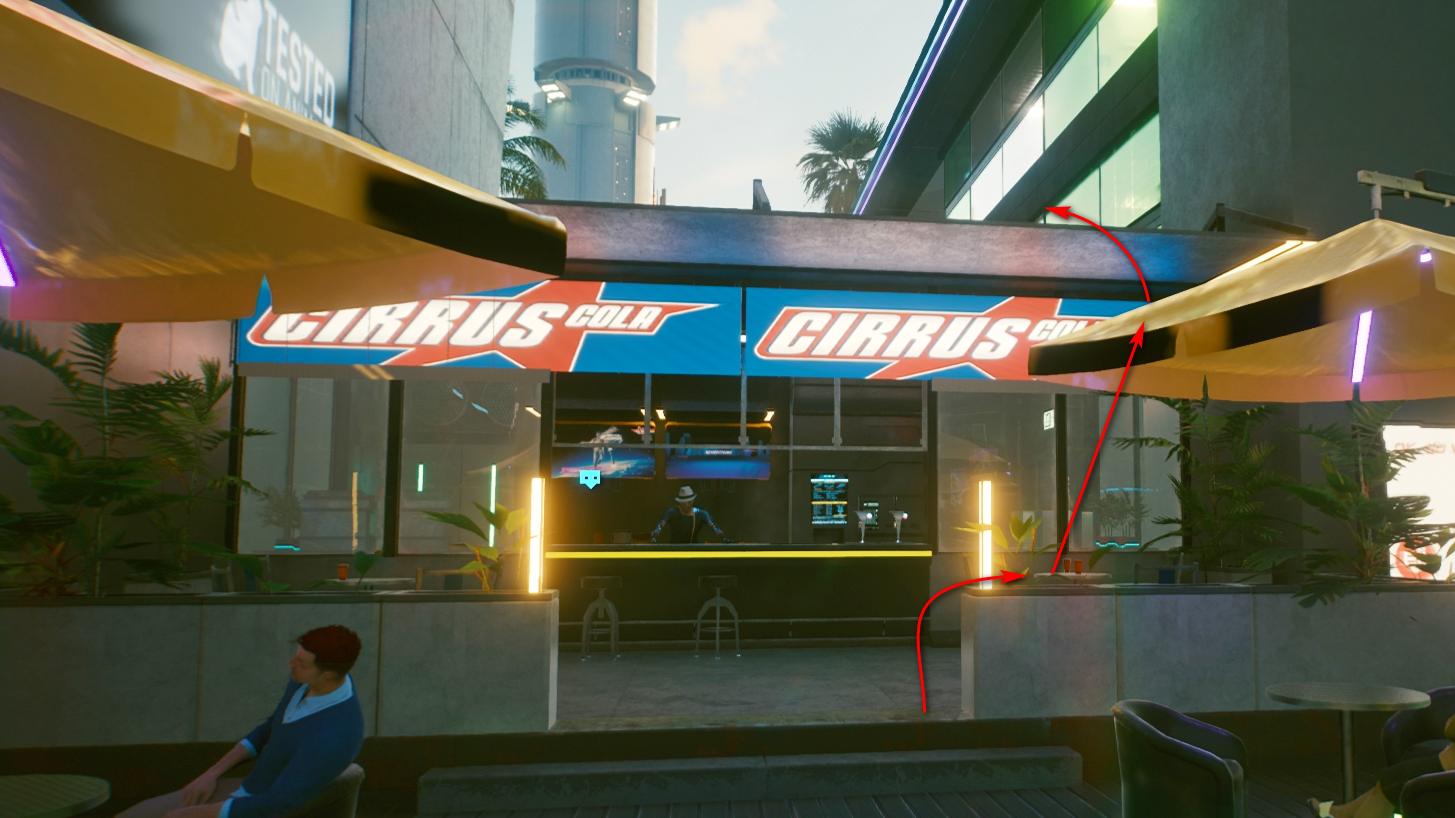
You will find the pants at two different points in the game. For the first location, turn left from the Fast Travel Dataterm “Lele Park”, cross the street and turn right from the “Rindo Hotel” onto a staircase that is lit up in light blue. Turn left on the elevated path once you see a “Cirrus Cola” booth. Jump onto one of the yellow umbrellas in front of the sales counter and from there onto the roof of the sales booth. There you will find the dead reporter and his pants.
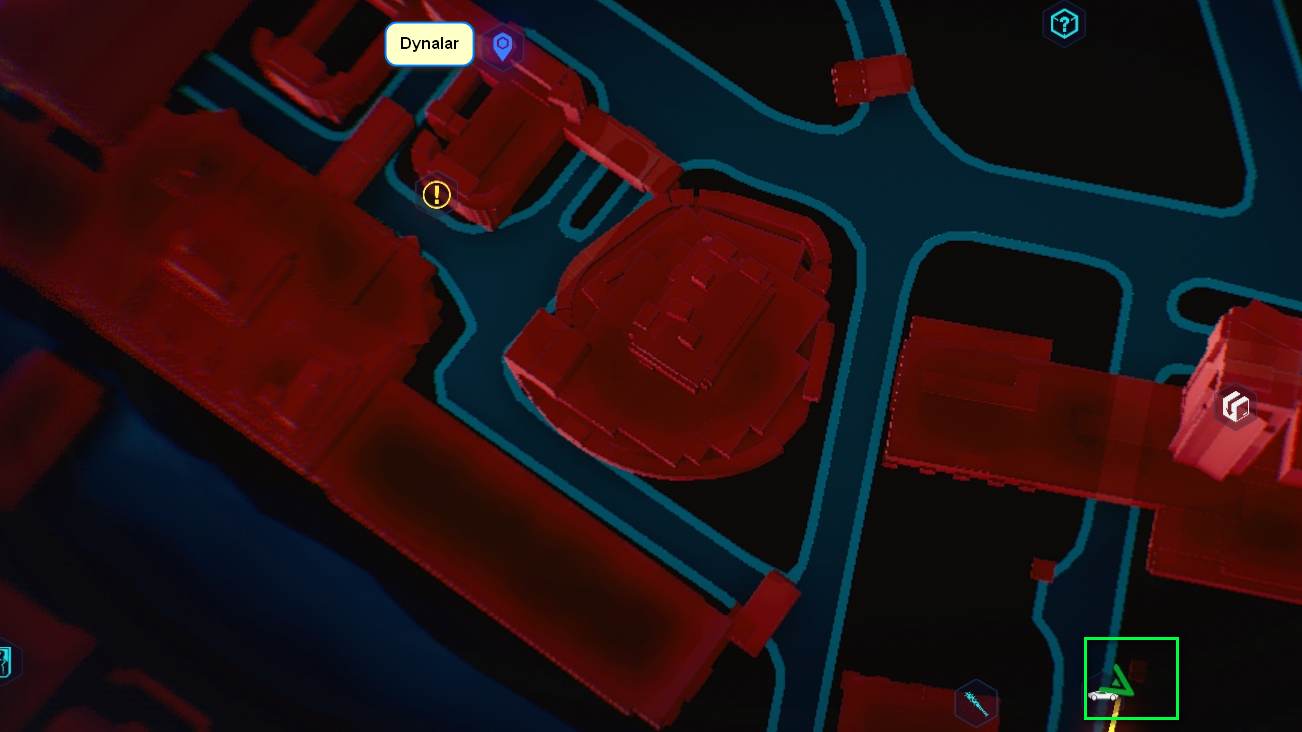
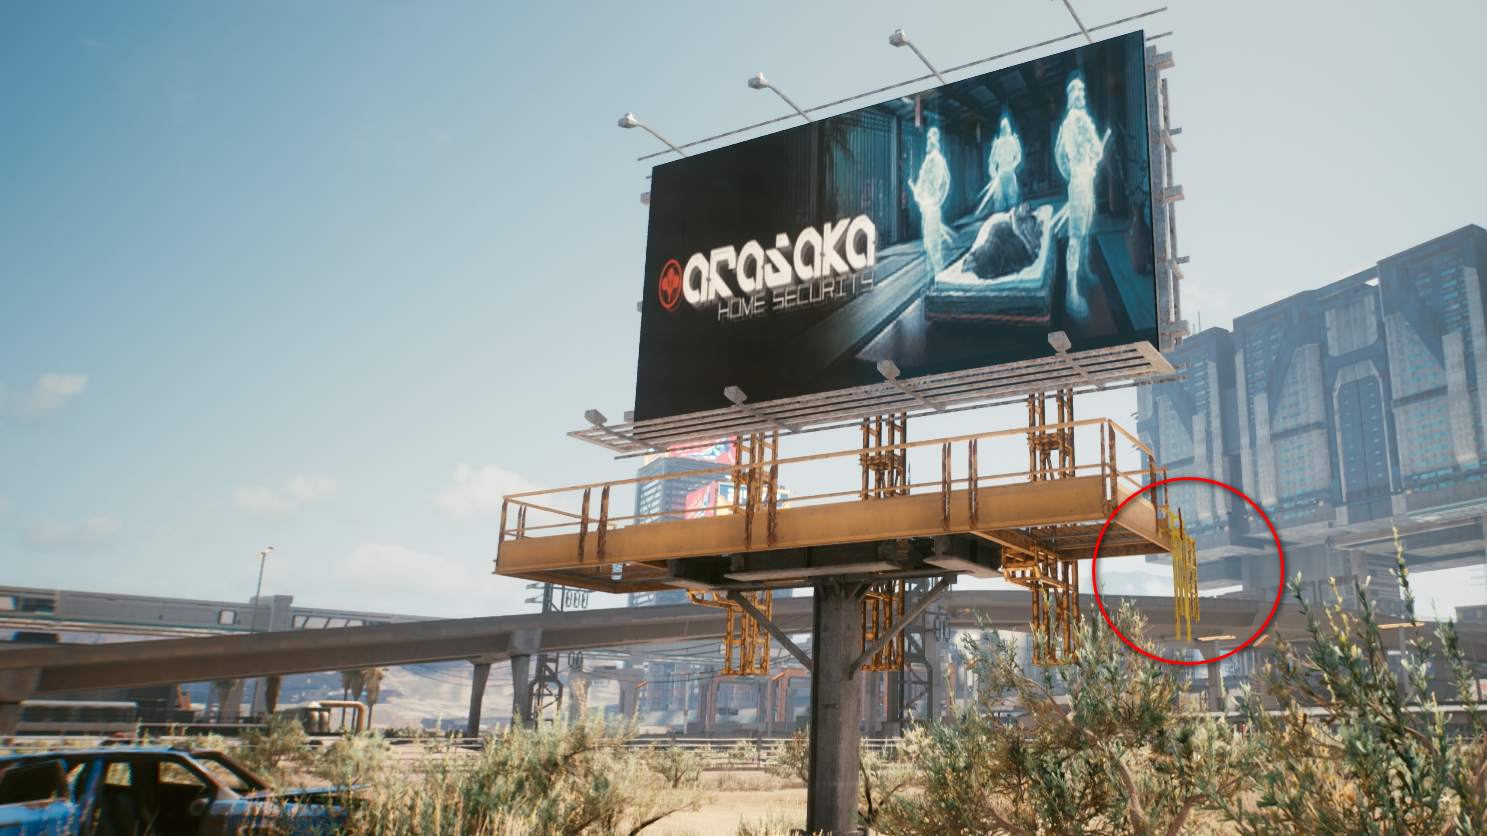
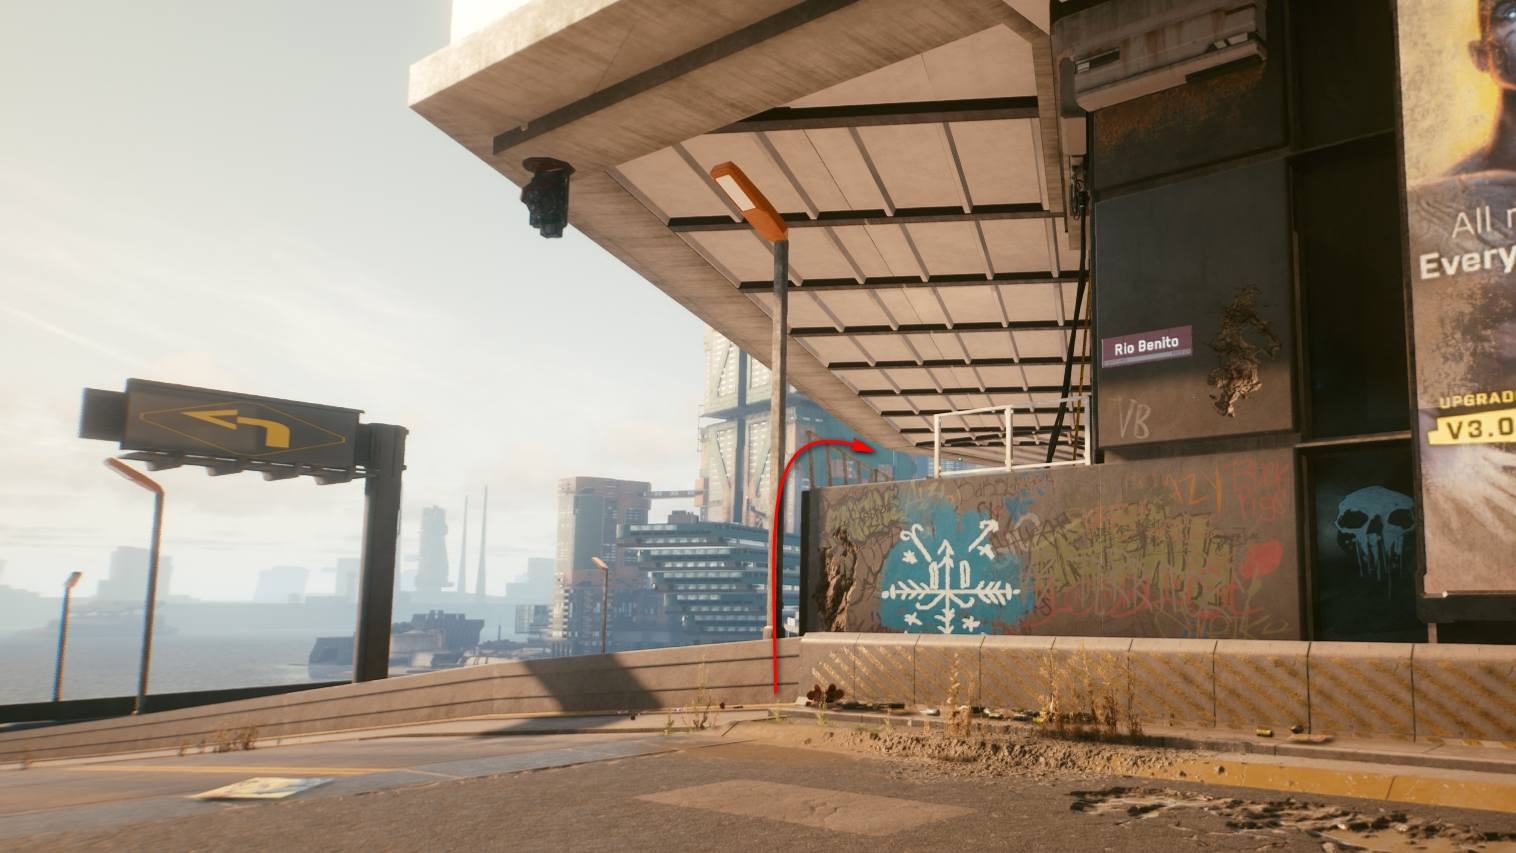
Head for the second location via the Fast Travel Dataterm “Dynalar”. Follow the road to the southeast and turn right at the white and red skyscraper. On the left side of the road after the skyscraper, a large Arasaka billboard will come into your view. Stop there and shoot the collapsed fire escape on the right side of the billboard and climb up. The corpse with the pants is on the barred walkway below the billboard.
- Area: Westbrook, Charter Hill
- Fast Travel Dataterm: Lele Park or Dynalar
- Slot: Legs
- Stats: 69.7 Armor, -5 % Fall Damage (1 slot) or 64.2 Armor, -5 % Fall Damage, +10 Movement Speed (2 slots)
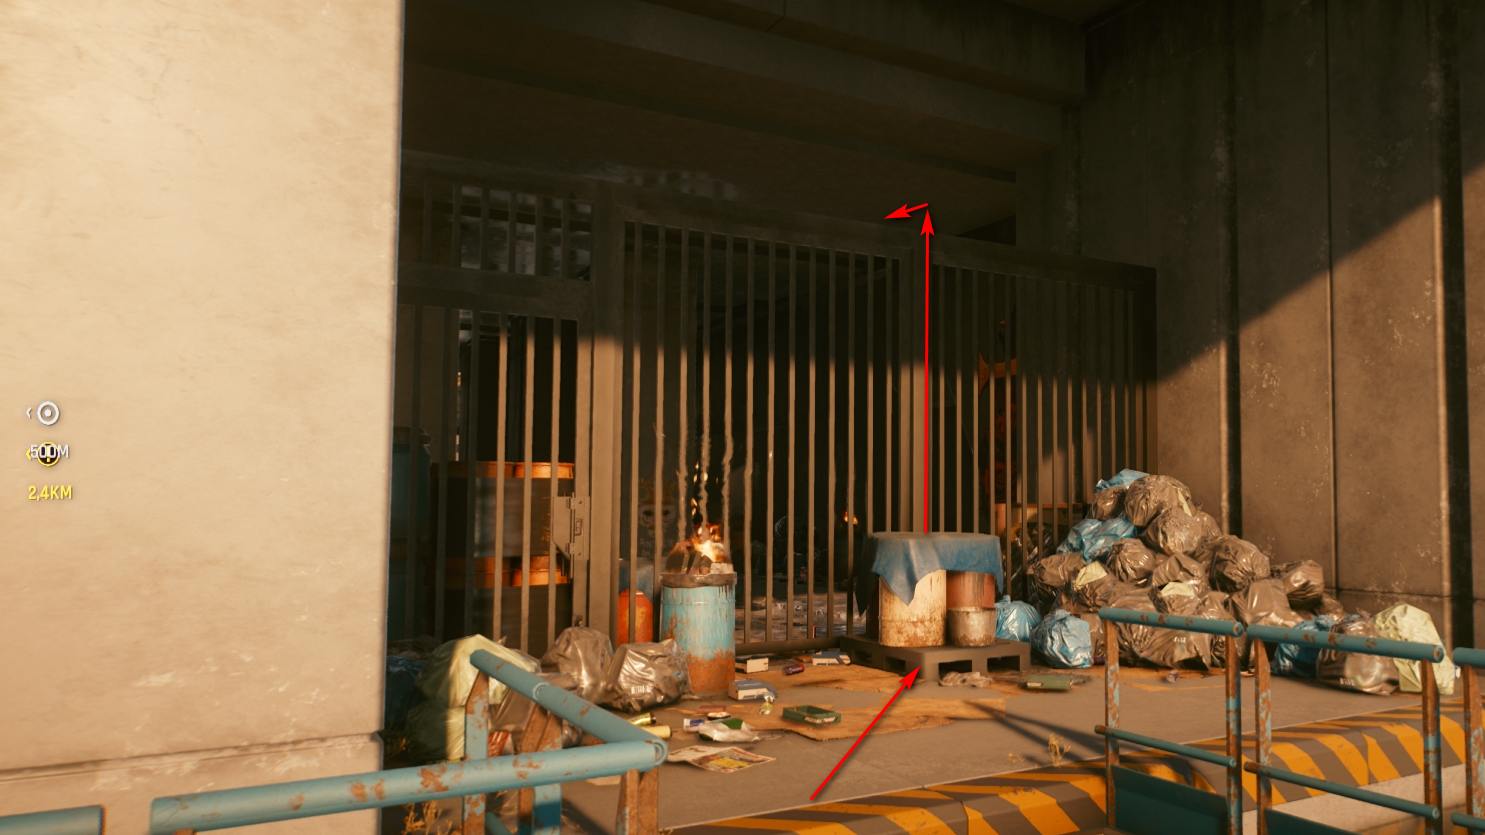
2. Heat-Resistant Nanoweave Media Shirt
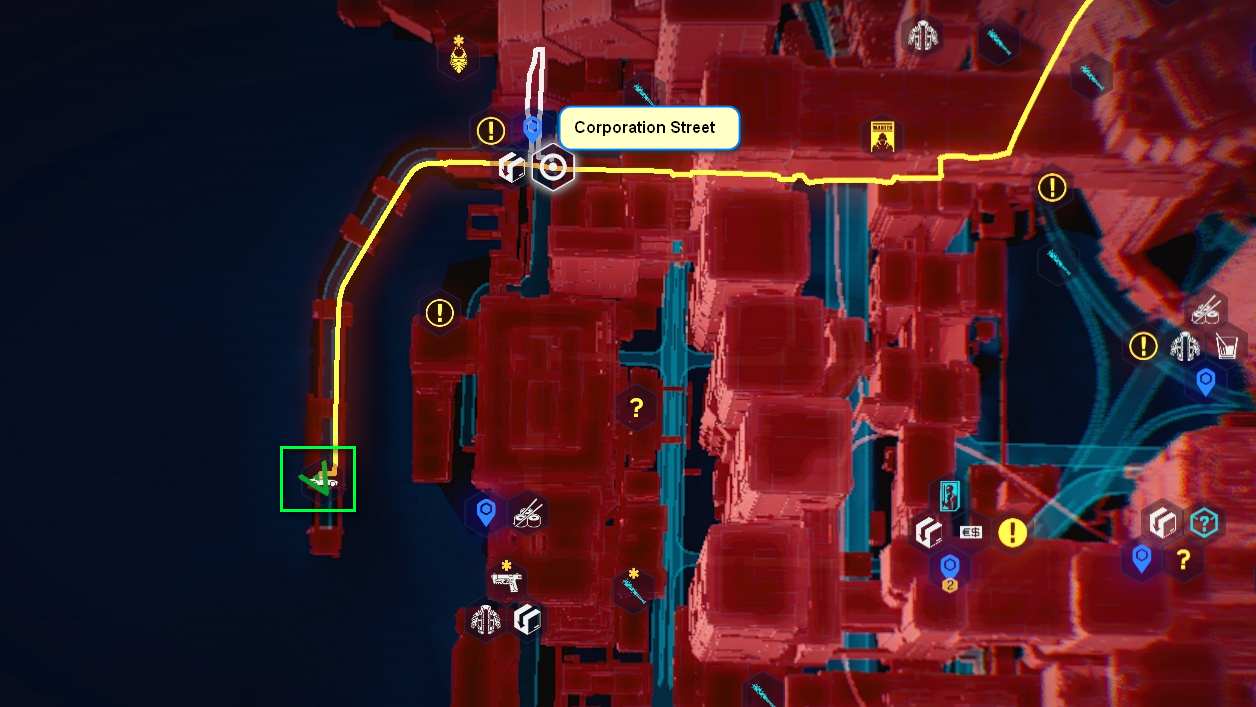
Starting from the Fast Travel Dataterm, drive down the road towards the sea until you reach its end. There, on the right side, you will find a staircase leading down to a metal grate that leads to a barred door. Climb onto the three barrels and jump over the metal grate. The dead body of an unfortunate reporter lies behind it.
- Area: Heywood, Wellsprings
- Fast Travel Dataterm: Corporation Street
- Slot: Upper Body (Inner Torso)
- Stats: 120.6 Armor, +15 % Critical Hit Chance, +0.50 Dodge (3 slots)
- Required Minimum Level: 30
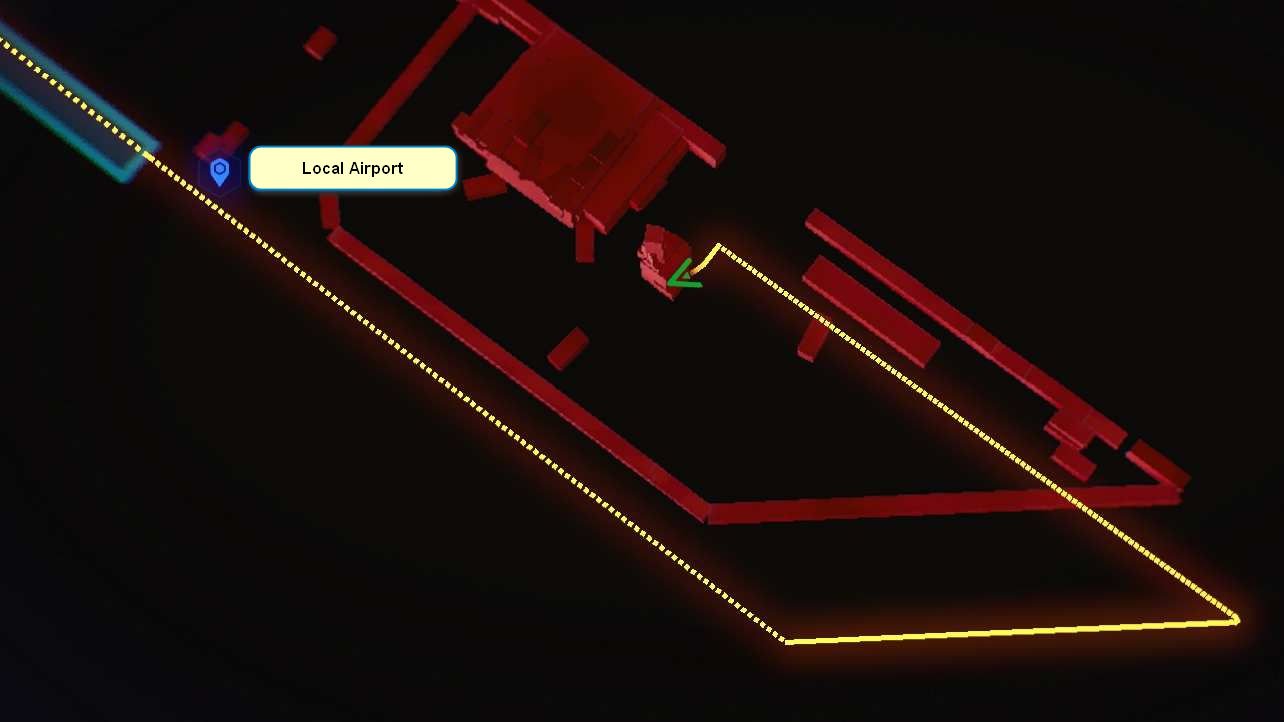
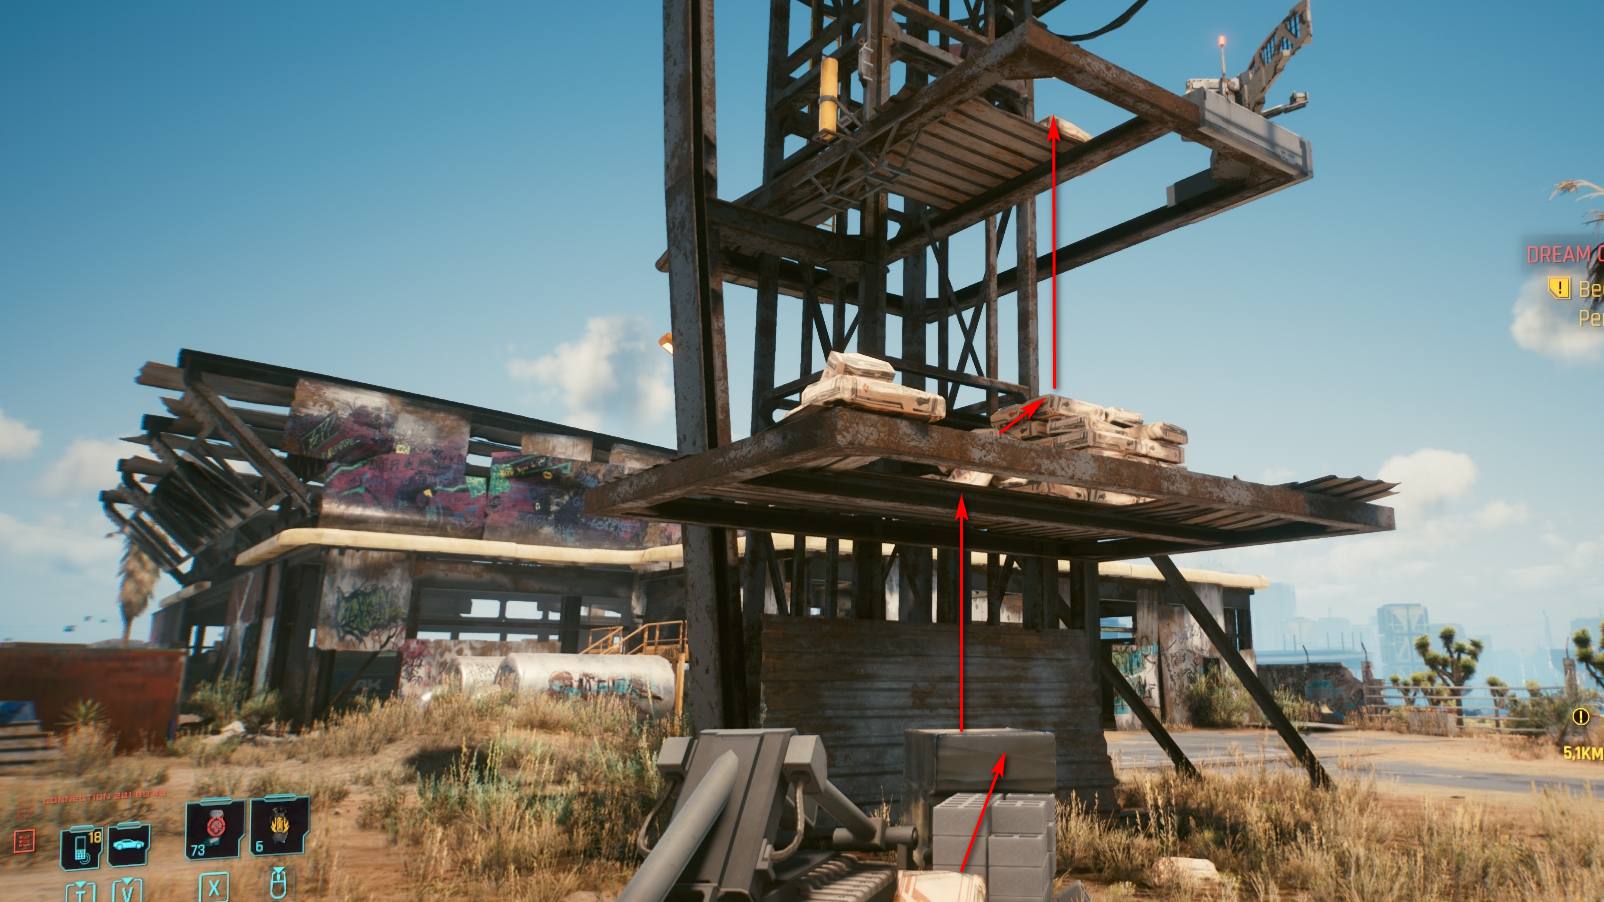
3. Media Baseball Cap with Reactive Layer
This location is unlocked only after completing the main mission “Life during Wartime”. Get there via Fast Travel Dataterm and go around the concrete wall of the airfield and proceed to the former tower. Climb onto the crates under the tower and pull yourself up through the opening onto the first metal floor level. Repeat this at the stacked cement bags and climb up to the second level. Go around the steel struts on the metallic walkway to reach the yellow ladder that leads to the gallery. At the top, you will find the baseball cap in a suitcase next to a standing camera.
- Area: Badlands, Jackson Plains
- Fast Travel Dataterm: Local Airport
- Slot: Head
- Stats: 47.5 Armor, + 5 Oxygen Capacity (1 slot)
4. Armored Media Ocuset with Camera
From the Fast Travel Dataterm, head for the crossroads and turn left. Follow the road until you see a trailer on the left side standing underneath a large solar panel. Inside it, in a box to the left of the door, you will find the item you are looking for.
- Area: Badlands, Jackson Plains/Biotechnica Flats
- Fast Travel Dataterm: Local Airport
- Slot: Face
- Stats: 16.2 Armor, +5 Oxygen Capacity (1 slot)


Netrunner
A legendary hacker legend just has to look stylish: In addition to a chic Netrunner suit, V can also walk on the street with the other set pieces. The only exception at the moment (as of game version 1.1) is the top for the outer torso, as it is traceable in the game files but not in the game world. We’ll add this to the guide as soon as that is fixed, of course.
- “I think they had some weeflerunner playin’ Sysop for them. I burned in, jolted the guy with a borrowed Hellbolt, and did the major plunder action all over the Data Fortress. You guys who live in Realspace; you move so slow. Me, I like Netspace. It moves fast. You don’t get old, you don’t get slow and sloppy. You just leave the meat and go screamin’.“
(Spider Murphy)
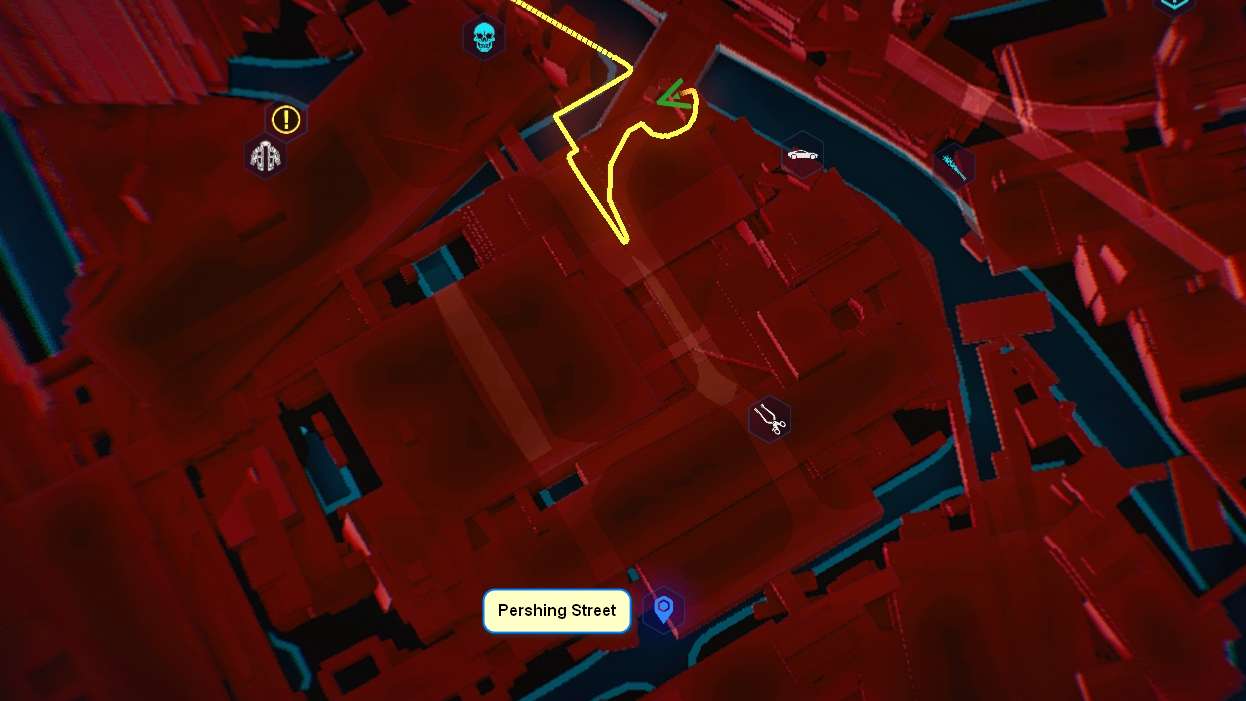
1. Dura-membrane Netrunner Neotac Pants
Drive northeast on the road starting from the Fast Travel Dataterm and turn left at the second street. Follow the road until you see several ball-shaped storage tanks on the left side on a concrete wall, with stairs leading up to them from the street. Take the stairs and cross the area to the metal staircase that goes around and up the foremost storage tank as seen from the road. You will find a Grilled Netrunner, complete with their pants, on a balcony at the top of the ball.
- Area: Watson, Northside
- Fast Travel Dataterm: Pershing Street
- Slot: Legs
- Stats: 64,5 Armor, + 15 % Critical Hit Chance (1 Slot)

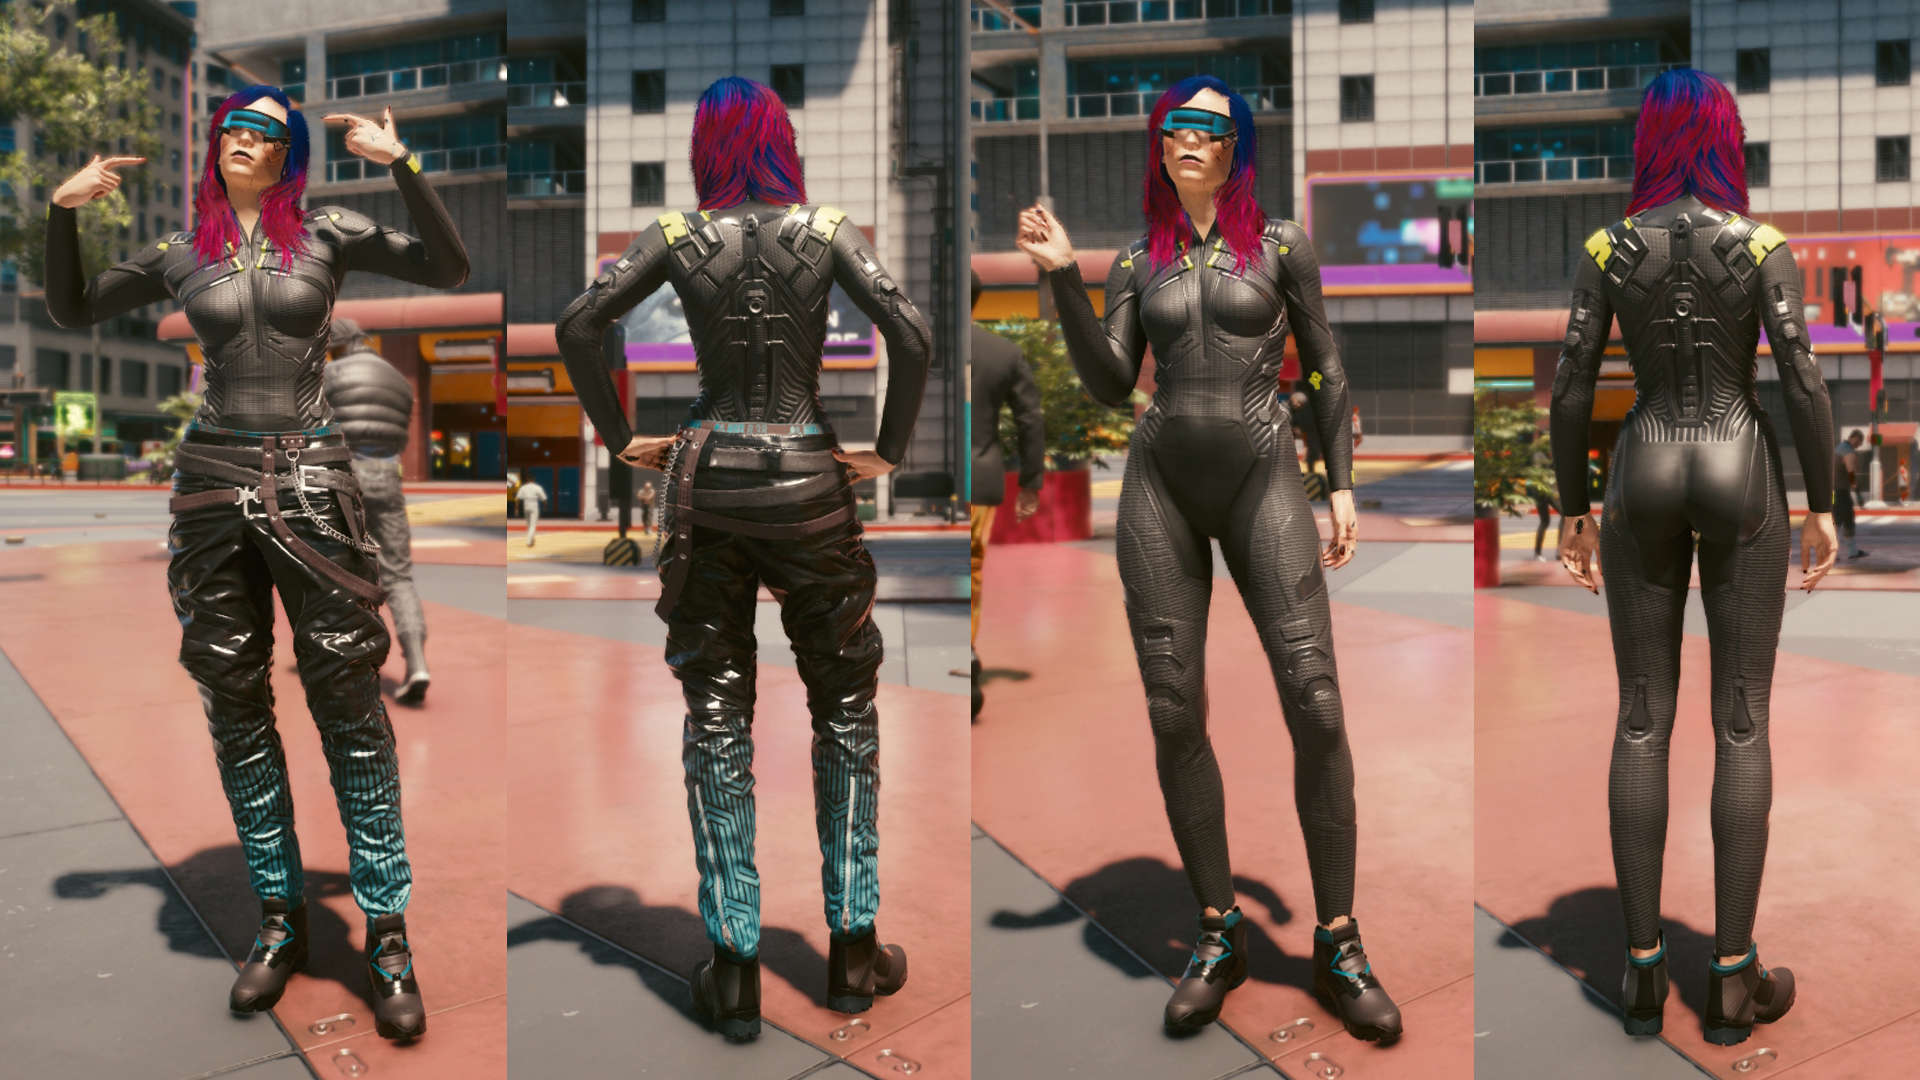
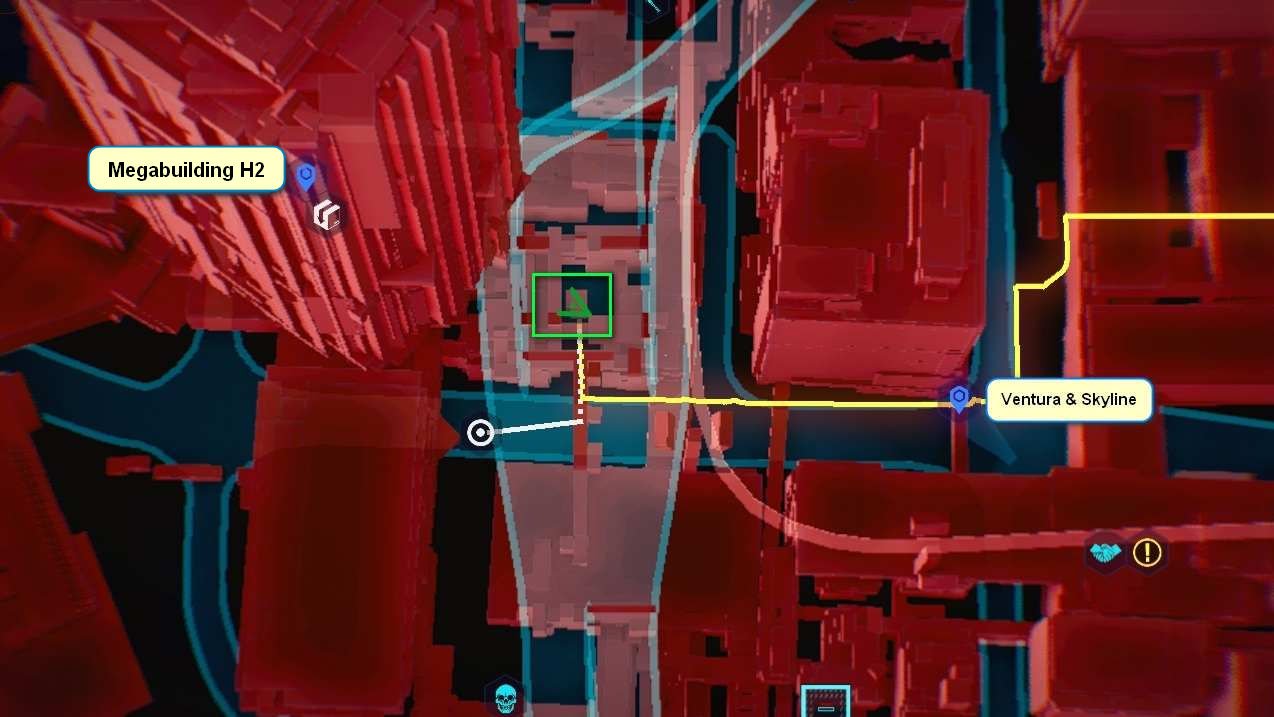
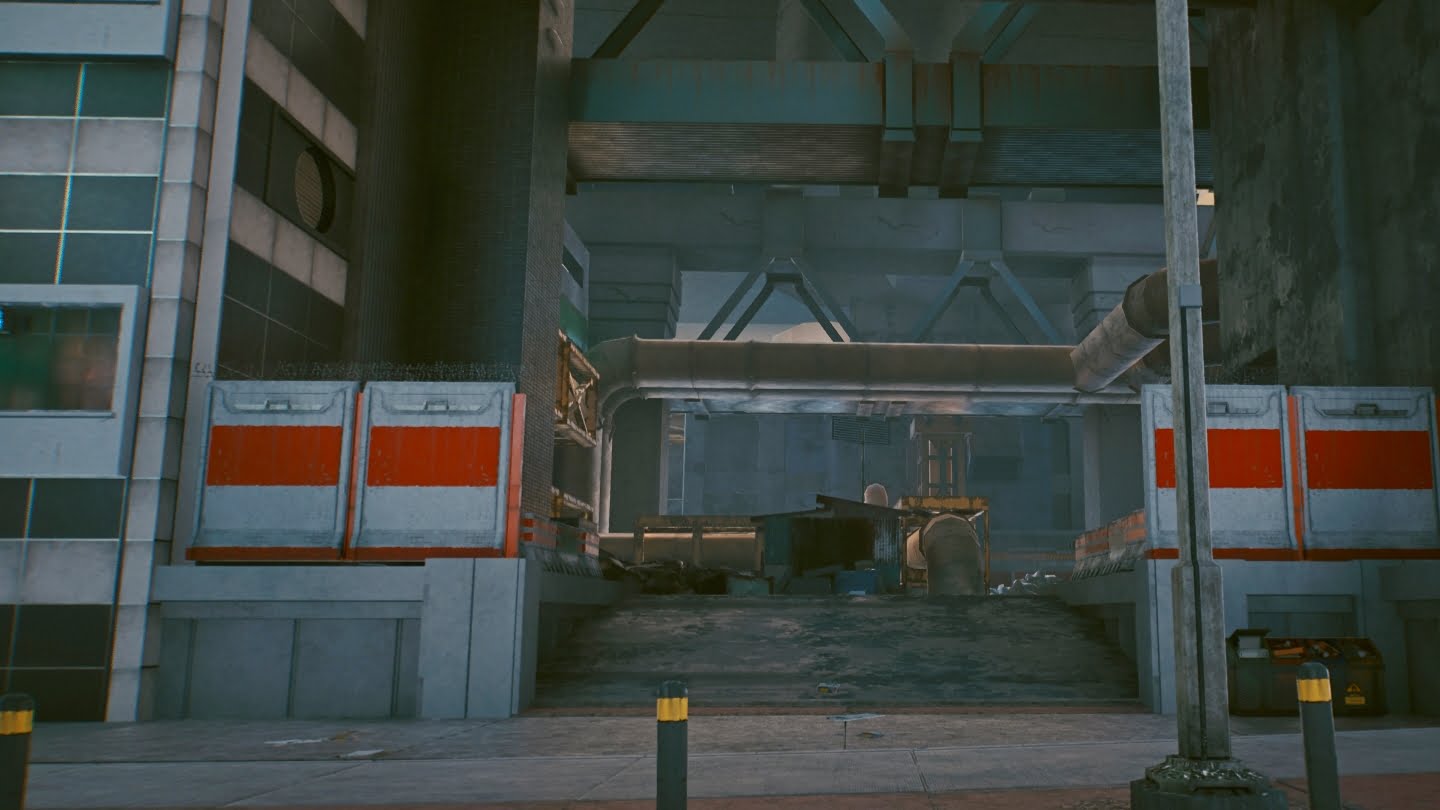
2. Heat-Resistant Hybridweave Netrunning Suit
Head west along the road from the Fast Travel Dataterm until you reach a passageway under the road near Megabuilding H2, which is blocked off with red-painted concrete blocks. There is a shabby corrugated metal hut under a large yellow pipe. Go around it on the left side, and through the garbage, and enter it through a hole on the backside. You will find the corpse lying in a Netrunner chair in the second room, which is separated by a transparent plastic curtain.
- Area: Heywood, Border between Wellsprings and The Glen
- Fast Travel Dataterm: Ventura & Skyline
- Slot: Upper Body (Interior Torso)
- Stats: 133,1 Armor, -8 % Damage from Negative Status Effects (3 Slots)
- Required Minimum Level: 30
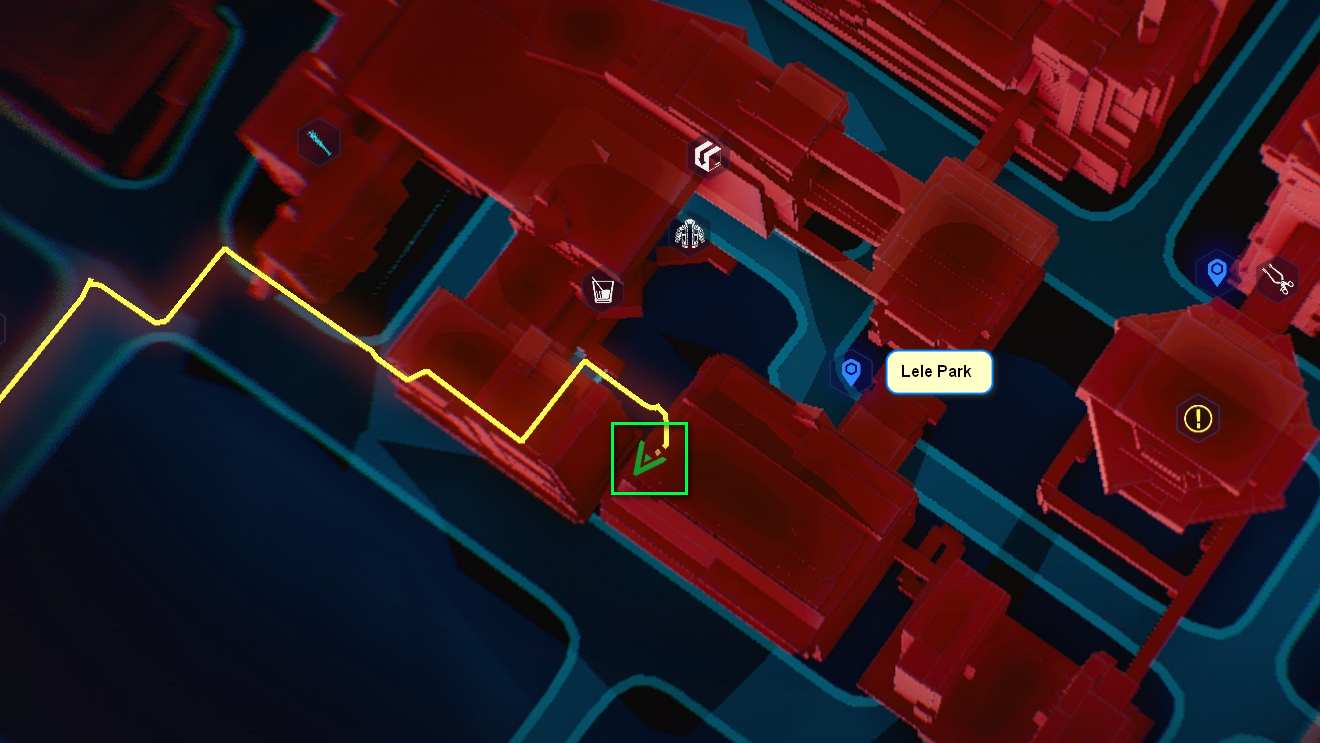
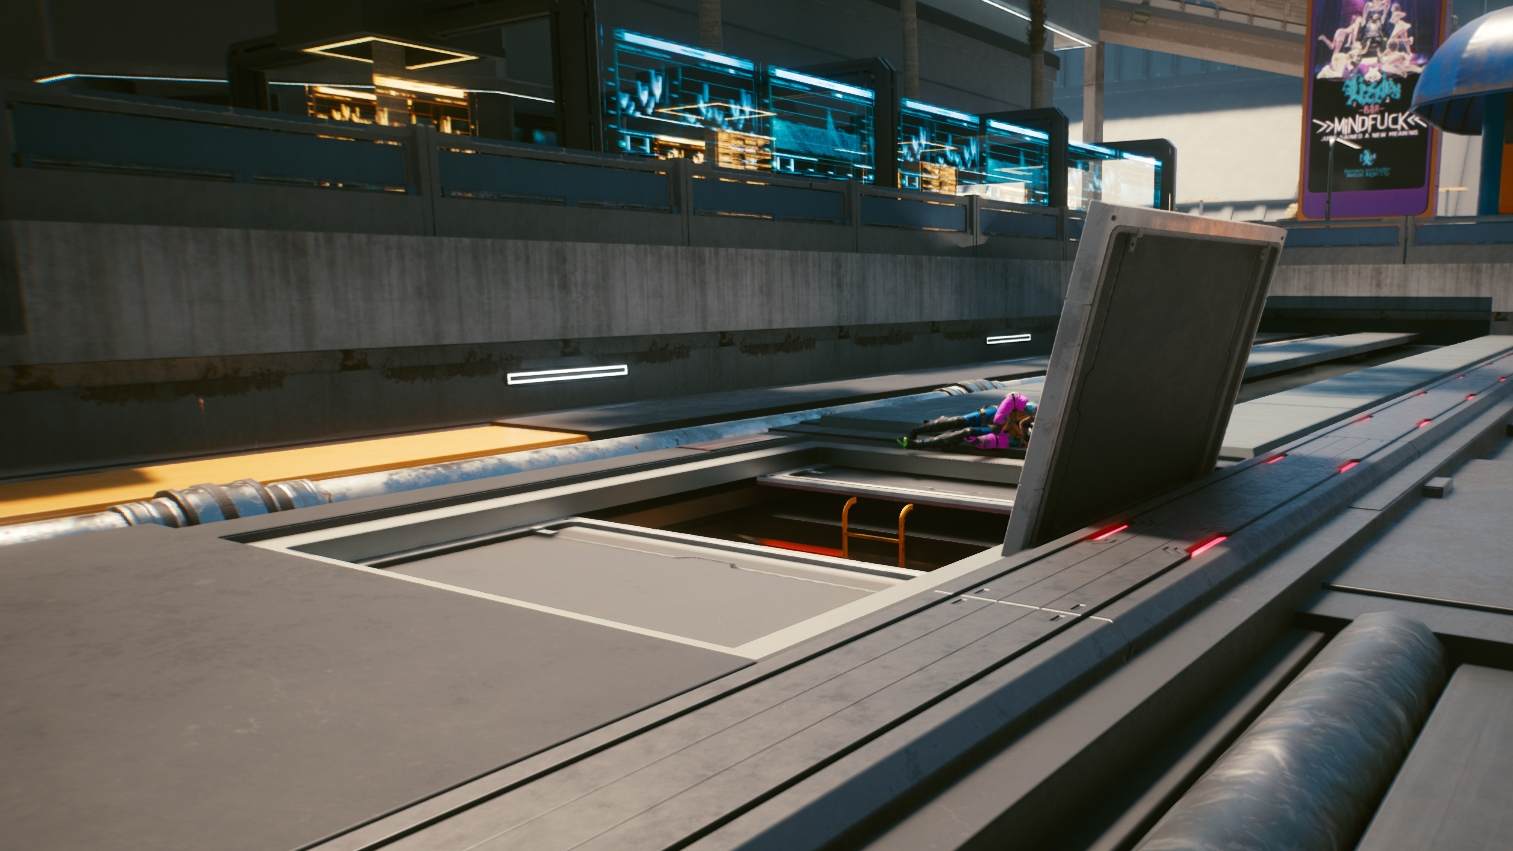
3. Hardened Netrunner Boots with Composite Inserts
Follow the road towards the southeast until you reach a crossroads. Cross this road and follow it a few steps southwest until you reach the railing on the left. There you will see an open, large metal hatch between the pipes, along with a colorfully dressed corpse lying behind it. Climb the ladder near the open hatch to get to the technician’s area, where you will also find the corpse with the boots.
- Area: Westbrook, Charter Hill
- Fast Travel Dataterm: Lele Park
- Slot: Feet
- Stats: 68,8 Armor, +13 Movement Speed (2 Slots)

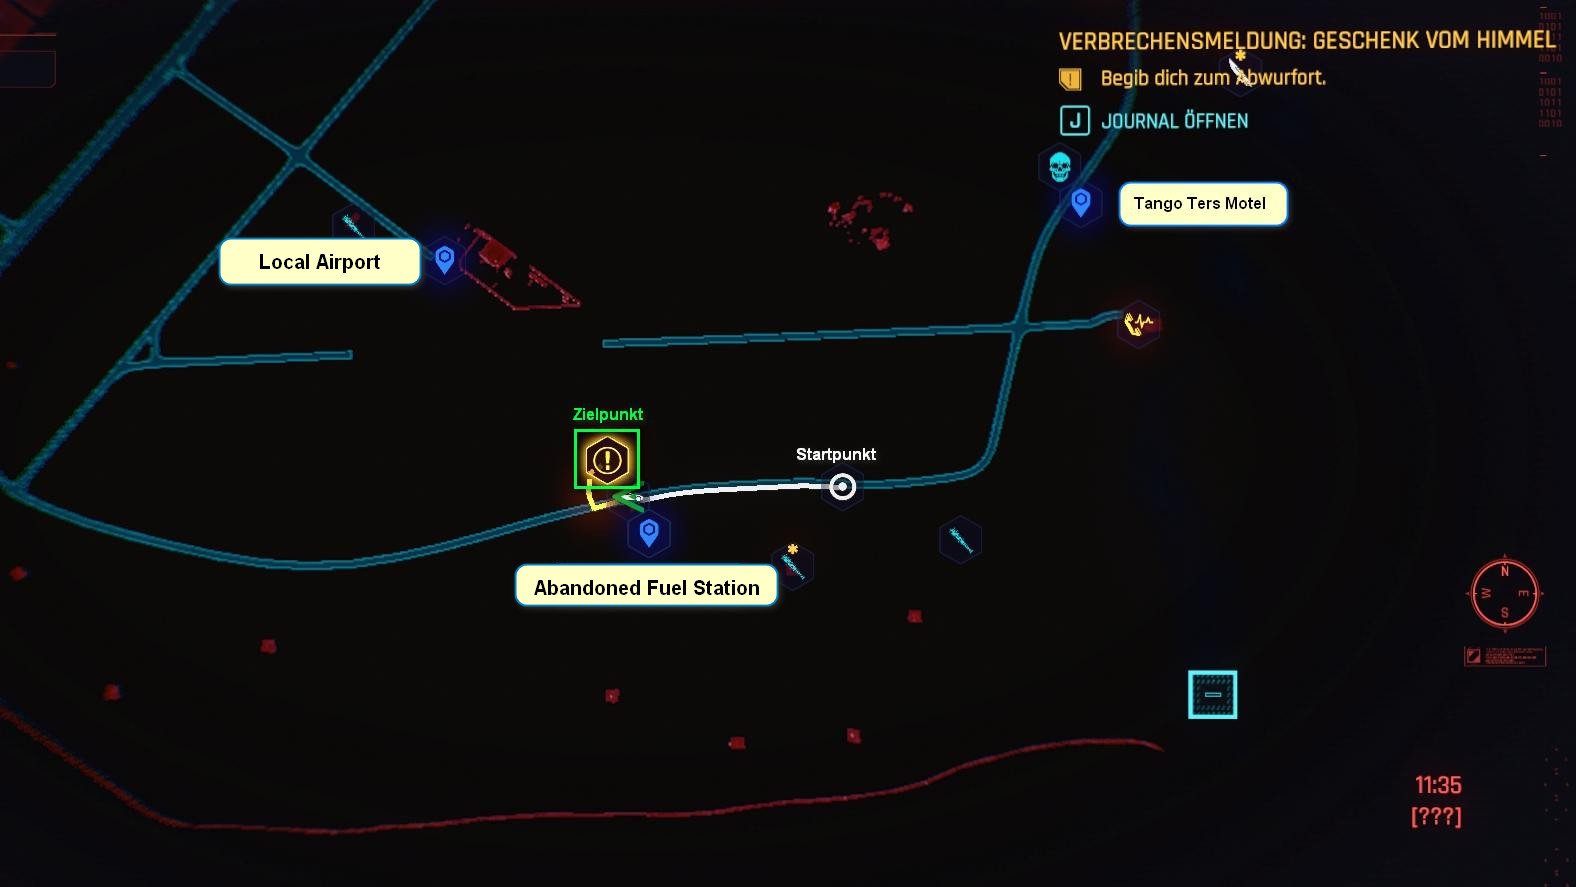
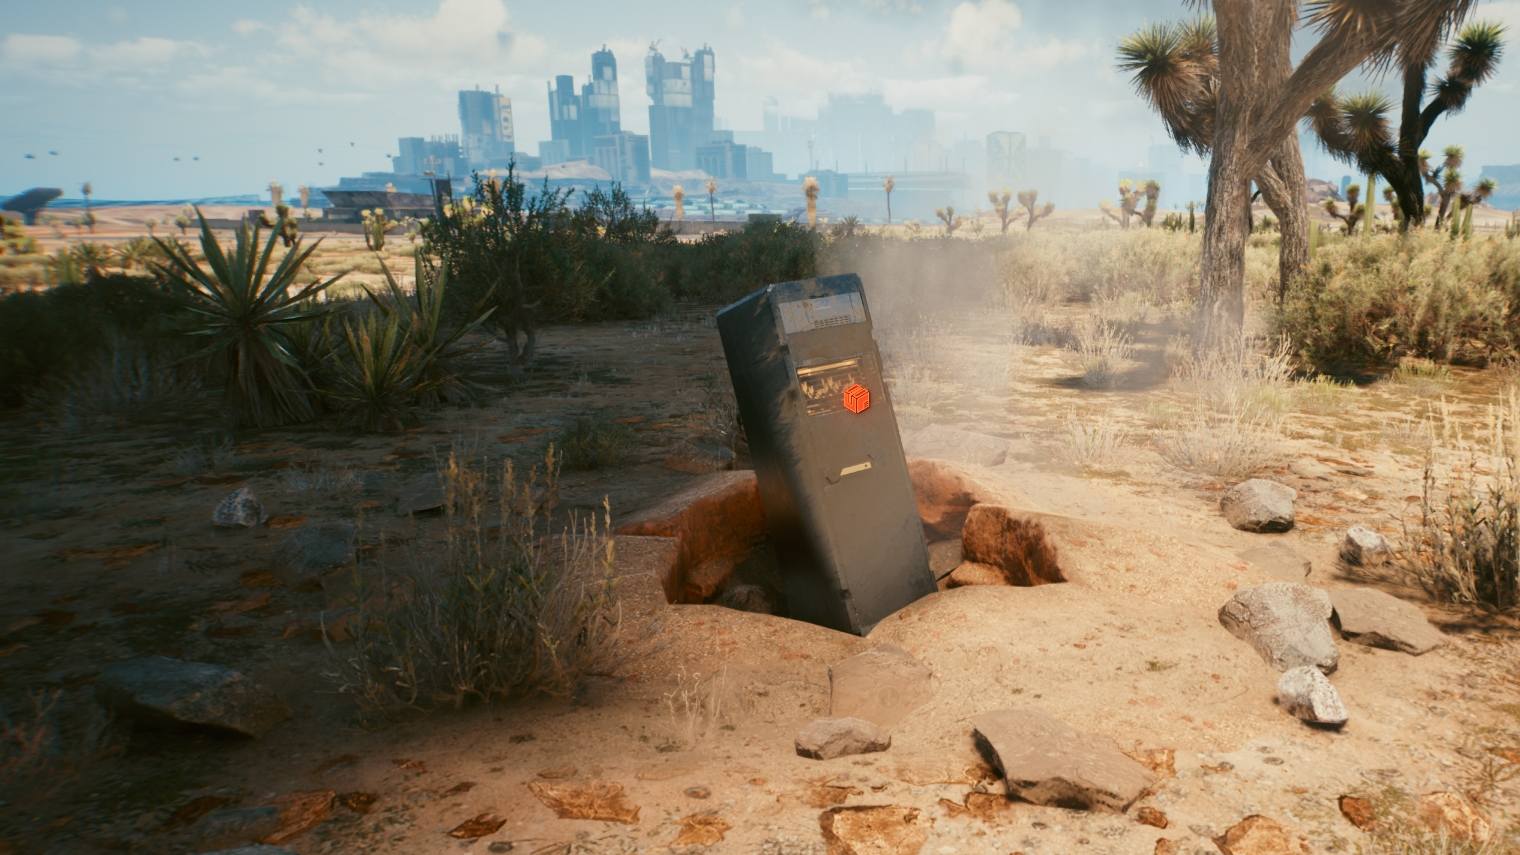
4. Antisurge Ice-Protected Netrunner Infovisor
Drive east until you reach a burnt-out car wreck with a corpse in front of it. Take the shard from the corpse and read it to start the mission “Reported Crime: Death from Above”. Follow the mission marker until you reach a cargo container that contains two variants of the Netrunner glasses.
- Area: Badlands, Rattlesnake Creek
- Fast Travel Dataterms: Abandoned Fuel Station
- Slot: Face
- Stats: 10.5 Armor, +30 % Critical Damage, +5 Oxygen Capacity (2 slots) or 23.0 Armor (1 slot).
Nomad
The Nomad clothing set is inspired by their pragmatic lifestyle and offers the right style for owners of the Aldecaldos Motorcycle. However, only four pieces of the five-piece set (shoes, two tops, face mask) are currently obtainable in the game world. The pants are present in the game files but have not been discovered in the game yet.
Alternatively, put on the pants from the Engineering set or, if you’re lucky, grab the Nomad Shorts as random loot or during the boss fight against Sasquatch during the main mission “I Walk the Line”. V also has to have a Constitution level of 13 to get all the set pieces.
- “We don’t have a home except the Caravan. We don’t have rights except what we take. We get run out of town by the cops: we get raided by the roadwarrior packs, and we survive because we’ve got guns and bikes…There’s kids, old men and women-families here. This ain’t no boostergang. These people are my family.”
(Nomad Santiago)
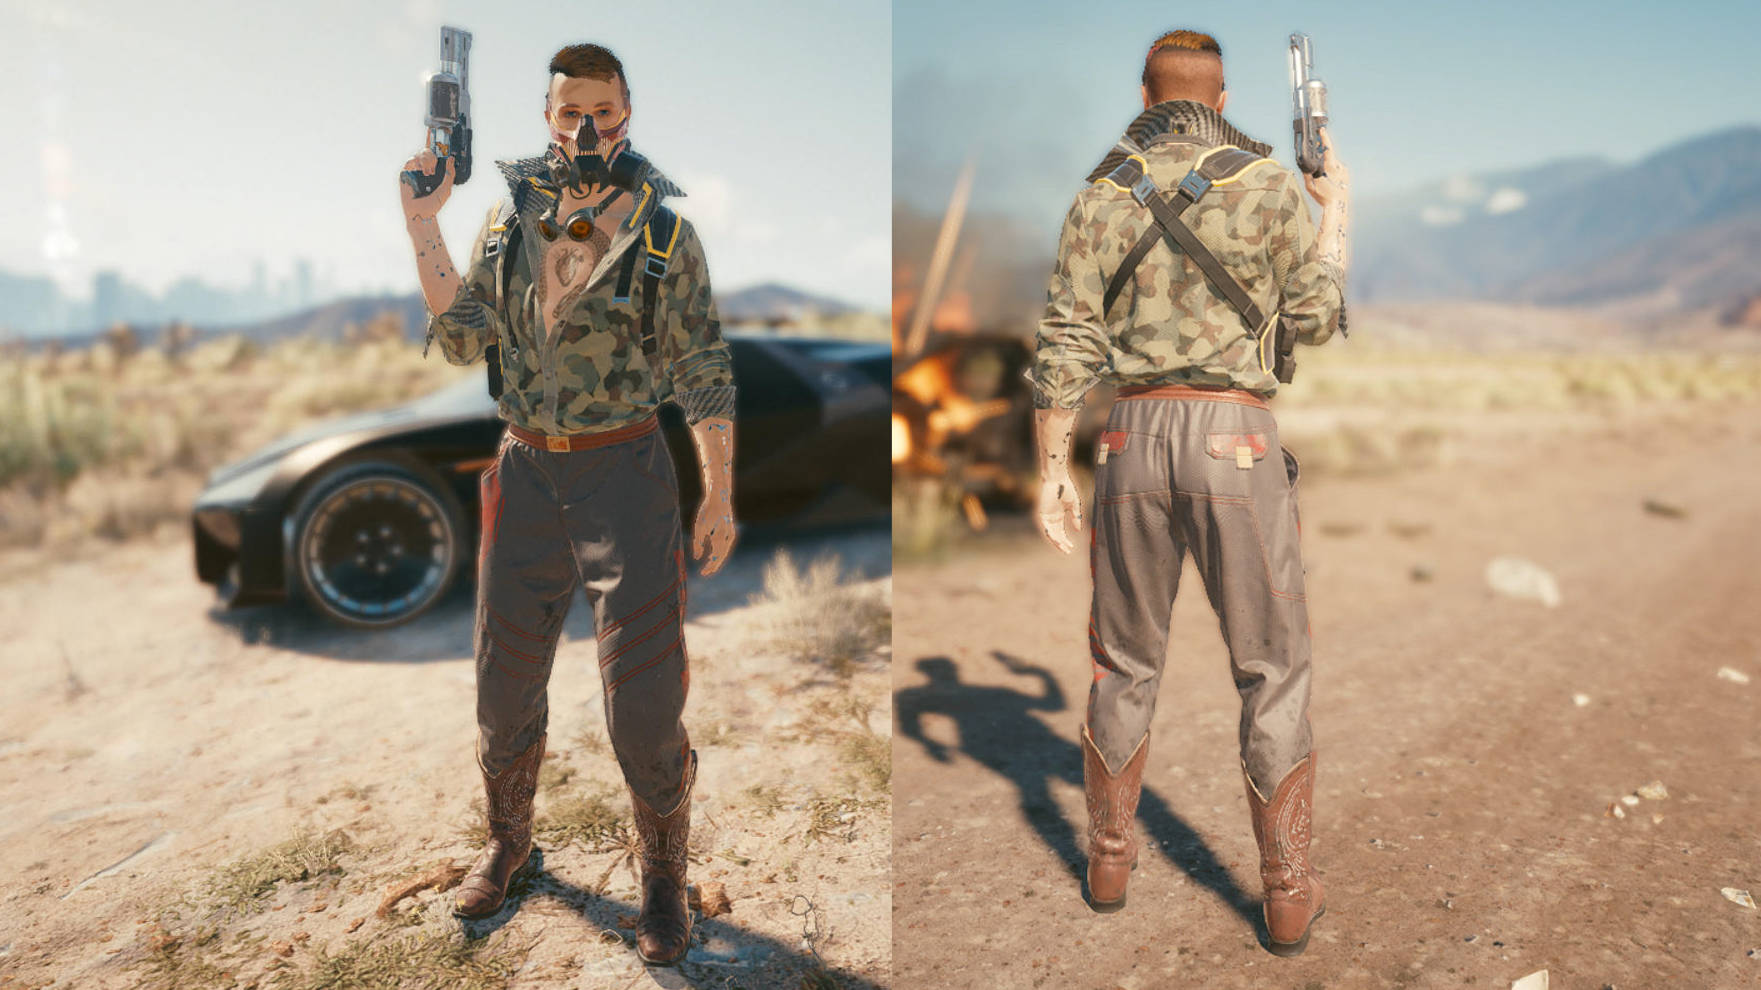
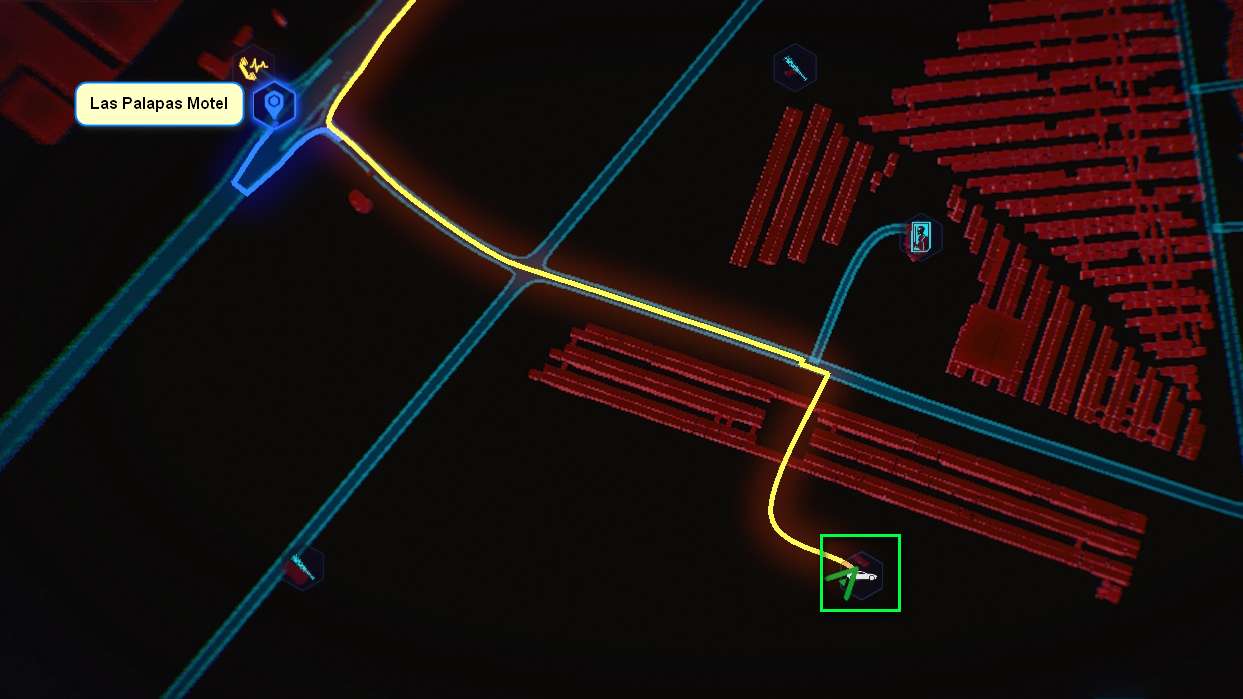
1. Manganese-Laminate Nomad Gas Mask
Starting at the Fast Travel Dataterm, take the road southeast through the solar panel fields. On the map, south of the row of solar panels aligned parallel to the road, you will find a small rectangular structure where a Wraith camp is located. The gas mask is waiting inside a crate on a sofa.
- Area: Badlands, Jackson Plains
- Fast Travel Dataterm: Las Palapas Motel
- Slot: Face
- Stats: 57,7 Armor

2. Nomad Jacket
Head southwest from the Fast Travel Dataterm towards the customs office. On the left side of the road, after about 750m, you will see a hut, which can also be spotted on the map in the shape of a rectangular structure. There is an underground cellar behind the hut. The door can only be opened through the use of force if your Constitution level is 13 – there is no alternative way to get inside.
- Area: Badlands, Jackson Plains
- Fast Travel Dataterm: Fuel Station
- Slot: Upper Body (Outer Torso)
- Stats: 17.1 Armor, -5 % Stamina Consumption when blocking melee attacks (1 slot).

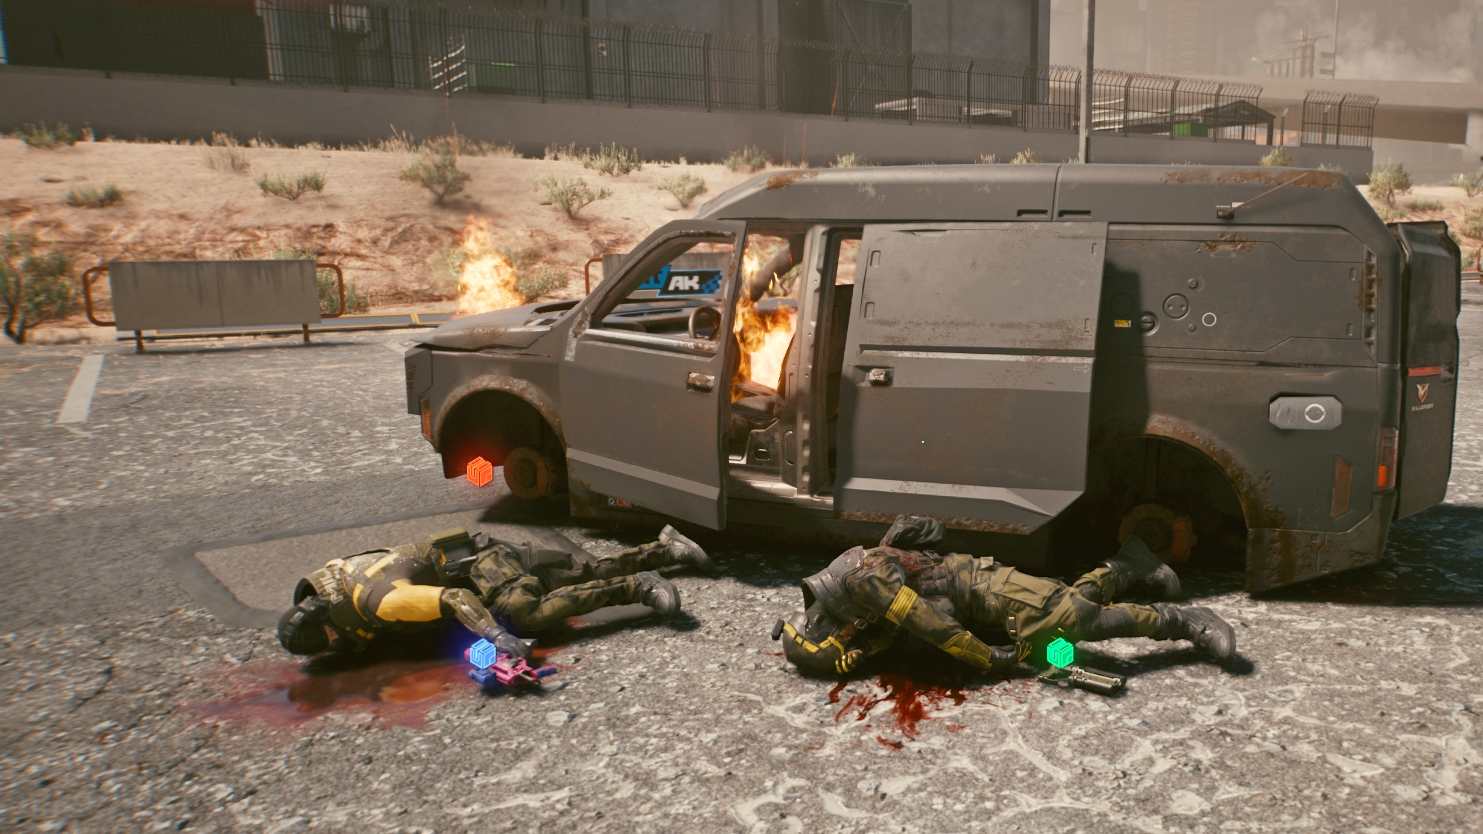
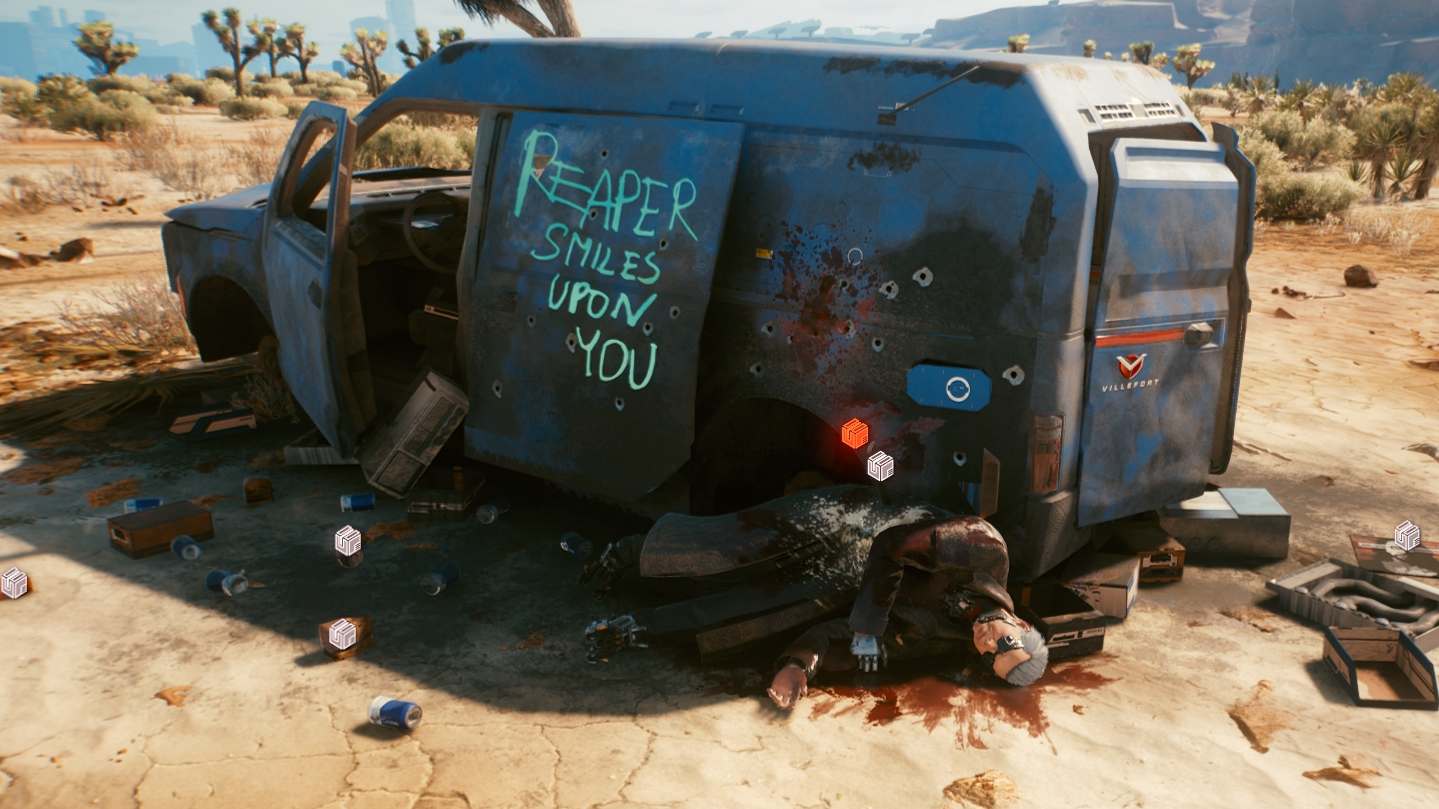
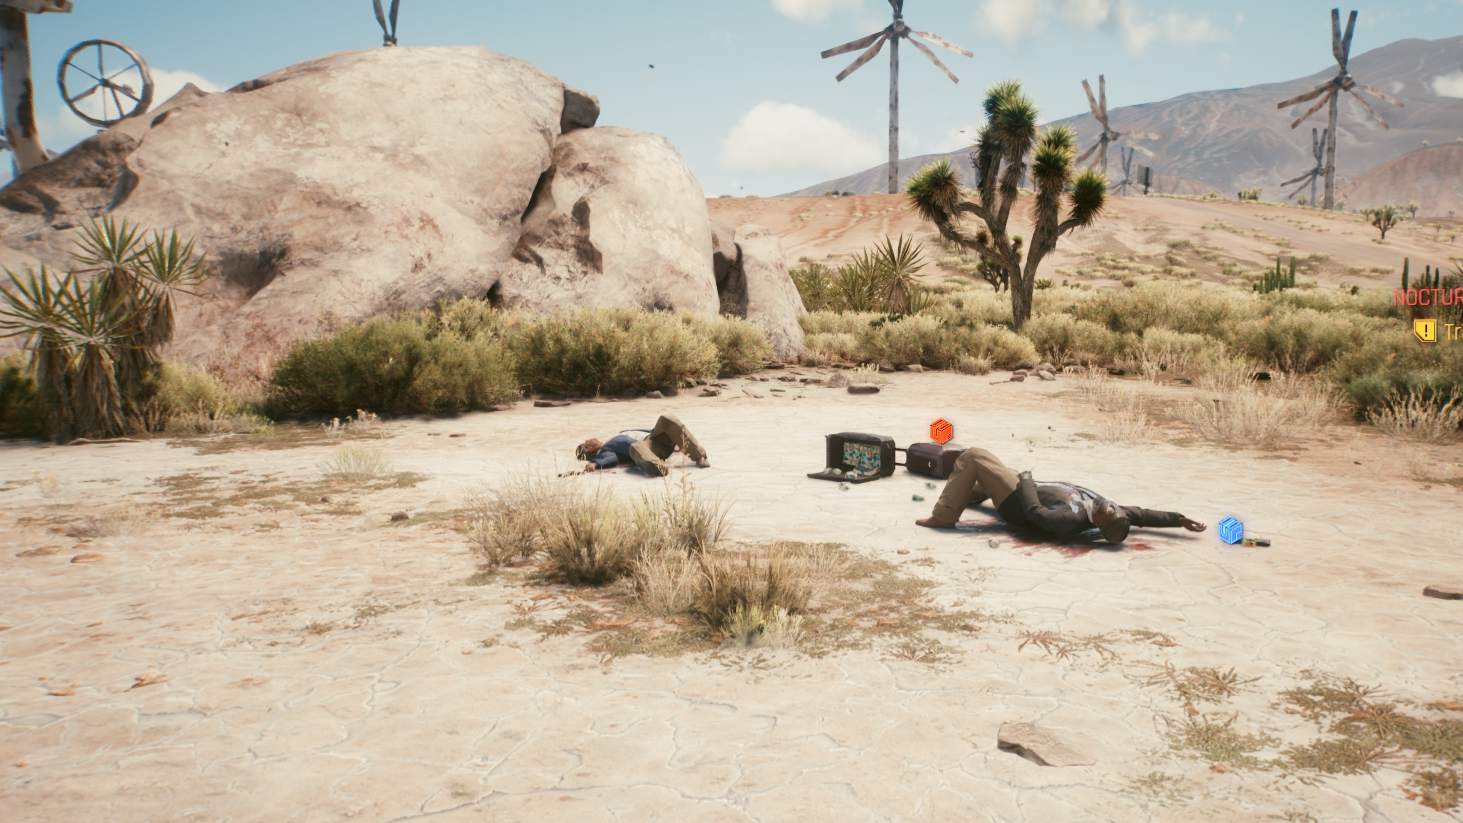
3. Polycarbonate Nomad Shirt with Reinforced Seams (Inner Torso)
Drive southwest on the road from the Fast Travel Dataterm and turn right at the first junction. Turn left into the desert at the height of the rock formations that are visible from the road on the right and drive south until you reach the destroyed blue van with its dead owner.
- Area: Badlands, Rattlesnake Creek
- Fast Travel Dataterm: Tango Tors Motel
- Slot: Upper Body (Inner Torso)
- Stats: 133.6 Armor, +5 Carrying Capacity (2 slots)

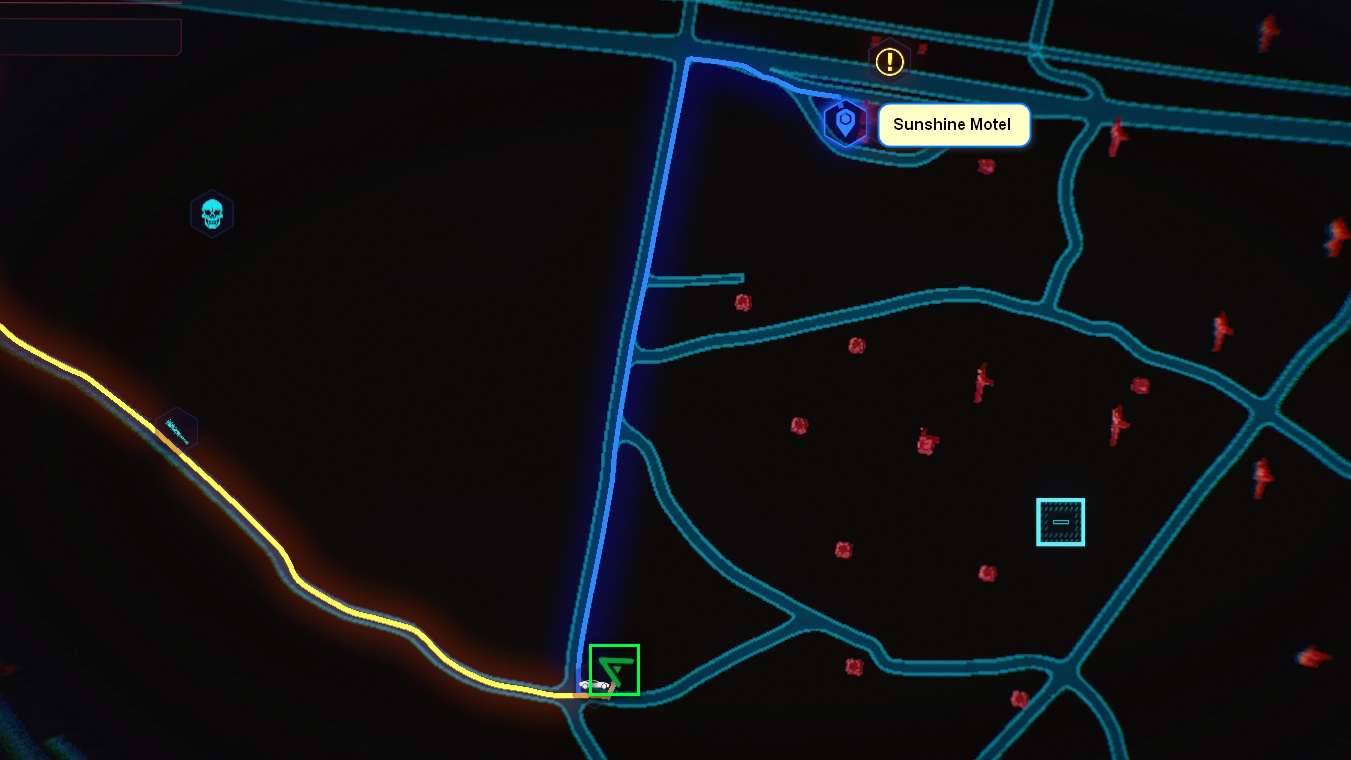
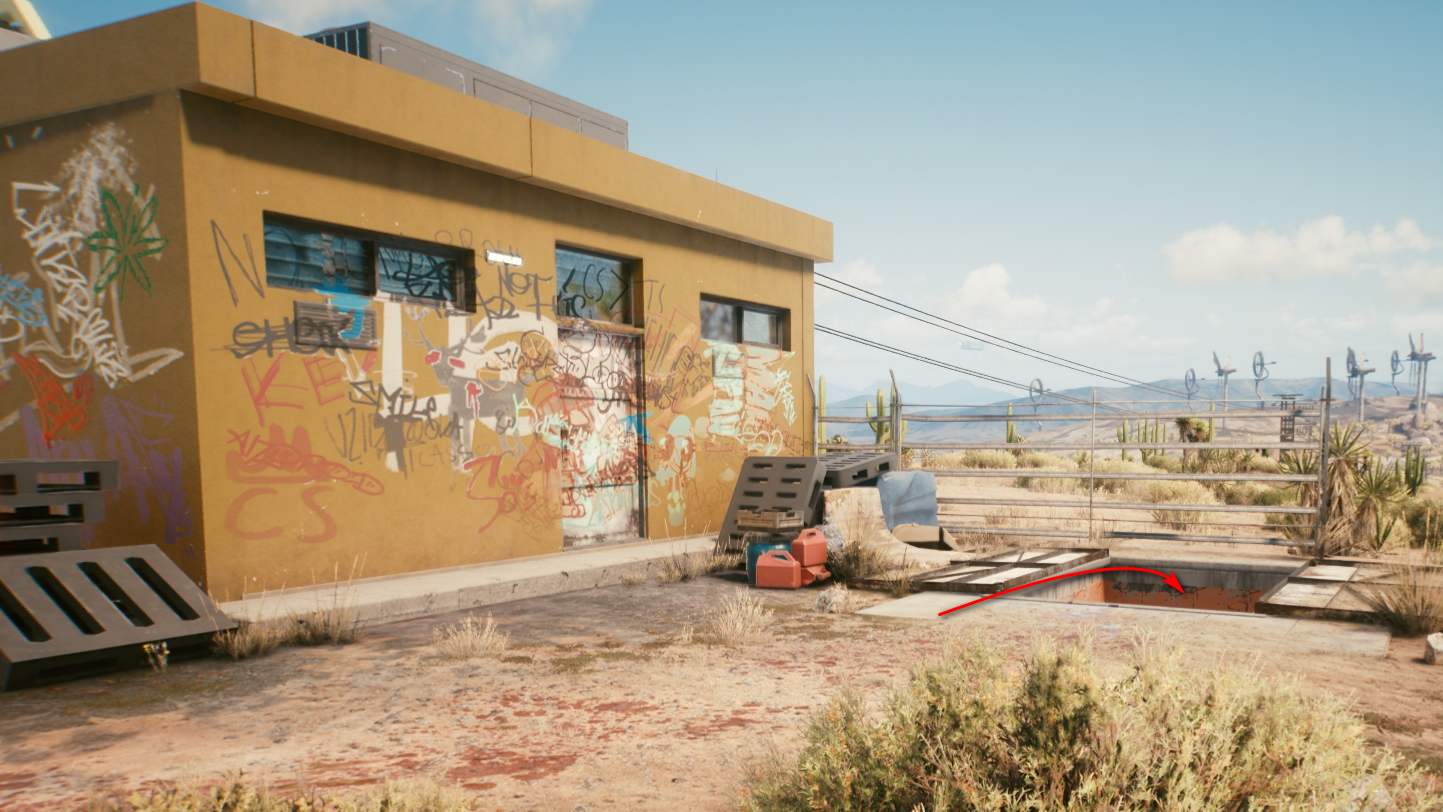
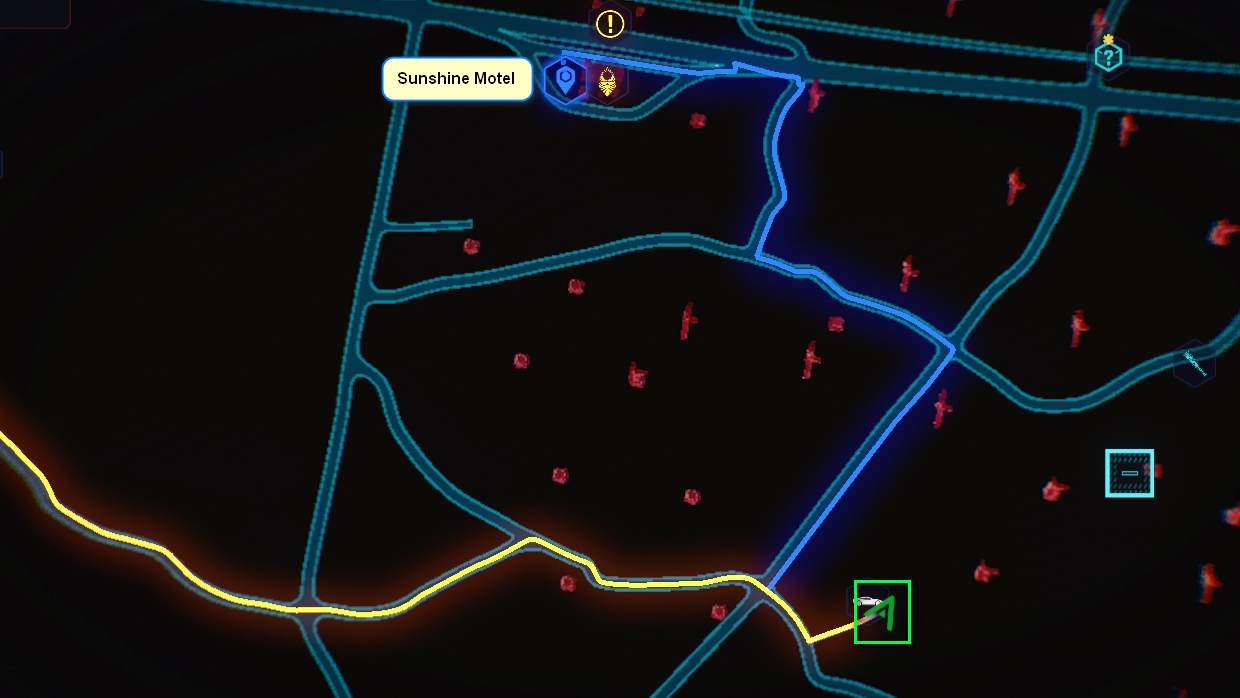
4. Durable Bioleather Nomad Western Boots
Starting from the Fast Travel Dataterm, take the road west and then turn south. Drive down the road until you reach the abandoned fuel station at the four-street intersection with the small mountain of trash bags in front of the fuel dispensers. Follow the blood trail from the parking lot to the basement stairs. In the basement you will find several corpses and the boots you were looking for.
- Area: Badlands
- Fast Travel Dataterm: Sunshine Motel
- Slot: Feet
- Stats: 82,2 Armor
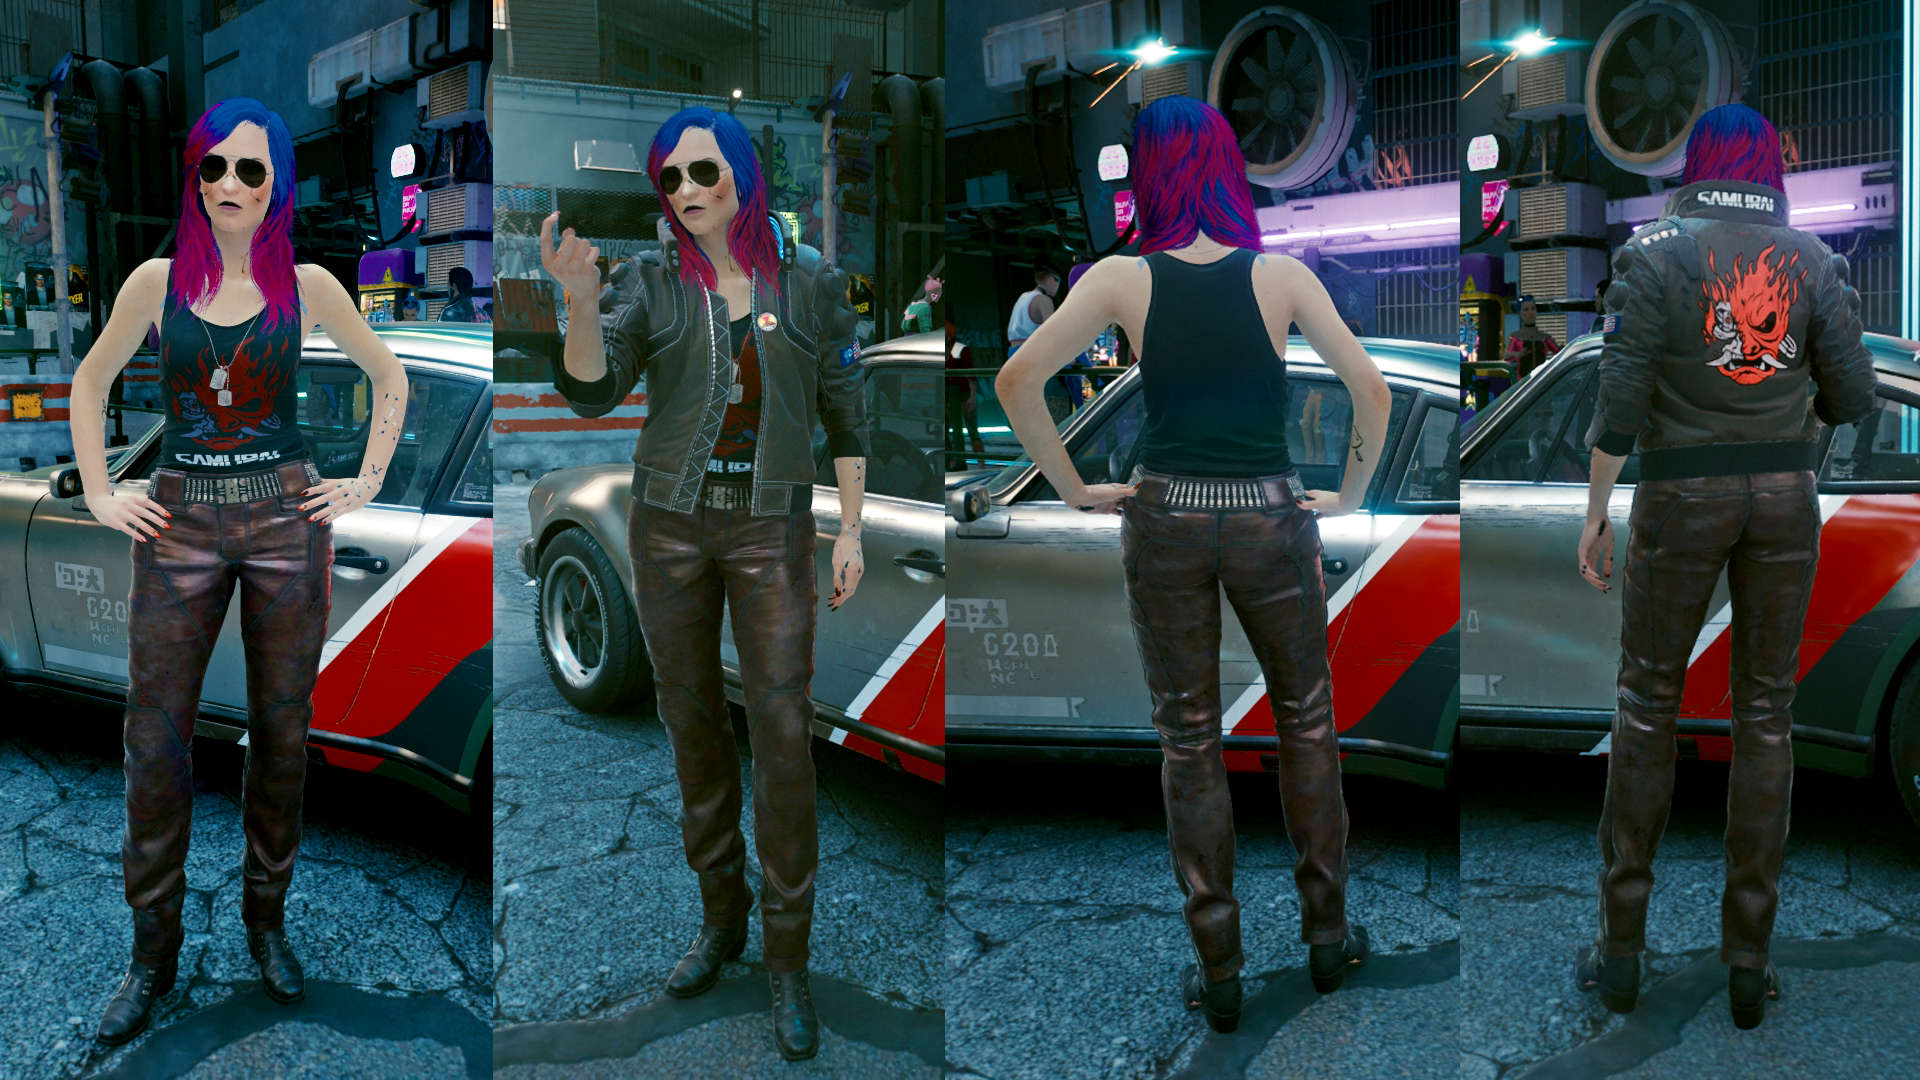
Rocker Boy / Rocker Girl
If you want to follow in the footsteps of Night City’s legendary musicians without having to dress up in Johnny Silverhand’s clothes, the Rocker Boy (or Rocker Girl) outfit offers up a good alternative. However, you’ll have to rely on big muscles or jumping power: V has to have either 12 Attribute Points in Constitution or be equipped with Leg Cyberware that allows you to do a double jump or a charged jump. Otherwise, you won’t get the full set.
- “There were these scum out there who were messing with the world. They were killing people, raping the land, and lying in our faces when we caught ’em. Music always gets hammered down to the three A’s. Axe, Attitude and Audience. Me, I had an Axe and an Attitude. All I had to do was get the third one…”
(Kerry Eurodyne, Rockerboy)

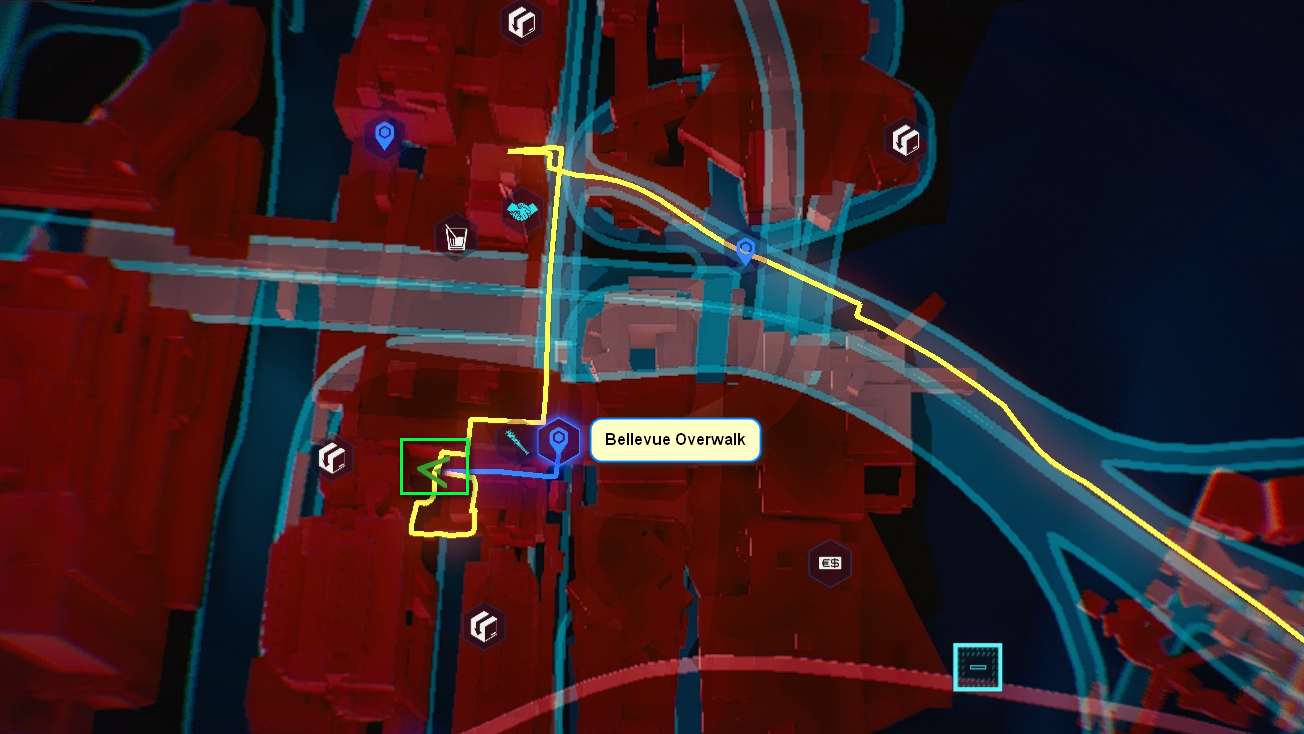
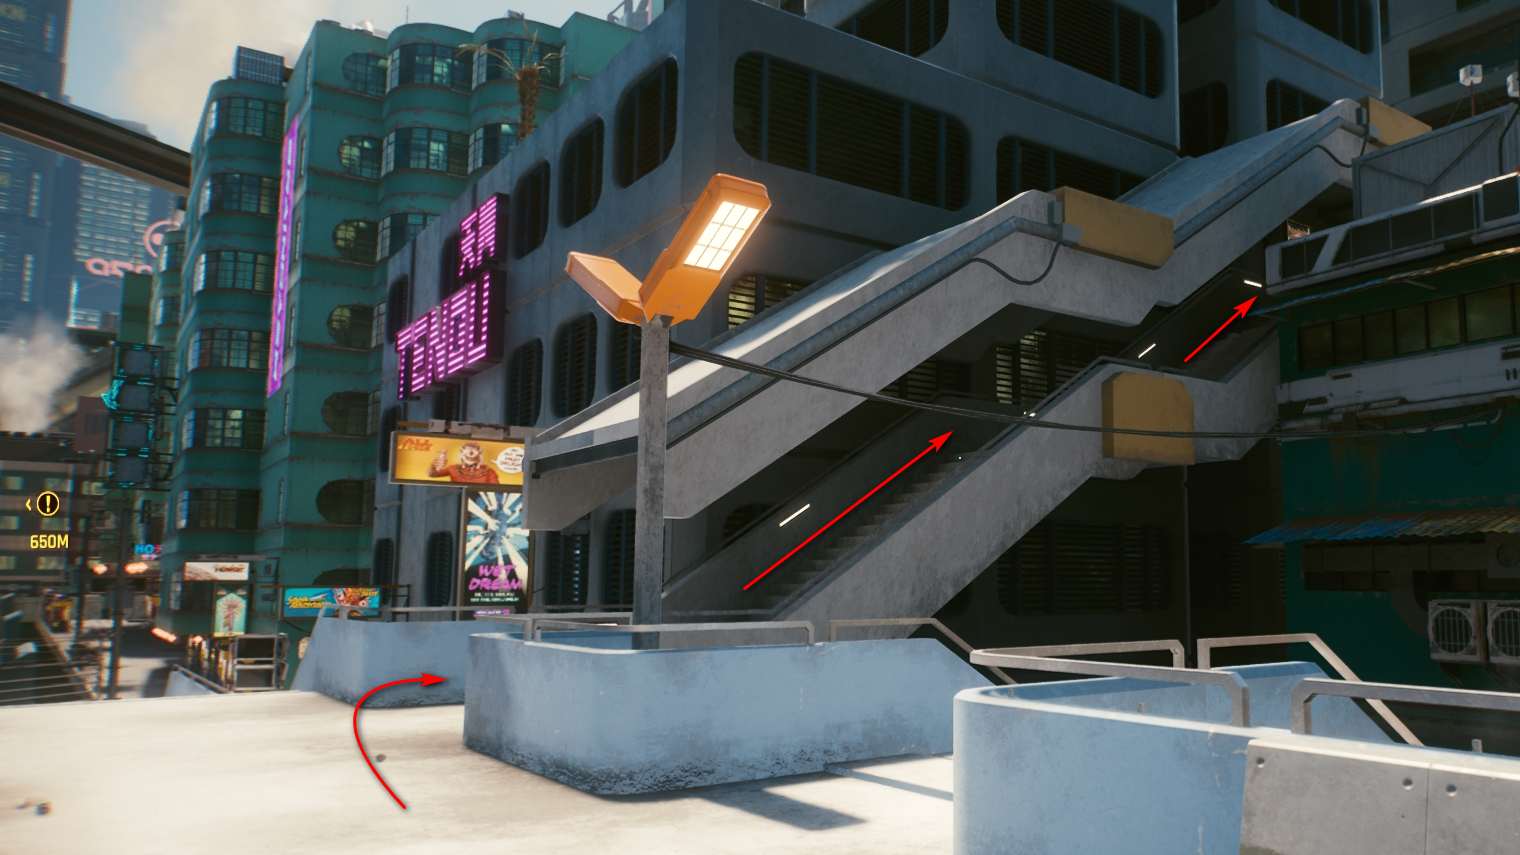
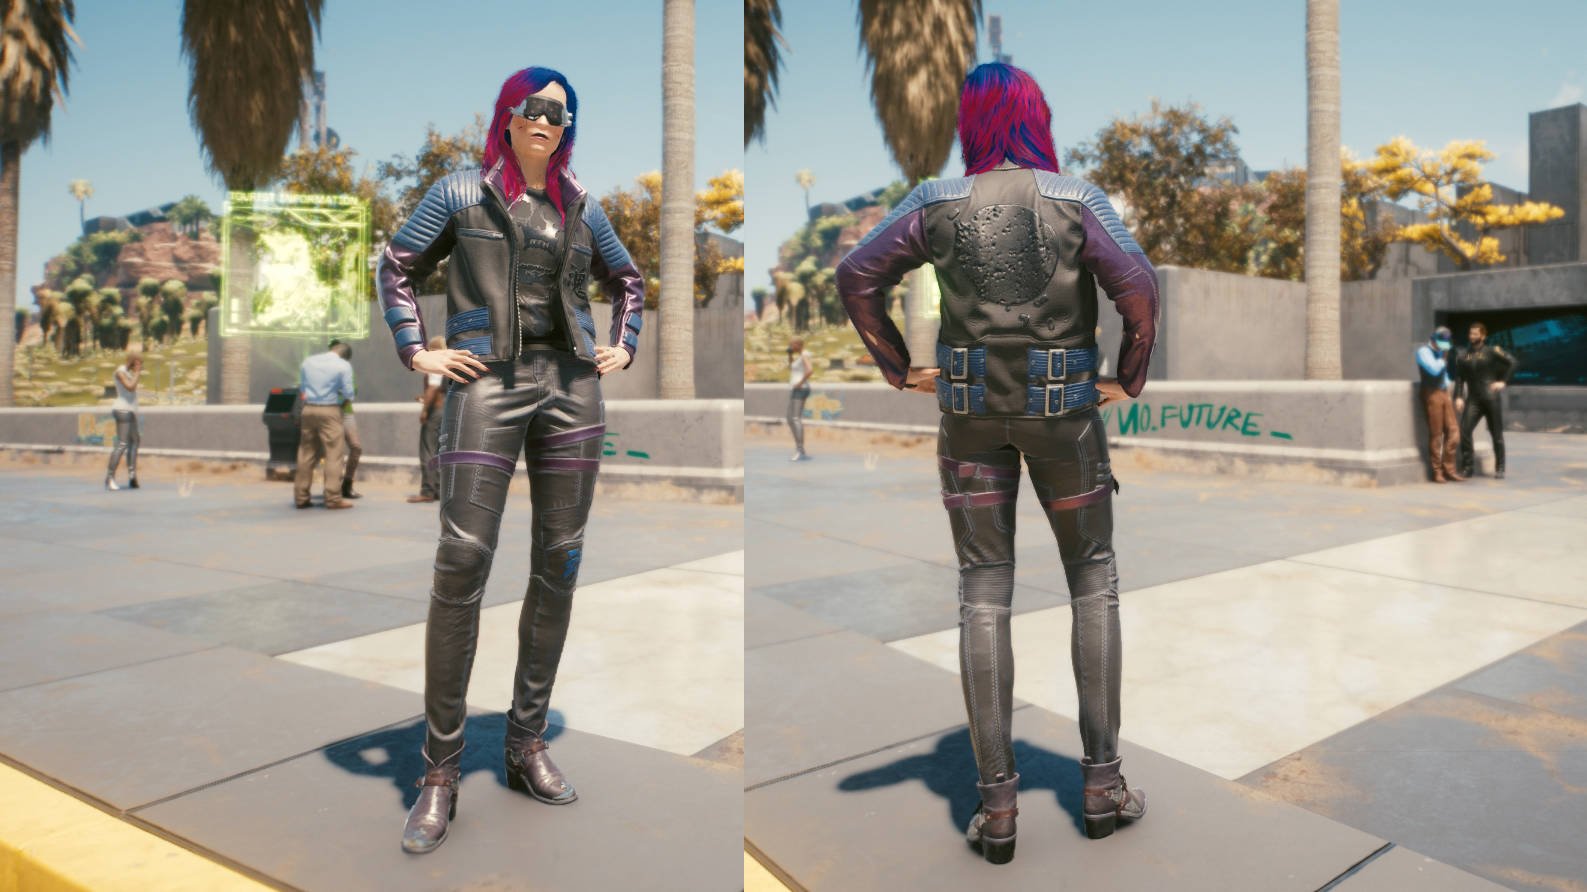
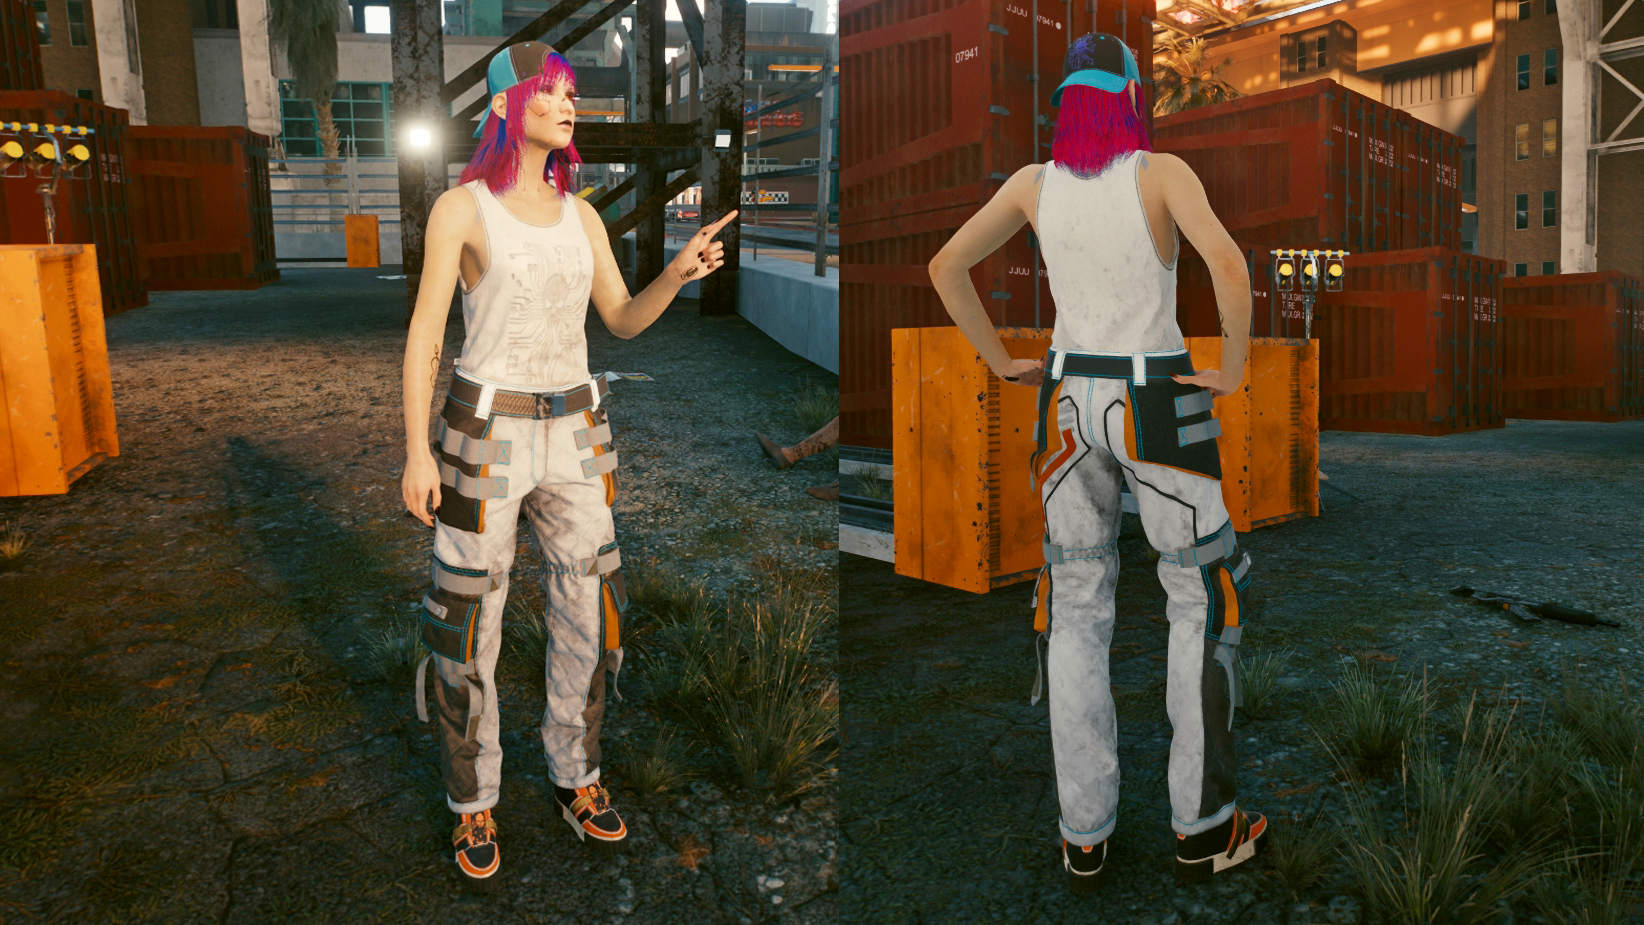
1. Duolayer Polyamide Rocker Vest / Foldtop
Head left from the Fast Travel Dataterm and go up the roofed staircase. Walk down the corridor to its end to find the body of a Rocker Boy wearing the top. Male Vs collect the Rocker Vest, female Vs get the Rocker Foldtop.
- At the moment (game version 1.11), the Rocker Foldtop for female V is bugged: The garment’s shiny silver pants are not placed over V’s legs, but behind them. So you can see the pants from behind, but not from the front – here you only see V’s bare legs.
- Area: Watson, Kabuki
- Fast Travel Dataterm: Bellevue Overwalk
- Slot: Upper Body (Outer Torso)
- Stats: 106.4 Armor, +5 Carrying Capacity, +0.2 Dodge (3 slots)
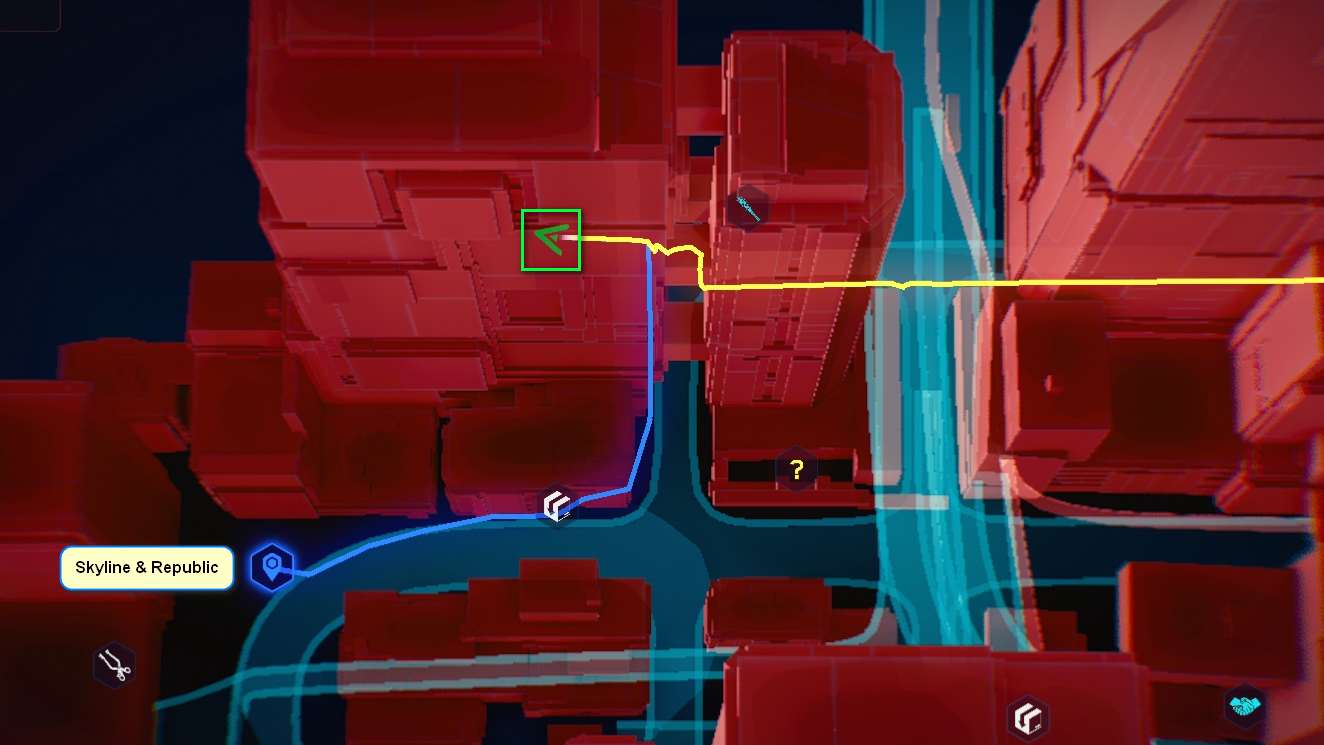
2. Puncture-Resistant Rocker Platform Boots
Go down the street from the Fast Travel Dataterm and turn left into the direction of the sea. Follow this road until you reach the “Bruce Skiv” street sign and then turn left into the small covered alley next to the building. Follow the street until the end. Next to a bloody shoe is a hole in the railing through which you can get to the lower footbridge. Then climb into the closed small area on the other side of the barred gate. There are two corpses lying there. You will find the boots on the female corpse.
- Area: City Center, Downtown
- Fast Travel Dataterm: Skyline & Republic
- Slot: Feet
- Stats: 73,3 Armor, +10 Movement Speed (2 Slots)
- Required Minimum Level: 30

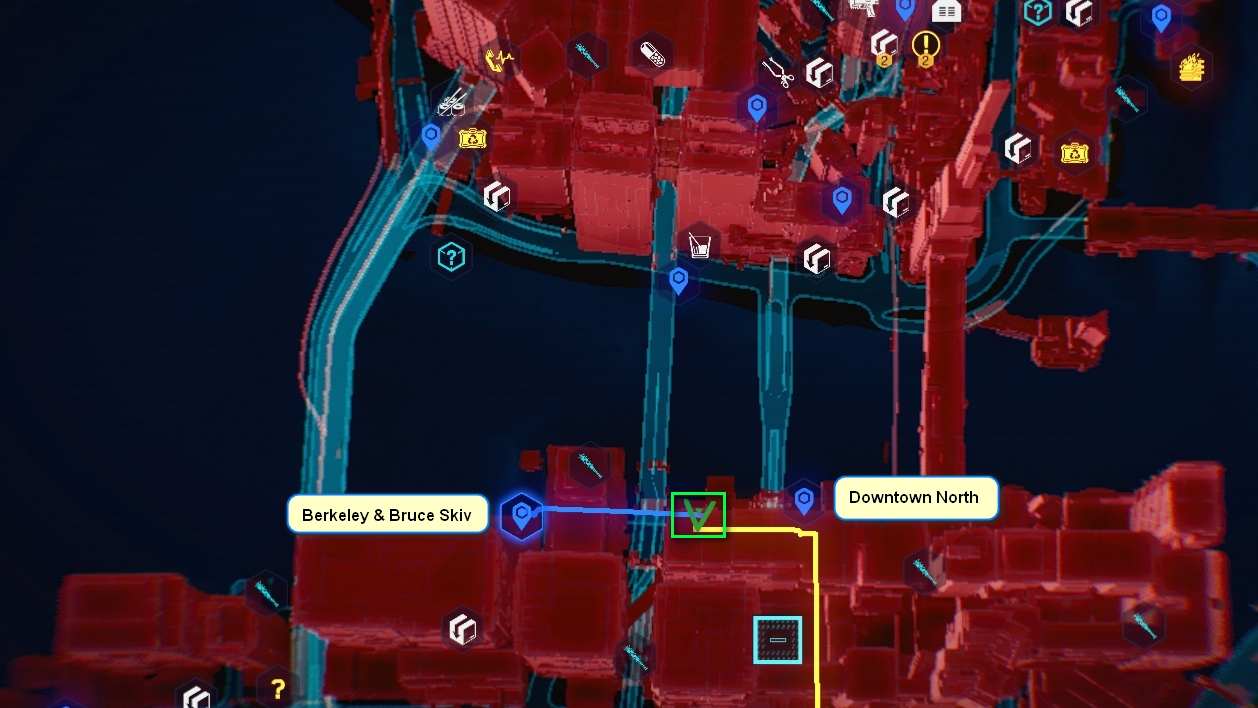
3. Elastic Flame-Resistant Rocker Pants
Starting from the Fast Travel Dataterm, walk west along the road near the water until you see an orange-yellow wall next to a barred area. Cross the road and pull yourself up to the higher level. There are two ways into the barred area: either forcibly open the door (Constitution 12) or double jump or do a charged jump with your Leg Cyberware to get up to the barred “roof”. Drop through a hole in the roof and into the room. You will find the pants on the corpse.
- Area: City Center, Corpo Plaza
- Fast Travel Dataterm: Downtown North
- Slot: Legs
- Stats: 68,0 Armor, + 10 Movement Speed, -5 % Fall Damage (2 Slots)
- Required Minimum Level: 30
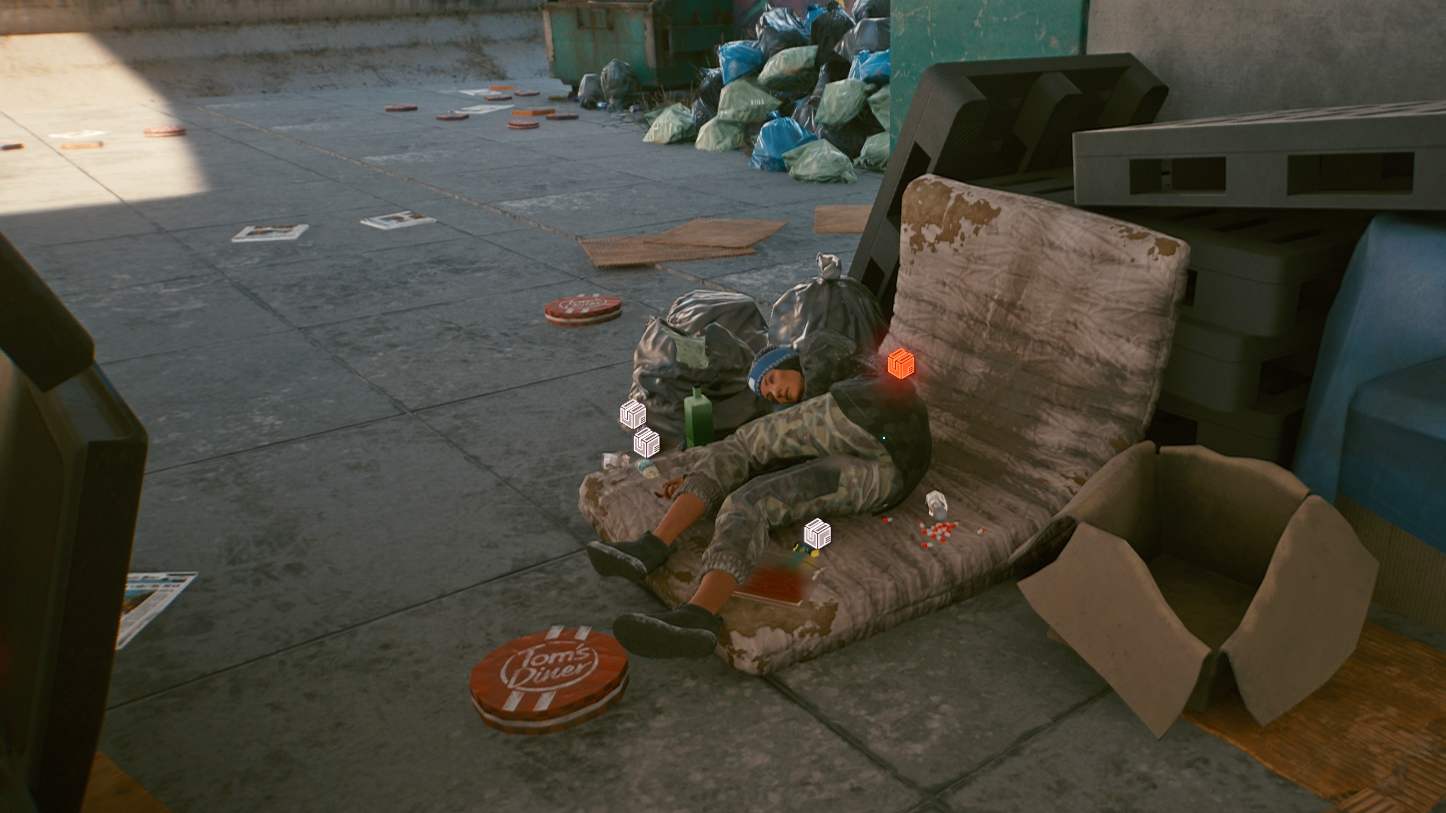
4. Scratch-Resistant Polarized Rocker Aviators
From the Fast Travel Dataterm, turn southwest and turn right. Follow the road to the next junction and continue southwest. Stop once you are on the lower level. The body with the Rocker Glasses lies on a mattress in a homeless settlement to the left of the “Foodscape” building.
- Area: Santo Domingo, Rancho Coronado
- Fast Travel Dataterm: Kendal Park
- Slot: Face
- Stats: 42.5 Armor, +5 % Bonus Damage against medium and high threat enemies, +6.5 Maximum Oxygen Capacity (2 Slots)
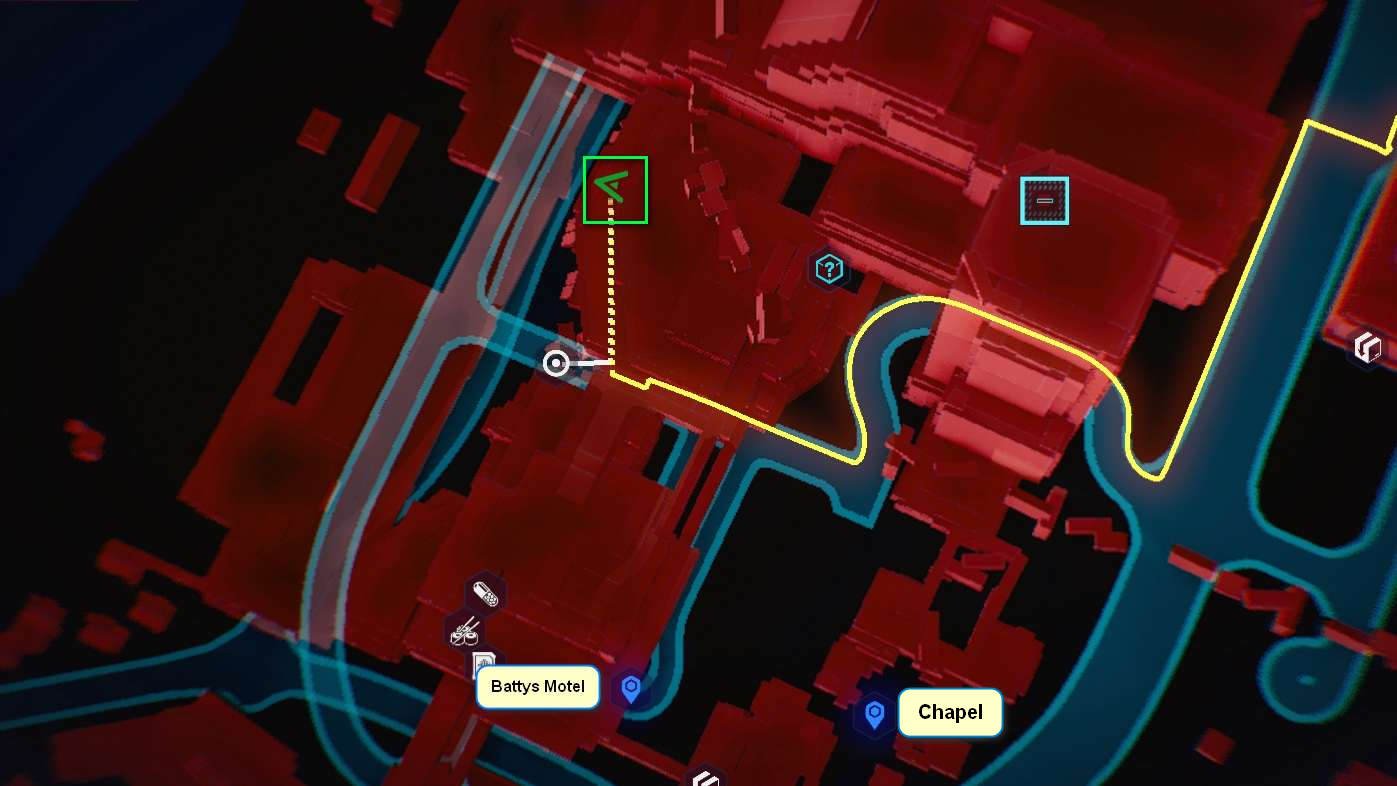
5. Armorweave Rocker Bra / Tank Top
Follow the road northeast from the Fast Travel Dataterm until you reach the crossroads. Turn left and walk down the street up to the concrete wall with the snowflake-like voodoo painting on the right. Climb the concrete wall and follow the balcony to a small stage with musical instruments and several corpses. The sitting corpse on the railing provides you with a Rocker Bra for female Vs and a tank top for male Vs.
Attention: If you have messed with the Voodoo Boys during the main story of the game, you may have to fight the gang members lurking around the “Snowflake”!
- Area: Pacifica, Coastview
- Fast Travel Dataterm: Battys Motel
- Slot: Upper Body (Interior Torso)
- Stats: 126.1 Armor, +5 Carrying Capacity, -5% Damage from Explosions (3 Slots)
Solo
Solo is the name given to the tough mercenaries who roam the streets of Night City on their own, fulfilling missions on behalf of corporations, the NCPD, or other financial backers. This outfit will allow you to live the mercenary way of life with style! However, you can only get the complete set if V has Technical Ability 16 – there’s no other way to open a door to an otherwise locked area.
- “After a few months on the Street, I got into a dustdown with a local Boaster Lord. I flatlined him and went back to my drink. Within ten minutes, the recruiter from Militech came up to me and dropped a business card… Now I’m a Company man.”
(Morgan Blackhand, Solo)
1. Gold-Tipped Manganese Steel Solo Boots
Starting from the Fast Travel Dataterm, walk around the central building of the Kabuki Market until you reach the 9 o’clock level (as seen from the map). Cross the street and turn towards the stairs at the building with the LOVE neon sign that faces the street. Go up the left staircase to the street and follow it uphill to a building on the left side of the street with a Blue Moon neon sign. Go through the Japanese archway and to the food stall on the right of the path. You will find the box with the boots behind the cook.
- Area: Watson, Kabuki
- Fast Travel Dataterm: Kabuki Markt
- Slot: Feet
- Stats: 58.4 Armor, -5 % Fall Damage, +10 Movement Speed (2 slots)


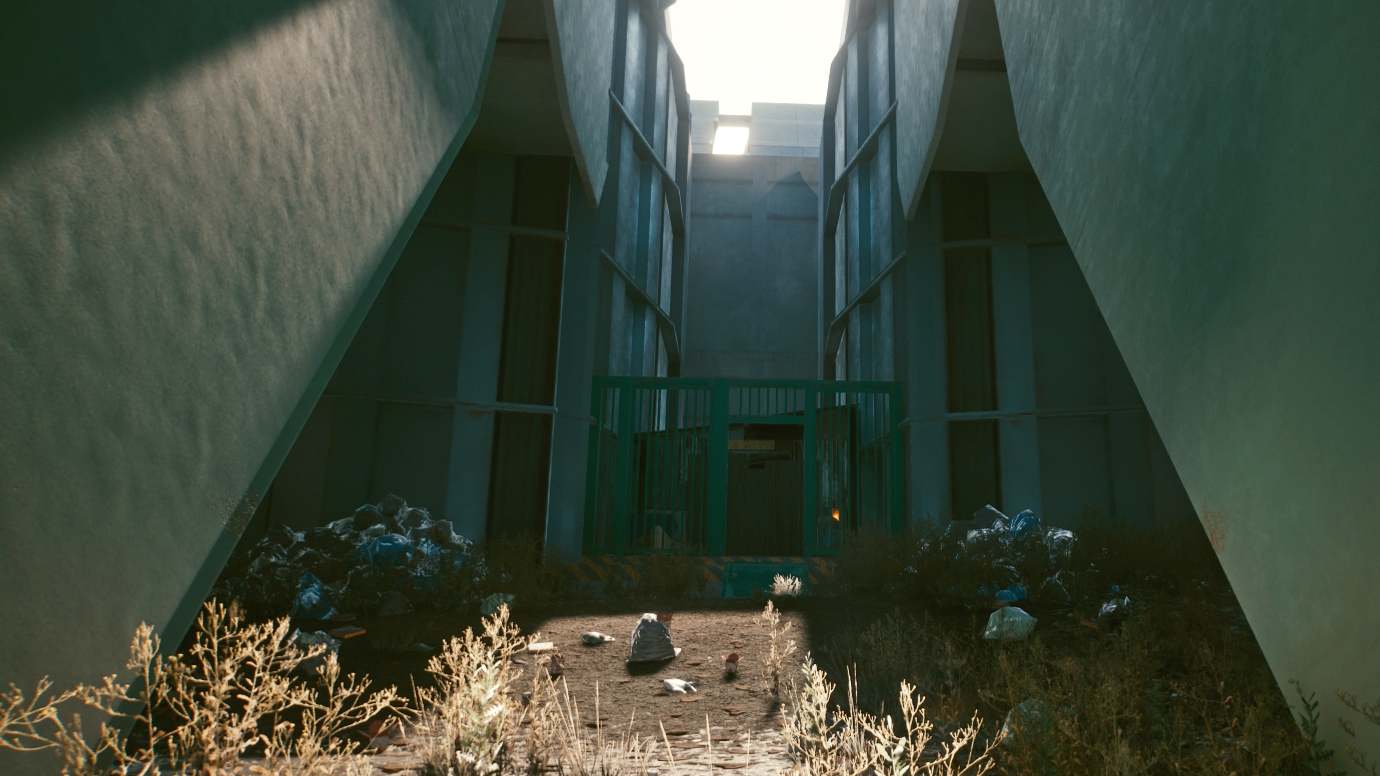
2. Reinforced Synleather Solo Racers
Move west from the Fast Travel Dataterm and walk to the water’s edge until you reach the end of the path, which is enclosed by a concrete railing. There is a yellow ladder that you climb down to the beach. Go south along the wall until you reach a turquoise-colored barred passage. Jump onto the barrels behind the gate on the left and climb onto the corrugated roof. Cross it, drop down on the other side and climb inside the hut. The pants are lying near one of the two corpses.
- Area: Heywood, Wellsprings
- Fast Travel Dataterm: Pumping Station
- Slot: Legs
- Stats: 76.8 Armor, +10 Movement Speed, -5 % Stamina cost for melee attacks (2 slots).

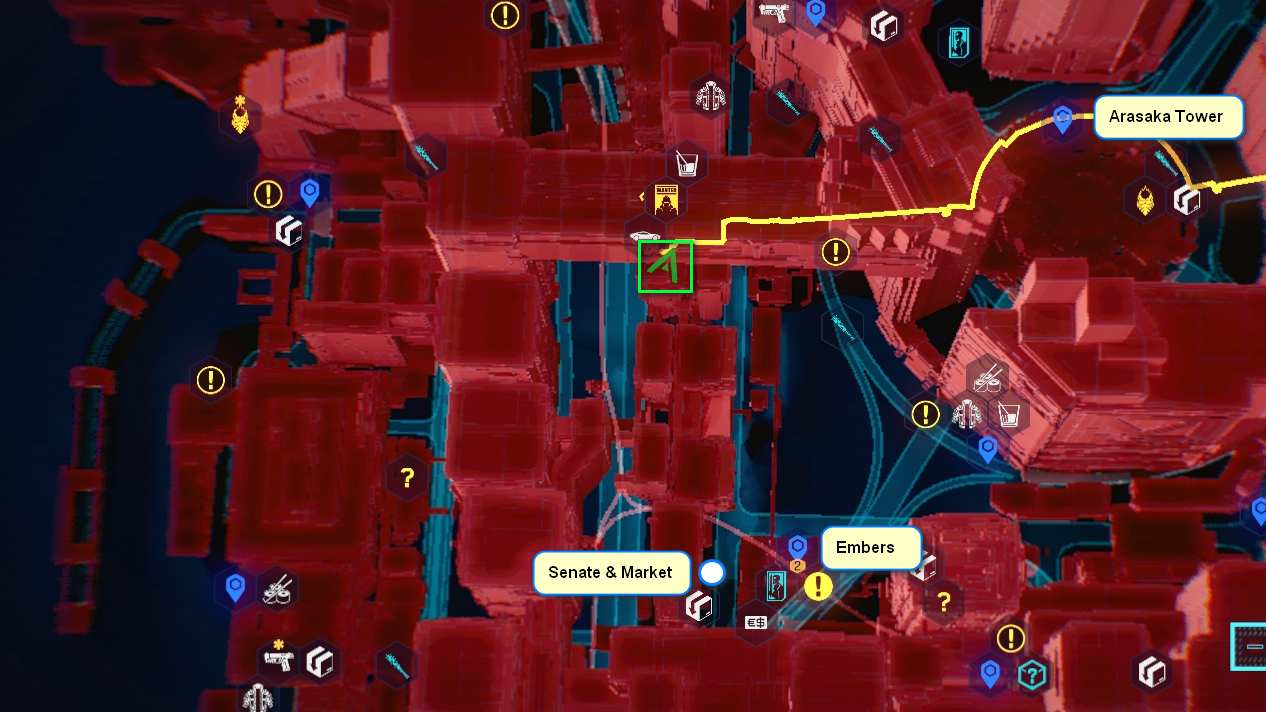
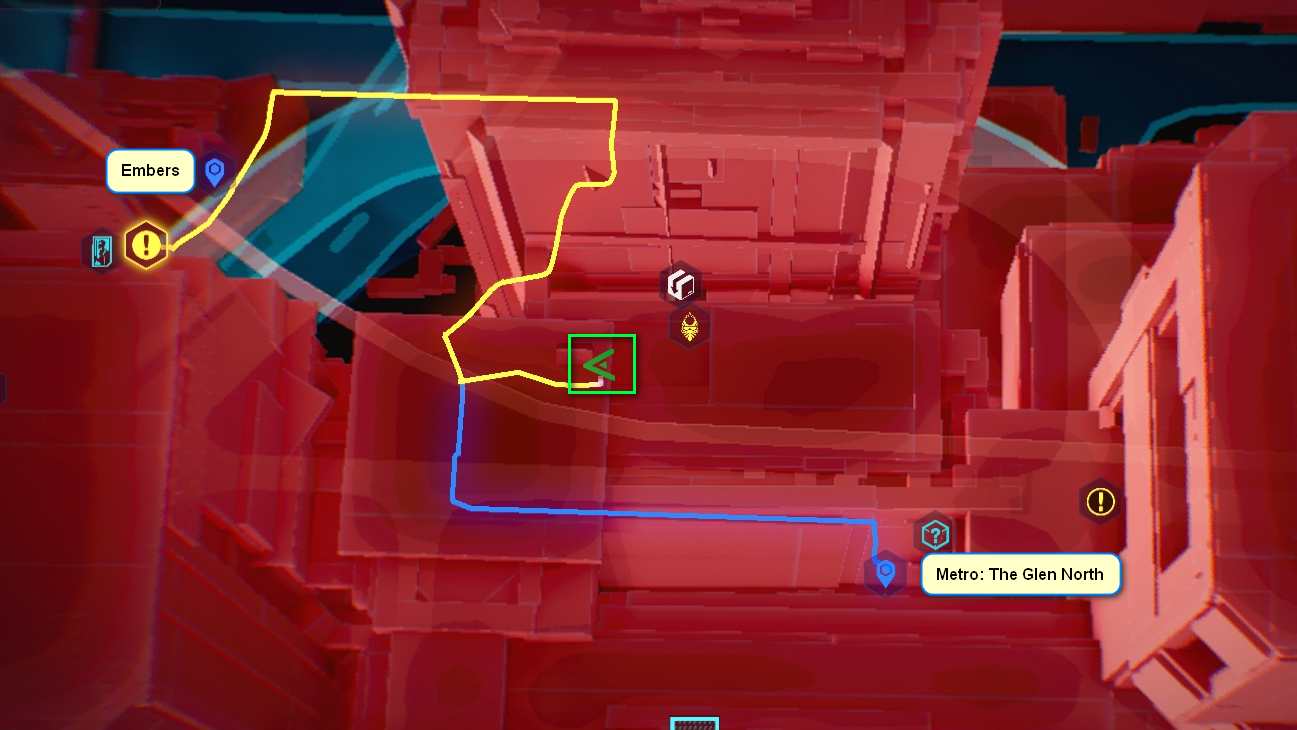
3. Heavy Shock-Absorbent Solo Jacket (Outer Torso)
Open the map when you’re at the Fast Travel Dataterm and mark the Fast Travel Dataterm “Metro: The Glen North” as your next destination. Follow the marked path until you reach a skyscraper with a staircase entrance that is marked “01”. To the right of the building is a side alley with a barred compartment on the left. Go down said alley. The entrance to the compartment is behind three boxes wrapped in dark plastic and can only be opened with Technical Ability 16. Inside the compartment, in the back, lies a corpse wearing the jacket you are looking for.
- Area: Heywood, The Glen
- Fast Travel Dataterm: Embers
- Slot: Upper Body (Outer Torso)
- Stats: 120.6 Armor, + 5 Carrying Capacity, + 0.2 Dodge, -5% Stamina Consumption when blocking melee attacks (4 slots).
4. Titanium Solo Techgogs with Tactical Software
The route marked on the map is not passable because of some roads blocked by concrete blocks or other obstacles, which the game GPS does not register. Instead, follow the road southeast from the Fast Travel Dataterm until you reach the roadblock that leaves room for a motorcycle to pass on the left side. Take the road northeast until you see the dead Solo on the left in front of a metal fence with barbed wire on top.
- Area: Badlands, Biotechnica Flats
- Fast Travel Dataterm: Protein Farm
- Slot: Face
- Stats: 56,9 Armor

5. Ultrathin Composite-Print Solo Shirt (Inner Torso)
Head east from the Fast Travel Dataterm and turn right, and then left at the next opportunity, and then right again until you reach the four-way intersection next to the road triangle. The body you are looking for is located slightly east, off the road, near several visible rocks.
- Area: Eastern Badlands
- Fast Travel Dataterm: Sunshine Motel
- Slot: Upper Body (Inner Torso)
- Stats: 21,3 Armor
Techie
If it weren’t for creative tinkerers who produce or modify technical innovations for the citizens of Night City, some people would probably be quite lost in the hypermodern world. With the pocket-heavy Techie outfit, V is making a clear statement – and you’re getting a practical outfit with useful stats. V needs Technical Ability 5 to open doors at two locations – but this requirement shouldn’t be a problem in the mid-game. So far, the top (Outer Torso) of this set has not been found in the game, although it is present in the game files. We will update this guide as soon as something changes.
- “I hear with the new cyberwear they’re coming up with in Chiba, you’re gonna be able to cram your body with more options than a frackin’ Zetatech aerodyne. Last guy in here, he wanted me to build him a cyberhand that had a built-in… aw, frach, you don’t wanna know. People want the weirdest stuff these days. If you can get parts, I can fix it. Count on it, Chombatto.”
(Mister Ice, Head of Design, Technix Inc.)
1. Cushioned Aramid-Sole Techie Shoes
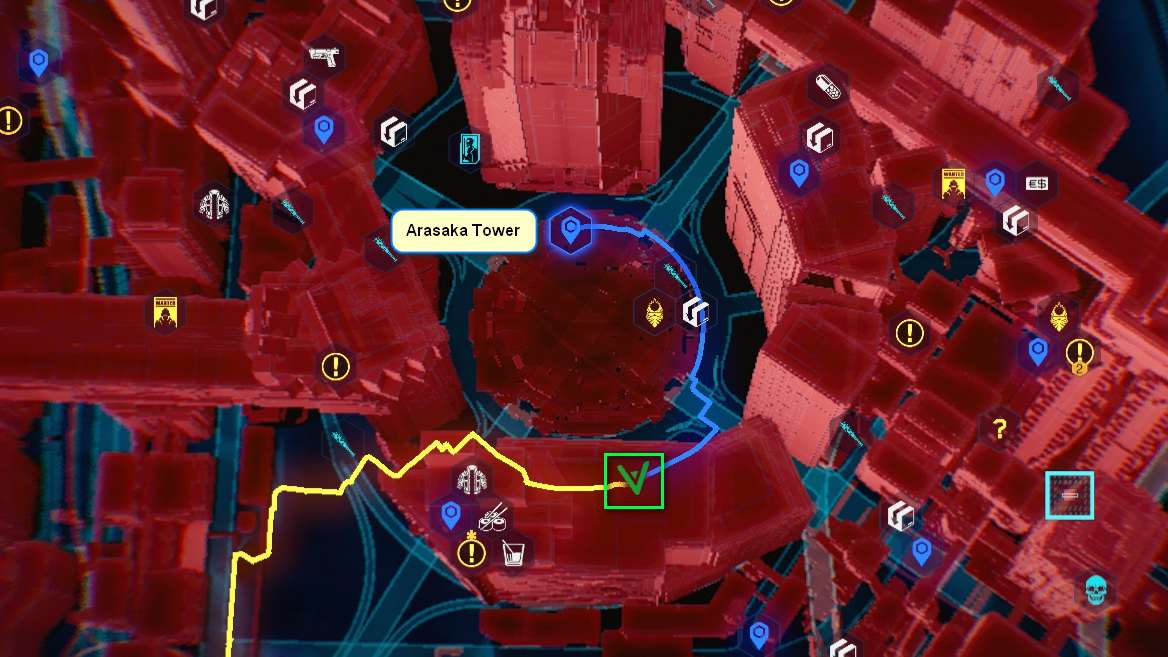
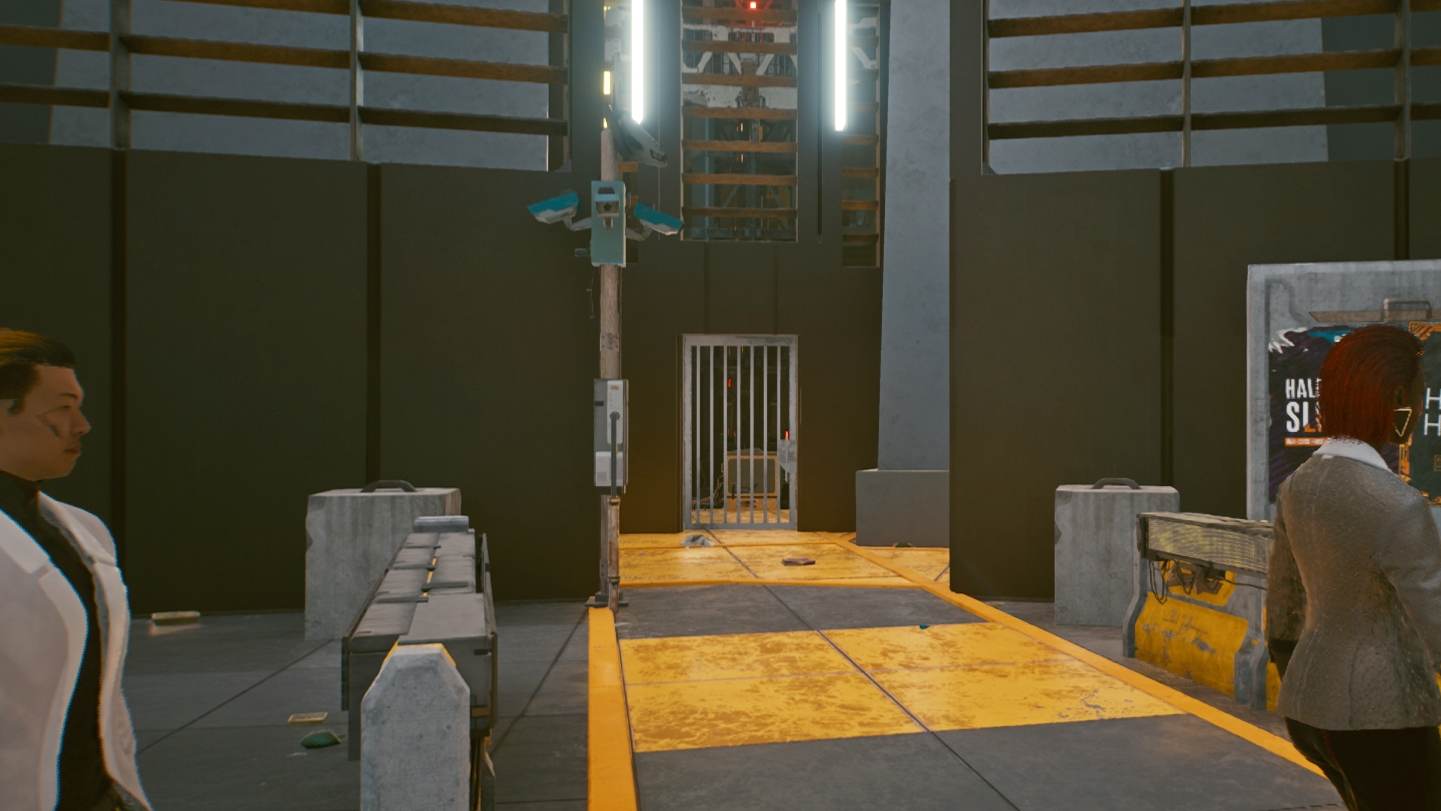
Head down the nearby stairs to the base level – you can recognize them by the traffic circle running right next to the walkway around Arasaka Tower. Go against the traffic flow until you see two passageways in the middle with “Keep Out” markers on the right side. Cross the road at the neon sign on the ground and head towards the opposite building on the right until you reach a barred door. Use Technical Ability 5 to crack open the door to get into the area with the technician’s corpse. You will find the shoes in there.
- Area: City Center, Corpo Plaza
- Fast Travel Dataterm: Arasaka Tower
- Slot: Feet
- Stats: 86,7 Armor (1 Slot)
- Required Minimum Level: 32
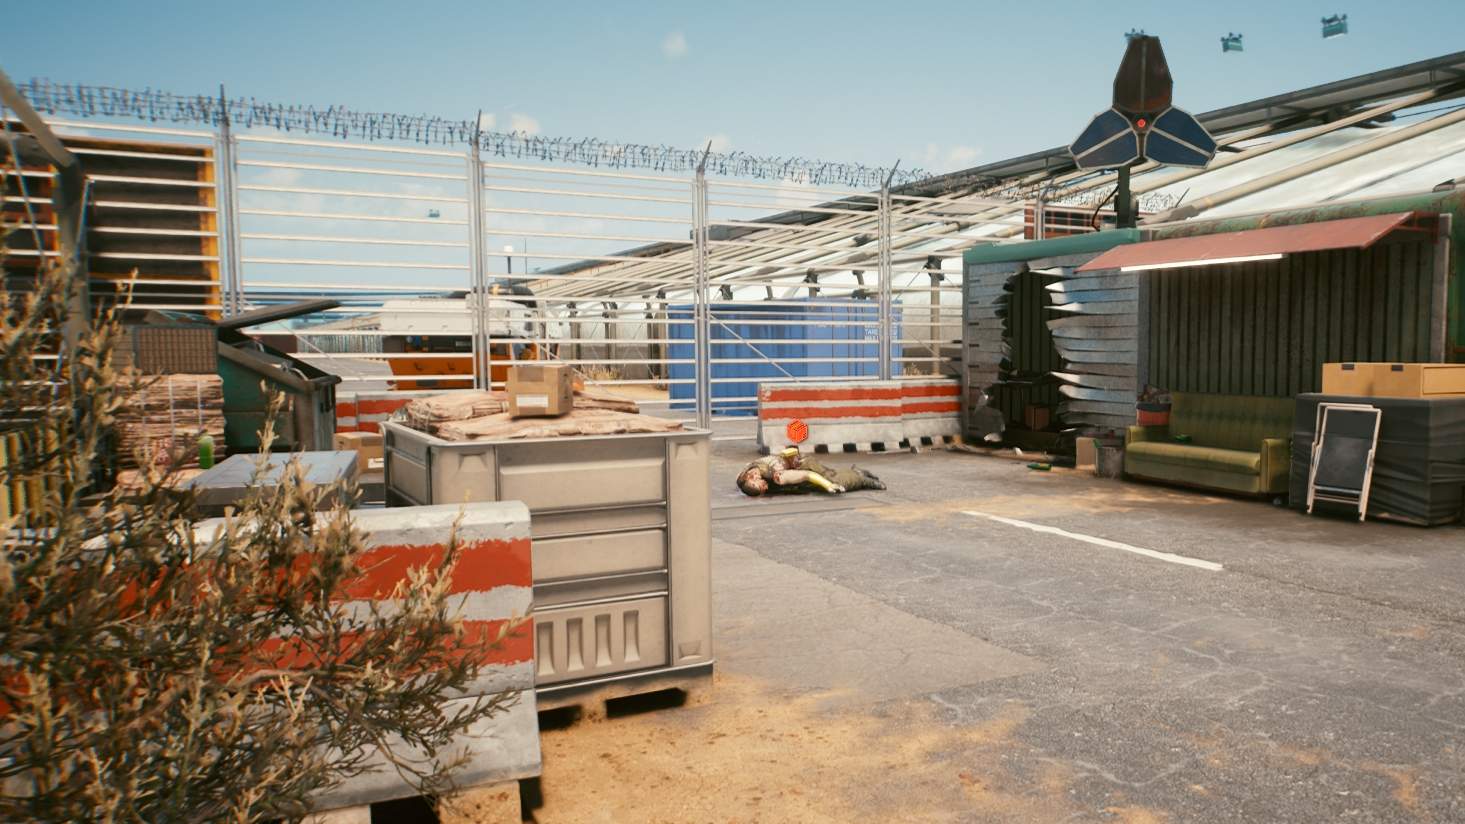
2. Reinforced Duolayer Techie Cargo Pants
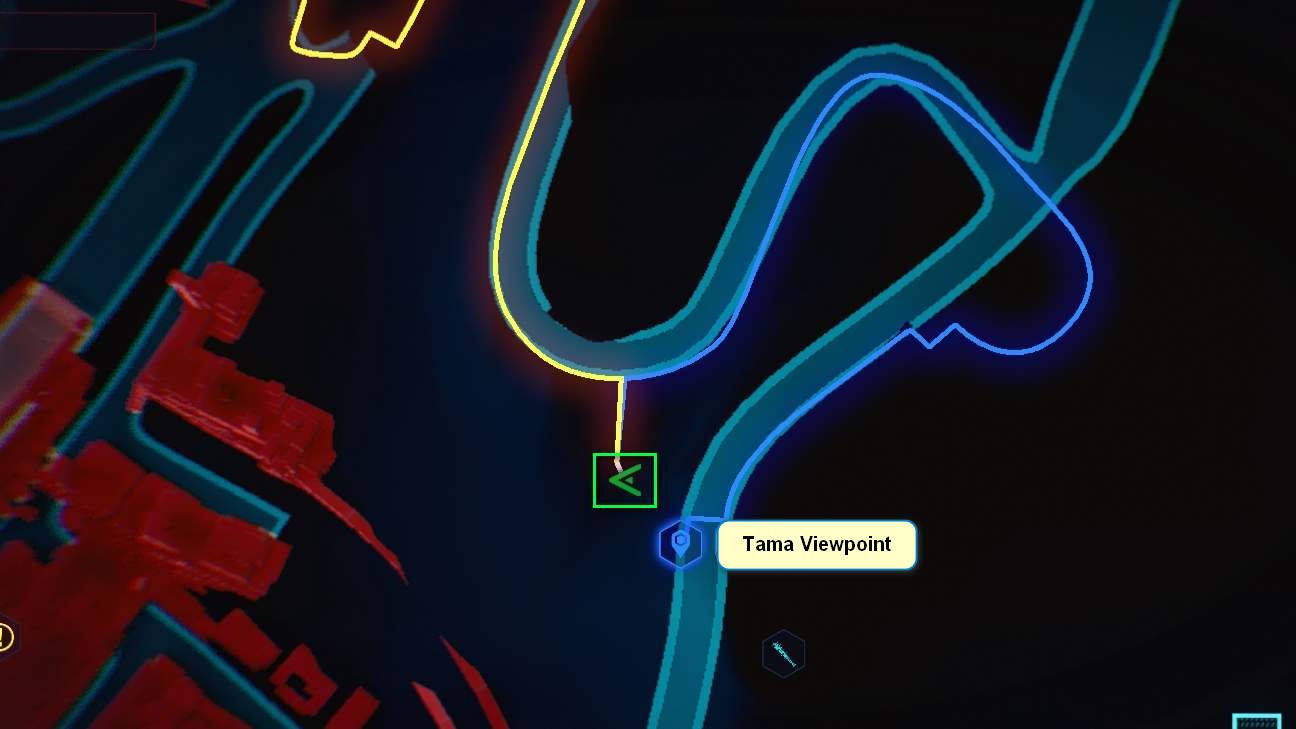
From the Fast Travel Dataterm, follow the road northeast and turn onto the serpentine road towards Night City. At the first turn, there is a parking lot on the left side of the road, with a technician’s corpse near the truck front on the left side of the police checkpoint. Attention: If you get too close to the police checkpoint, you’ll get a wanted star and the unwanted attention of the cops!
- Area: Santo Domingo, Rancho Coronado
- Fast Travel Dataterm: Tama Lookout Point
- Slot: Legs
- Stats: 67.0 Armor, -5 % Fall Damage, + 10 Movement Speed (2 slots)

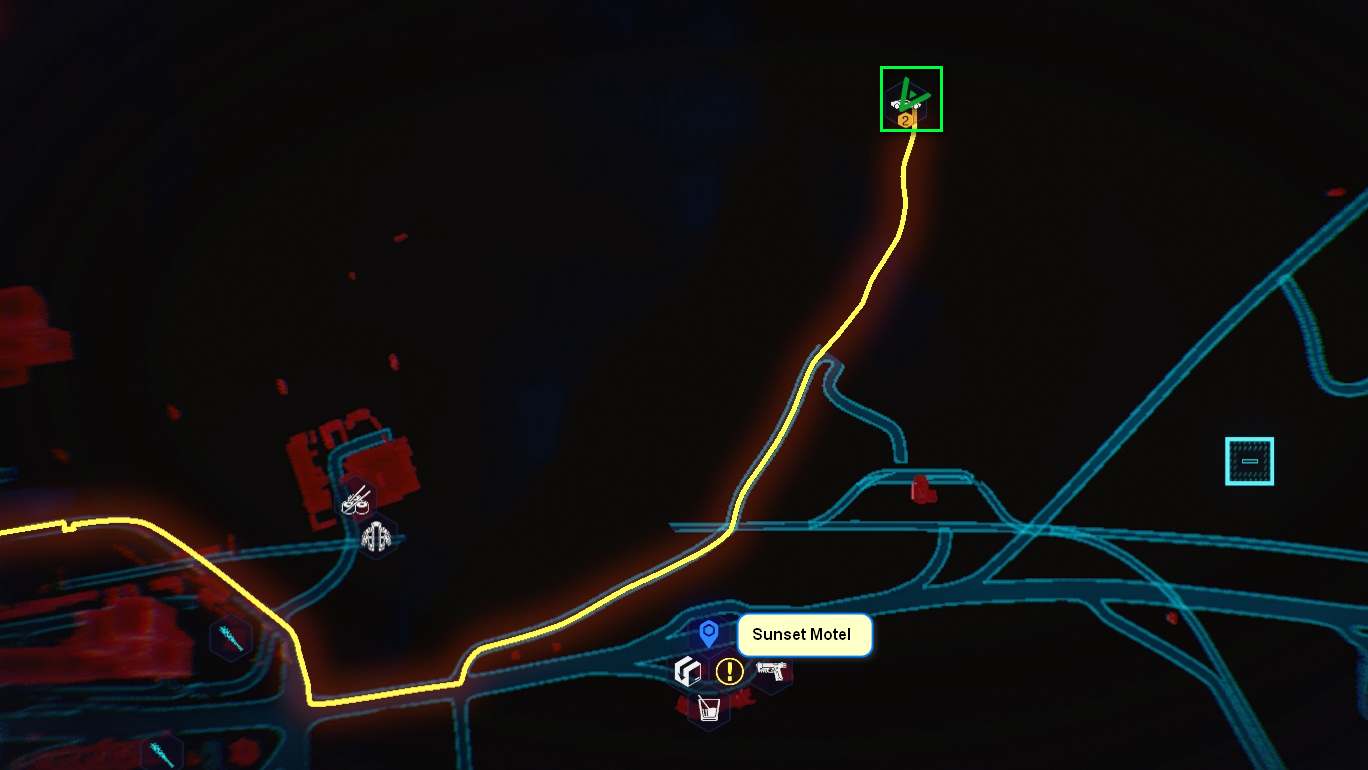
3. Thermoactive tear-resistant Techie shirt
You’ll pick up this piece of clothing after completing the main mission “Ghost Town” in the cave where Panam’s enemy Nash and his supporters hide. Just drive a bit further down the mineshaft from the combat area to an open blue container, which contains the free Rayfield Caliburn vehicle as well as a box with the shirt you’re looking for. If you haven’t assisted Panam in her revenge, take the road from the Fast Travel Dataterm towards the northern mountain and into the mine.
Be careful, motorcyclists: the ground in the mine tunnel has many potholes and poorly lit obstacles – drive slowly!
- Area: Badlands
- Fast Travel Dataterm: Sunset Motel
- Slot: Upper Body (Inner Torso)
- Stats: 13,7 Armor, +5 Carrying Capacity (2 Slots)

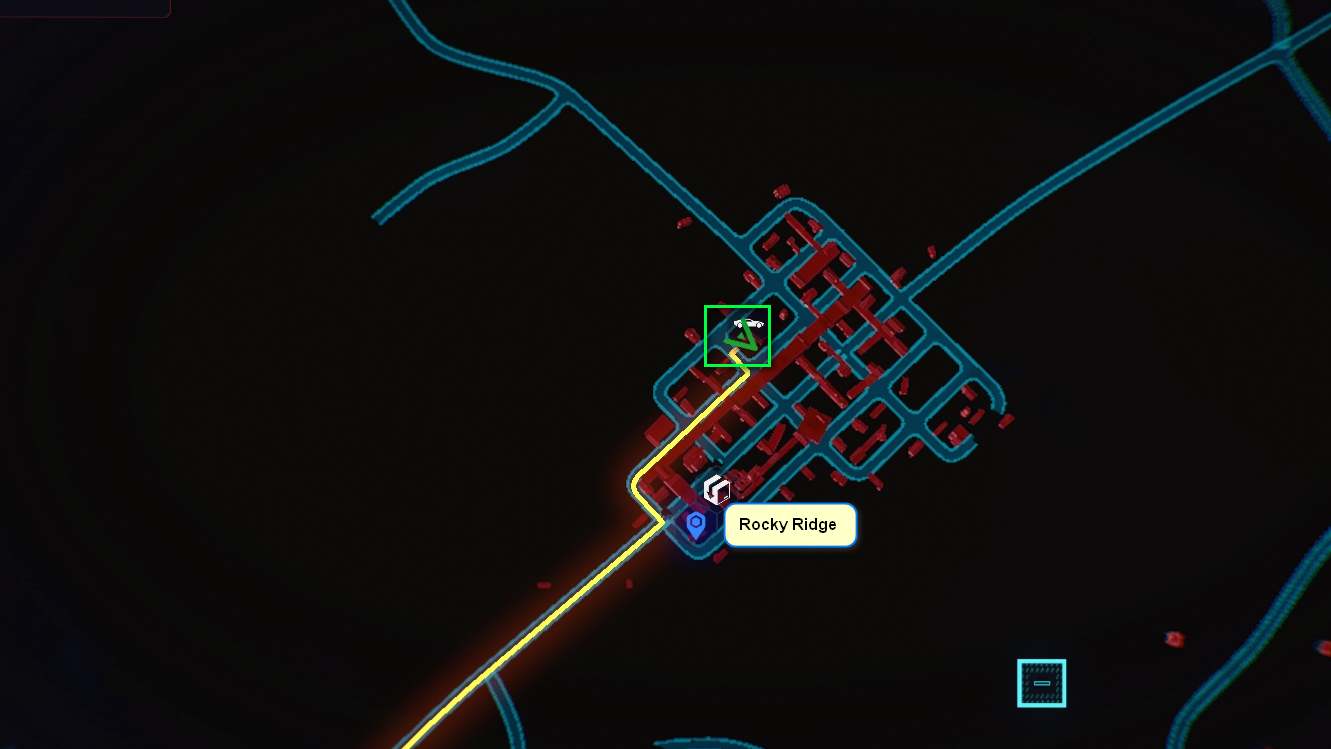
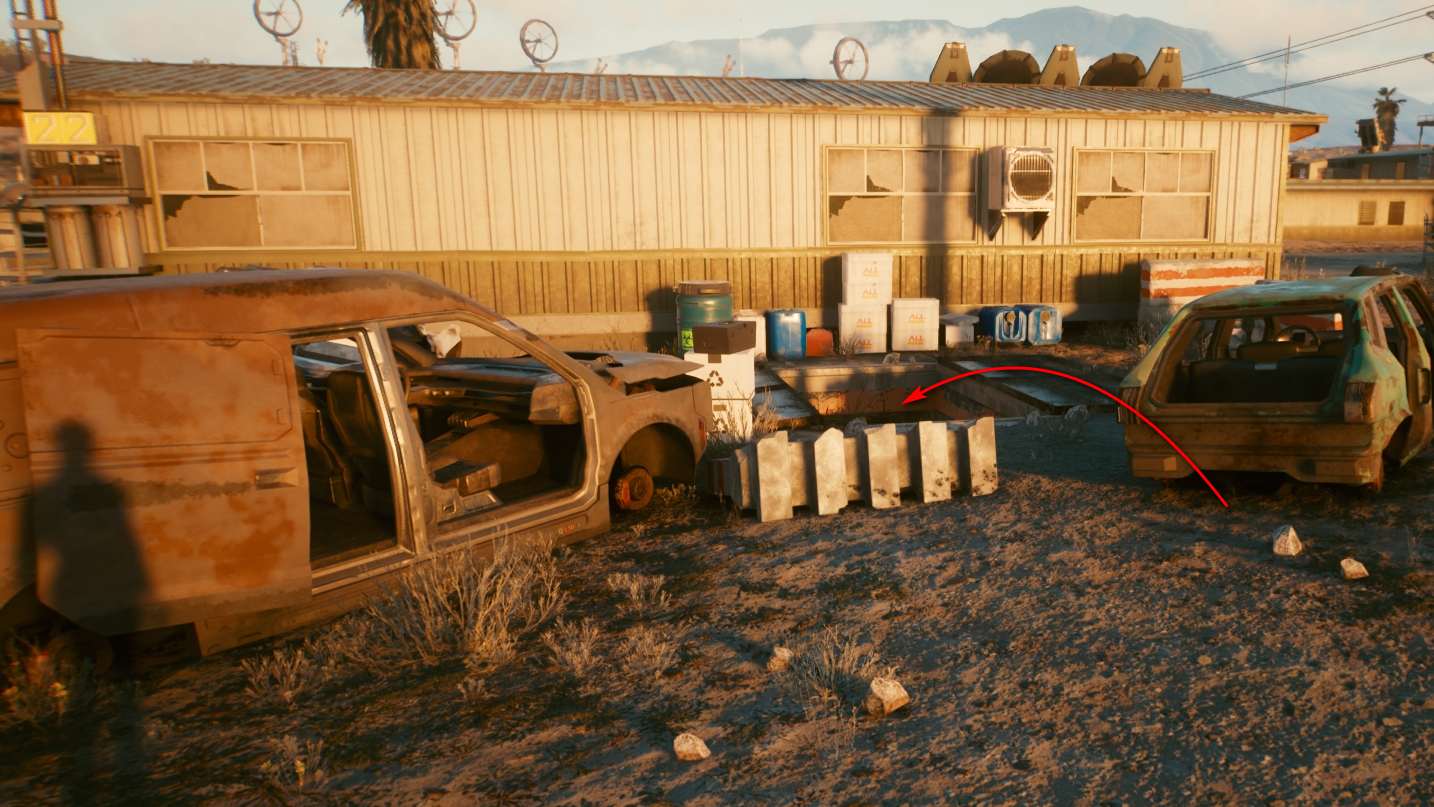
4. Cushioned Techie Baseball Cap
Starting from the Fast Travel Dataterm, go to the center house on the northwest street of Rocky Ridge and look southeast toward the rear of the neighboring house. There is an entrance to a basement between the broken van and the destroyed car. The door can be opened with Technical Ability 5. The baseball cap lies in a box on the workbench inside the bunker.
- Area: Badlands, Rocky Ridge
- Fast Travel Dataterm: Rocky Ridge
- Slot: Head
- Stats: 55,3 Armor (2 Slots)
Cyberpunk 2077 Clothes: The styles of Night City
On the way through Night City, not only a variety of cultural-historical details can be spotted, but also, based on the clothing of the inhabitants, their affiliation to different classes, which are determined by background, income or lifestyle. The four main stylistic influences show up in the attire of the people V has to deal with during various missions and throughout the main story of Cyberpunk 2077.
Read more about the history of Night City in our big Cyberpunk 2077 Timeline.
Kitsch
- First Appearance: after the great stock market crash in 1994 – regains strength as a countermovement to entropy (around 2020-2030)
- Prominent Wearers: Rogue, Tyger Claws gang members, citizens in low-income areas
- Slogan: Style over Substance
It is true that Kitsch (which is a loanword from German) as a clothing style first blossomed before the turn of the millennium in 2000. However, in the aftermath of the Fourth Corporate War, the style presented itself as a more cheerful alternative to the entropy style, which was characterized by hopelessness and the struggle for survival. The spread of braindance technology in particular (and the accompanying attainability of dreams of success, happiness, and adventure) exerted a strong influence on this style: More color, flashier accents, and a focus on Cyberware with helpful add-ons as opposed to pure prosthetics took hold, especially on the street. The inexpensive materials that were used made clothing and Cyberware affordable for many.
Many consider Kitsch to be a stylistic uproar in a time of crisis and states crumbling under the heel of increasingly powerful corporations. Standing out at all costs served as a visible sign of rebellion against conformity and capitalist optimization of human resources. Representatives of the Kitsch style are easily recognizable by their colorful clothing and plastic-clad, no less colorful Cyberware, which they combine with extreme makeup and neon-colored hair.
The flashier, the merrier – the look isn’t as important in any other style as it is in Kitsch. Glow-in-the-dark tattoos, chrome, glittering gold accents on Cyberware, sparkling accessories and screamingly colorful plastic definitely turn authentic members of the style into flashy eye-catchers.

Entropy
The Entropy style emerged during and largely after the Fourth Corporate War, mirroring the impact of poverty and hopelessness among large segments of the population. While many citizens struggled just to survive in a time of relentless technological advancement, there was no time for most people to take care of their own appearance. The widespread, worldwide crisis that resulted from the Fourth Corporate War left much of the population unemployed and homeless. These circumstances are reflected in their often ragged and patched outfits.
Those with Cyberware cannot afford any veneers or embellishments, causing real skin all too often to merge into bare or already tarnishing metal. Cables, mechanical joints, and the like are exposed. Buildings in poor neighborhoods are also an unplanned example of style due to their gray, plain facades and often run-down condition, held together only by habit and several layers of gang graffiti. Representatives of the Entropy style usually live from hand to mouth, trying to get their lives and jobs in order somehow – no matter how.
Neo-Militarism
- First Appearance: during the time of crisis after the Fourth Corporate War (2025-2040)
- Prominent Wearers: Meredith Stout (Militech Corporate), Arthur Jenkins (Arasaka Corporate), corporate employees, citizens around Corpo Plaza (downtown)
- Slogan: Substance over Style
Clear shapes, very subtle accents in silver or gold, strict and dark colors, little gimmickry – their preferred clothing is also matching the no-bullshit attitude of many corporate executives, trying to demand respect and deference from the very first glance. Neo-Militarism developed during the crisis period after the Fourth Corporate War when even the former giants had to struggle hard to get back on their feet again in an unpredictable world. However, large corporations like Militech and Arasaka succeeded in re-establishing themselves as a power factor and influencing politics to their own liking.
This renewed self-confidence is reflected in the cool, elegant clothing style favored not only by members of the executive suite. The hard-working corporate drones from the large open-plan offices also wear them to indicate that they belong to something bigger and more important. The influences from classic officer uniforms, whose body-hugging cuts served as a model above all for formal and business clothing, are also unmistakable. Complemented by the deadly efficiency of the more utilitarian clothing worn by many mercenaries in Night City, Neo-Militarism comes across as more than just a chic style.

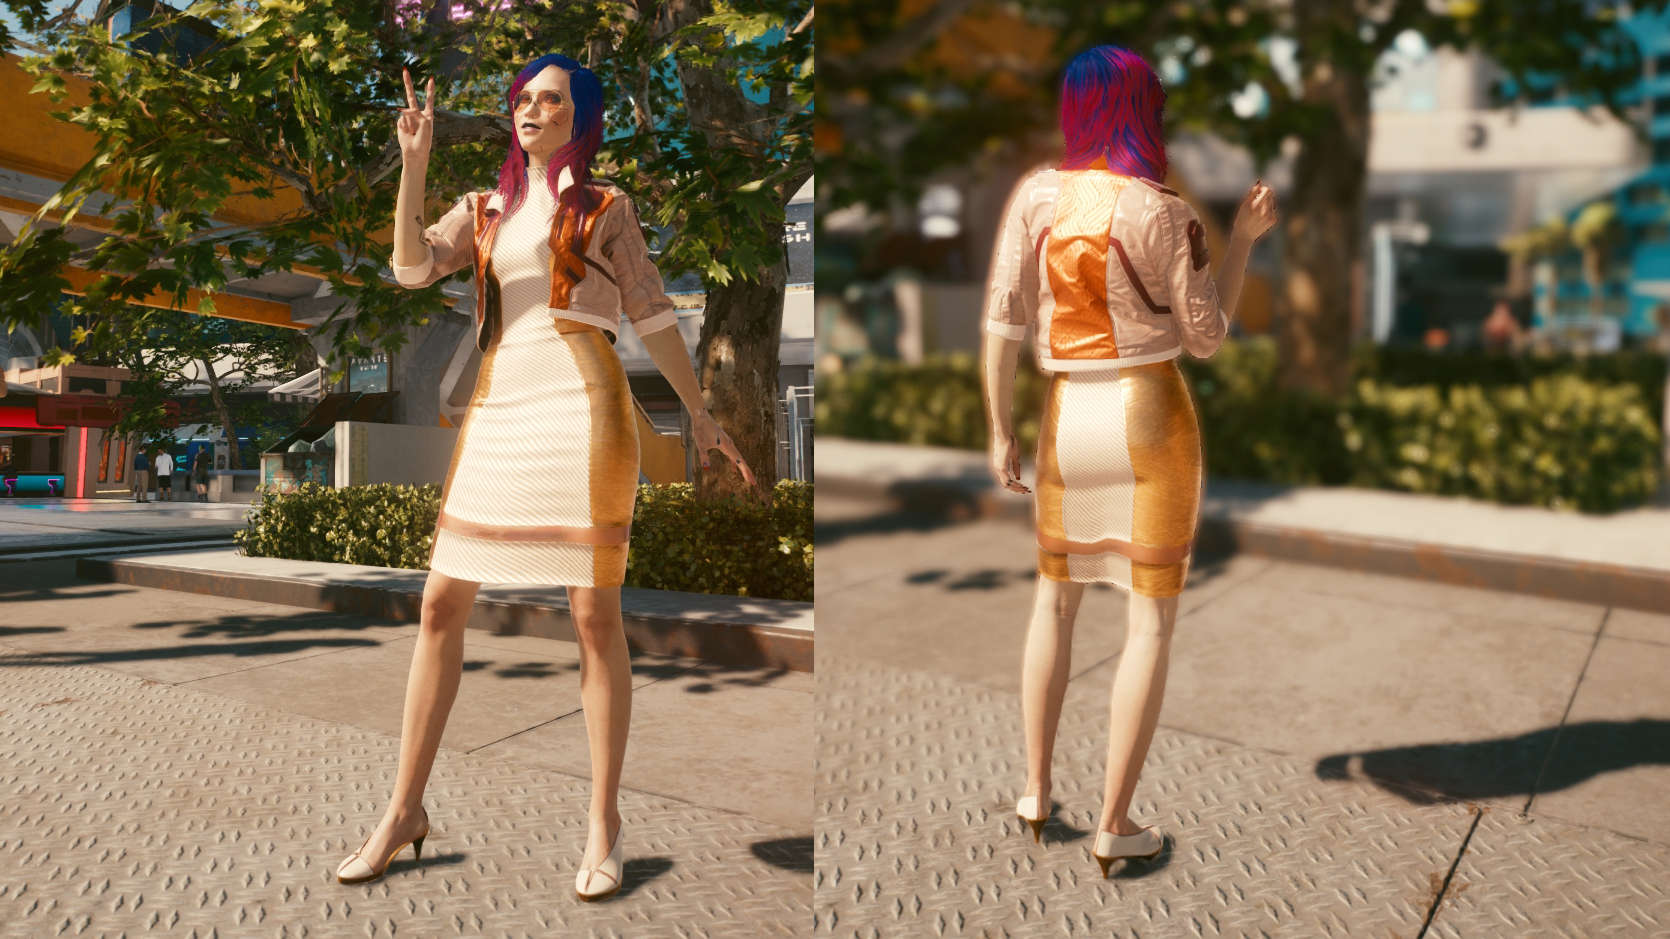
Neo-Kitsch
- First Appearance: after the war between the NUSA and the Free States ended (circa 2070)
- Prominent Wearers: Hanako Arasaka (a member of the Arasaka family), Kerry Eurodyne (musician, ex-singer (guitarist of the band Samurai), Denny (drummer of the band Samurai), braindance stars, celebrities, ultra-rich people
- Slogan: Style and Substance
Neo-Kitsch is the most recent development of all styles in and around Night City and emerged during a time of new stability and restored peace. After the NUSA and the Free States temporarily ended their conflict in a formal peace treaty in 2070, the rise of many stars and celebrities in the entertainment sector began. While the original Kitsch style achieved widespread popularity thanks to low prices and easy access, Neo-Kitsch boasts exclusivity and thus becomes a status symbol for the ultra-rich. Although the color palette used is similar to that of the style’s predecessor, the fabrics used and additional materials such as ivory, furs, and feathers from rare animals, as well as marble and precious woods for furnishings, are simply unaffordable for the vast majority of people.
Leaving behind the cold shapes and colors of Neo-Militarism, fans of Neo-Kitsch prefer warm colors and contrast this with gold and platinum accents applied to the skin directly. With a focus on rare materials and the utmost display of luxury, Neo-Kitsch has another element in common with the original Kitsch: those who embrace this style are living it to the fullest, without caring much about the opinions of others. Of course, in the game’s reality, the voices of ordinary people have no real meaning for those who can afford Neo-Kitsch, simply because of their lack of any real power.
All Cyberpunk 2077 Guides & Articles
- Earning Money – How to get rich
- Skills Guide – All Attributes and Perks Explained
- Hacking Guide – Breach Protocol Mini-Game Solved & Tips for Netrunners
- Weapons Guide – All Weapons, Mods, and Iconic Weapon locations
- Cyberware Guide – All about Cyberware & where to find it
- Clothing Guide – All about clothing, legendary sets & mods
- Cyberpsychos Guide – Locations, Tactics & Attacks
- Vehicles Guide – All Cars, Bikes & Locations
- Trophies Guide – All Achievements & Gamerscore
- Timeline – History of Night City
- Sex – In 146 annotated images