

There is an incredible amount of stuff to find in Resident Evil Village: Goats, Weapon Parts, Files and tons of Treasures!
Our maps will show you where to find all Treasures, Goats of Warding, Lockpicks, Files, Weapons and Weapon Parts — complete with screenshots and detailed instructions. Additionally, we show you the locations of all Wells and Simple Locks, including the loot they yield. We also show you where which animals can be found and when they spawn.
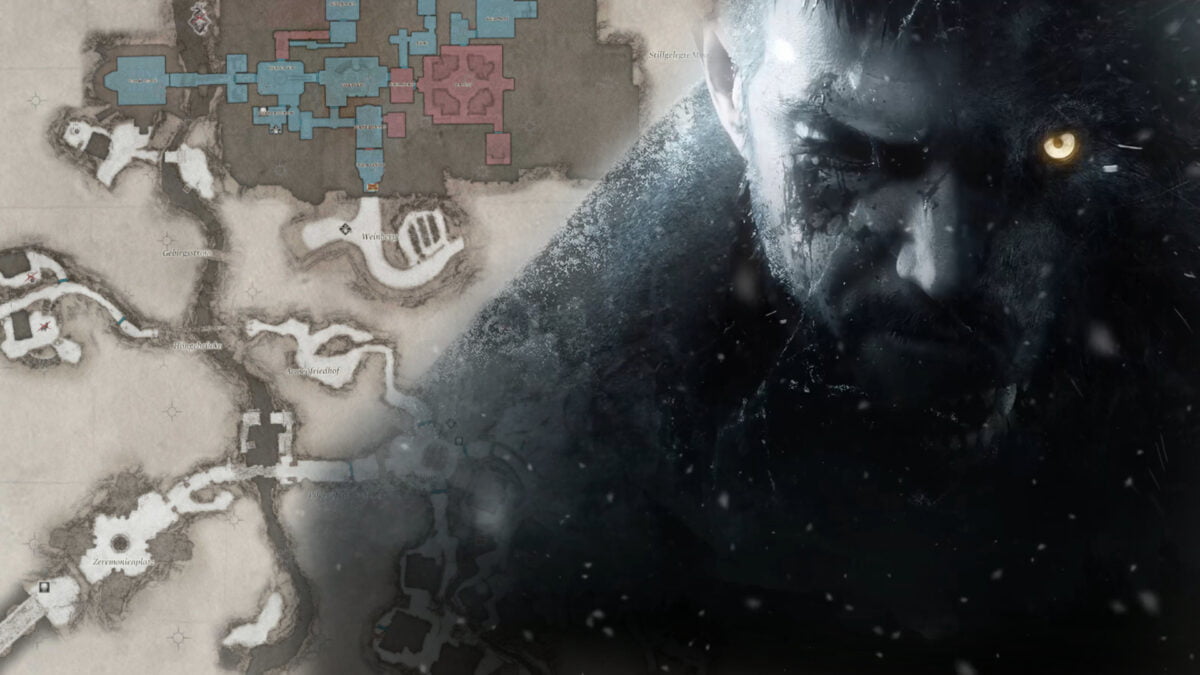
We’ve also marked the locations of all bosses in Resident Evil Village. Click on a boss pin to receive some useful tips for the boss fight.
Notes on the Files
Our map covers the “open-world” part of Resident Evil Village — which is more than 95 percent of the game. However, the prologue takes place in Ethan’s house and doesn’t last longer than 15 minutes at most. In the prologue, you’ll find four of a total of 47 files. This is how you can find the four files in the prologue:
- Fridge Memo: hanging on the fridge in the kitchen (first floor).
- Old News Clipping: on the table with the lamp in the storeroom (upper floor)
- Ethan’s Diary: the laptop in Ethan’s study (upper floor)
- Medical Checkup Report: inside the drawer in the green cupboard to the right of the laptop (upper floor)
Resident Evil Village: Gameplay Tips
Resident Evil Village is not a survival horror game, but a shooter with a horror atmosphere. You get plenty of ammo, don’t have to worry about space since key items don’t take up inventory slots, and you can craft herb mixtures and ammo by using widely available resources.
So, don’t approach the game like a typical Resident Evil, but more like a shooter with lots of collectibles to find. Search all areas for crafting materials and don’t be afraid of combat — on the one hand, there is more than enough ammunition, and on the other hand, enemies are dropping money and treasures. Exploring is worthwhile precisely because of the battles, since you can sell all treasures — and you need the money to upgrade your weapons.
Is an item missing, or is a marker not in the right place? Is something not working properly? Write us an e-mail!
Resident Evil 8 Village: All Locations & Tips on Interactive Maps
All Locations & Positions at a Glance
Below you can find all collectibles, NPCs, bosses and much more on our interactive map as a complete list including descriptions. You can click on each entry and the position will be displayed interactively.
For a quick search for individual locations, we recommend using the search function or the category lists in the interactive map directly.
Global
The chalice is stored inside the grave. You have to insert the "Broken Slab" to open the grave.
A blue bird will show up at the Graveyard after you have cleared Castle Dimitrescu. It is sitting on the tree above the graves.
With this meat you can cook the dish "Tochitura de Pui". (Maximum health increases significantly)
The crypt will open only after you have cleared the Beneviento house. Inside you'll find the "Broken Slab", which you'll have to insert into the large gravestone in the garden of House Beneviento.
The goblet is inside the jewelry box. You will find the key (Luiza's key) in "Luiza's Necklace".
The chickens spawn after you have cleared Castle Dimitrescu.
ATTENTION: You can only pick up the note upon entering the house - after the cutscene in the living room, the house will be no longer accessible for the remainder of the game.
The Exquisite Pig shows up in the backyard of Luiza's Shed after you return from Castle Dimitrescu. Slay it to get the "Quality Meat"
"Quality Meat" is used to cook the dish "Ciorba de Porc". (Damage taken while blocking decreases significantly).
Attention! Spoilers for the end of the game!
These files are located in the catacombs beneath the village - you won't get there until the last 20 to 30 minutes of the game. After fighting your way through the village as Chris Redfield, your teammates will blow a hole in the graveyard. Climb down to enter the catacombs under the village. There is no map for this section - however, the cave is completely linear. So just follow the route.
Follow the path to the stone stairs after the cutscene featuring the Megamycete (the giant fetus). The stairs lead you to Miranda's laboratory (also known as the "Lore Dump Room"). In addition to nasty experiments and vintage photographs, this is where you'll find the last collectible files in the game:
- Dimitrescu's Medical Report
- Donna's Medical Report
- Moreau's Medical Report
- Heisenberg's Medical Report
- Spencer's Letter
- Miranda's Diary
Finest Fish is needed to cook the dish "Sarmale de Peste". (Increases the movement speed)
The catfish show up after you have opened the dam and killed Moreau.
Warning: As soon as you enter the tent, a cutscene will be triggered, and you won't be able to return to the fish cave!
The fish spawn after you have cleared Castle Dimitrescu!
Increases the rate of fire.
The billy goat emerges from its hiding place after you have collected the broken stone slab in the graveyard.
You will find the first Goat of Warding on an altar on the right side of the graveyard in the very center of the village.
(The goat is not visible in the screenshot because Goats of Warding that have already found do not spawn again on subsequent playthroughs.)
This goat stands on the right side between the stone tomb and the fence.
(The goat is not visible in the screenshot because Goats of Warding that have already found do not spawn again on subsequent playthroughs.)
The Goat of Warding resides in an otherwise empty stone cottage on the footbridge by the river.
(The goat is not visible in the screenshot because Goats of Warding that have already found do not spawn again on subsequent playthroughs.)
Attention: You can't return here once you take the elevator to the top!
The goat stands on the roofing over the wood storage.
(The goat is not visible in the screenshot because Goats of Warding that have already found do not spawn again on subsequent playthroughs.)
The goat is standing on the crumbling suspension bridge.
(The goat is not visible in the screenshot because Goats of Warding that have already found do not spawn again on subsequent playthroughs.)
The second goat is standing on the back corner of the church roof. The goat is standing exactly where Ethan is aiming with the pistol.
(The goat is not visible in the screenshot because Goats of Warding that have already found do not spawn again on subsequent playthroughs.)
WARNING: You will not be able to return to the area later, so be sure to destroy the goat now!
The third goat sits on the brick wall - exactly where Ethan is pointing the gun at.
(The goat is not visible in the screenshot because Goats of Warding that have already found do not spawn again on subsequent playthroughs.)
The goat is placed between the firewood and the tree trunks on the windmill terrace.
(The goat is not visible in the screenshot because Goats of Warding that have already found do not spawn again on subsequent playthroughs.)
This goat sits on the altar that has been placed in the stream below the sawmill. (See the little house on the screenshot).
This goat is located in the catacombs under the village - you won't get there until the last 20 to 30 minutes of the game. After fighting your way through the village in the role of Chris Redfield, your teammates will blow a hole in the graveyard. Climb down to get to the catacombs under the village. There is no map for this section - however, the cave is completely linear. So just follow the route.
The goat is placed on a rock in the pond to the right of the Megamycete (The Giant Fetus). When you get there, a cutscene will start playing - after that you can look around freely. Look to your right towards the swamp. There is a statue there. The goat is standing at the feet of the statue.
These goats show up after you have defeated Moreau.
The golden statue is waiting for you on the altar. You will also find two bullets for the Wolfsbane Revolver.
Increases the capacity of the magazine by +5.
Increases capacity of the magazine by +8
The House Beneviento Ball Labyrinth. You need the Sun and Moon Ball.
Reward: Onyx Skull (worth 15000 Lei)
Warning: As soon as you enter the tent, a cutscene is triggered, and you can no longer return to the fish cave!
You will find the body of a wooden doll named Madalina in the shed on the luthier's front yard.
Madalina (Body) can be combined with Madalina (Head).
This is where you first meet the very fat merchant "Duke". You can upgrade your weapons, buy a healing item and a limited amount of ammunition, and also buy certain weapon parts at his shop. Accordingly, these weapon parts are only available at Duke's shops. You also obtain all special items, such as extra weapons, which are only unlocked on the second playthrough from him.
The metallic ball for the Ball Labyrinth in Moreau's Reservoir.
The ball labyrinth of Moreau's Reservoir. You need the Mermaid Ball.
Reward: Chartreuse Skull (worth 20,000 Lei)
Warning! Spoilers for the end of the game!
The Duke will take you back to the altar after you have killed Heisenberg. All paths are now blocked by giant fungal tentacles, and your only option is to take the route to the ceremony site. Squeeze through the gap between the fungal vegetation at the entrance to the ceremony site to begin the final battle against Mother Miranda.
Tips for the fight: Miranda will constantly change her shape during the fight, allowing her to swap between different attack patterns.
Humanoid
She performs melee attacks in this form, but you'll be able to dodge them easily if you keep enough distance. Sometimes she sprouts gigantic megamycete roots to her left and right. At this stage, she ignites a large megamycete mass to cause an explosion. Hide behind the tall roots on her flanks - they'll protect you from the explosion.
She starts flying in this form. Most of the time she'll be throwing burning fungal orbs at you. She forms three orbs which hover above her, which she then lights on fire. Shoot the orbs to burst them. However, her dive attack is dangerous - sometimes she stops at one point in the air and then rushes at you at blazing speed. Dodging only works to a limited extent, especially on the higher difficulty levels, due to the unpredictability of the attack - try to block it instead.
Spider
The spider phase is the most dangerous, because you can hardly dodge her rapid attacks. The pounce attack in particular was the main cause for most of our deaths in this fight. Again, not much helps except blocking when she goes for the pounce attack.
Miranda has no weak spots - but with strong weapons like the Wolfsbane Revolver, you can cancel all of her attacks. If you deal enough damage, Miranda will fly to the ceiling and start charging up a Megamycete Whirlwind. She takes a few seconds to charge the whirlwind up, but you can't dodge it, and it still drains massive amounts of health even when you block. You can cancel this whirlwind by shooting at it with a powerful weapon while it's charging. For this purpose alone, you should always keep some spare ammunition for the grenade launcher and the revolver.
Tips for the fight: Ironically, Moreau has more attacks than Dragon Dimitrescu - despite his pathetic appearance. He will either hit you with his claws or attack you with a ramming attack in close-range. Sometimes he puffs up and spits acid in your direction. His acid blast has a long range, so be sure to move as soon as he starts puffing up.
Sometimes he climbs on the houses and vomits into the sky - the acid rains down on the whole battle area. Hide under one of the roofs marked with yellow tape to avoid the acid.
When you do enough damage, the giant fish becomes stunned and Moreau falls out of the fish's mouth. He is unprotected during this moment - shoot at him with stronger weapons like the grenade launcher to finish him off quickly.
Reward: Crystal Moreau
You can collect this special treasure only after you have visited the Dimitrescu castle!
After you have sent Lady Dimitrescu to the afterlife, a white jewelry box spawns on the stairs of Luiza's burnt house. Inside this jewelry box you will find Luiza's Necklace.
Examine the necklace and remove the "Necklace Stone".
Examine the necklace again to receive the "Luiza's Key". You will need it to unlock the Jewelry Box (Cesare's Goblet) in the ruins near the Lone Road.
The pig can be found in the stable after you have cleared Castle Dimitrescu.
You have to climb up the ladder by the chickens and jump onto the roof of the shed. There you will find a jewelry box next to an unlucky villager. In this jewelry box you will find the "Pigeon Blood Ruby".
The "Pigeon Bloody Ruby" can be combind with the "Necklace with Two Holes"
This lagoon can only be reached after you have opened the dam and killed Moreau.
Warning: You can't return to this area once you have taken the elevator back to the top!
The ball for the House Beneviento Ball Labyrinth. The ball is inside the jewelry box in front of the tombstone under the tree.
The door to the cellar will be opened after you have cleared Castle Dimitrescu.
Tips for the fight: Uriaș Drac attacks you with a huge axe. It does a lot of damage on all difficulty levels above "Normal" - so be sure to keep your distance! Fortunately, he's quite slow and there's plenty of room to dodge in the combat area. Most of the time he swings the axe around furiously, but he also has an assault attack where he raises the axe and runs towards you. In case you don't manage to dodge in time, you can still absorb a lot of damage by blocking. The grenade launcher and pipe bombs are the most useful tools for fighting this creature.
Moroaicăs will climb out of the tombs during the fight. Keep this in mind to avoid getting surprised from behind in the middle of the fight.
Reward: Giant Crystal Axe
Tips for the fight: Just like in the first fight, keep enough distance and don't be afraid to use stronger guns - from this part of the game on, you'll find plenty of ammunition. Make good use of the two red barrels placed in the combat area.
Because there is more space, this Uriaș Drac performs jump attacks more often. He indicates the jump attack with an animation, where he kneels down for a short moment.
He also calls Samcas (the flying mosquito hybrids) for help - take care of the critters as soon as they arrive, because otherwise they will just annoy you in the fight.
Reward: Giant Crystal Axe
This Boss awaits you in the catacombs under the village - you won't get down there until the last 20 to 30 minutes of the game. After fighting your way through the village in the role of Chris Redfield, your teammates will blow a hole in the graveyard. Climb down to enter the catacombs under the village. There is no map for this section - however, the cave is completely linear. Simply follow the path.
Tips for the fight: this enemy is nothing more than a slightly larger version of Uriaș. However, you're controlling Chris Redfield at this point anyway - so you'll have a powerful assault rifle with a lot of ammo at hand, and you'll be able to withstand quite a bit as well. Shoot the giant until your teammate gives you the signal. After that, equip the laser pointer and order an air strike against Uriaș.
Yes, this is not a very challenging boss fight.
Reward: Giant Crystal Mace
Tips for the fight: Put mines on the ground - there is enough space in the area. Lure Alfa to the mines and shoot him with the shotgun when he is briefly thrown to the ground by the explosion. Alfa can withstand much more and does massive damage - especially on "Veteran" and "Village of Shadows" . This means blocking is not useful. Flee to the hut or church instead, to make him retreat to the field. If you have more mines, lay them out again - otherwise just keep firing at him and retreating to the hut every time he races towards you.
Reward: Crystal Ancient Beast
Content: Necklace with Two Holes
The "Necklace with Two Holes" can be combined with the "Pigeon Blood Ruby" and the "Large Pigeon Blood Ruby".
This well is special. Use the well wheel and pull up the ladder. Then
climb down the ladder and solve the small puzzle. The puzzle is about
raising the platforms to the same level. Once you've done that, you can
run across the platforms, hop through the hole and collect the "Large Pigeon Blood Ruby".
"Necklace with Two Holes".
The "Large Pigeon Blood Ruby" can be combined with the "Necklace with Two Holes".
Content: Madalina (Head)
Madalina (Head) Can be combined with Madalina (Body).
The body of the wooden animal is placed on the table next to the exit to the backyard.
"Wooden Animal Body" can be combined with the "Wooden Anima (Head)"
House Beneviento
(The goat is not visible in the screenshot because Goats of Warding that have already found do not spawn again on subsequent playthroughs.)
Heisenberg's Factory
You have to make the ball for the Ball Labyrinth in Heisenberg's factory yourself. Collect the ball mold and head back to the foundry with it. Put the mold into the forge and wait a short moment. You will receive the Iron Horse Ball once the machine is done.
The goat is stuck on the barricade.
(The goat is not visible in the screenshot because Goats of Warding that have already found do not spawn again on subsequent playthroughs.)
(As seen in the screenshot)
(As seen in the screenshot)
The ball labyrinth of Heisenberg's factory. You will need the Iron Horse Ball.
Reward: Bister Skull (worth 30,000 Lei).
Here you will find the following treasures:
- 2 Large Crystals
- 1 Vivianite
- 1 Yellow Quartz
Increases firepower by +200
First you have to tear down the wall with the help of an explosion - a pipe bomb does the trick.
The mechanical part is stored inside the big leather case on the table.
"Mechanical Part (Cylinder)" can be combined with "Mechanical Part (Shaft)"
The shaft is stored inside the large case on the table in the center.
"Mechanical Part (Shaft)" can be combined with "Mechanical Part (Cylinder)".
Heisenberg is angry with Ethan and therefore mutates into a Transformer with biotic abilities - of course, what else did you expect?
Tips for the fight: You get to drive a tank in this fight. It is equipped with a machine gun, a rocket launcher and a chainsaw. The chainsaw is used only to block attacks.
In this fight, you just have to keep shooting and sometimes change your position. His weak points glow in orange - fire at them. Sometimes he makes metal walls hover in the air to protect himself from your machine gun fire. Other times he throws the metal walls in your direction. Shoot Heisenberg with the rocket launcher to make him drop the metal again.
Once you've dealt enough damage, you'll lose your tank and have to face him with standard weapons once again. Keep shooting at the weak points on the arms. After a few shots from the grenade launcher or another similarly powerful weapon, Heisenberg will simply explode.
Reward: Crystal Heisenberg
Content: 1 Yellow Quartz
Content: 3 Magnum Rounds
Tips for the fight: Sturm has only two basic attacks. Either he runs towards you at a moderate speed or charges up and races towards you. Always keep moving, as he is only stunned briefly when he hits a wall.
He has a glowing generator on his back - this is the only point where you can hurt him. Wait until he runs at you, dodge his attack, and then shoot his back with everything you have.
Sturm overheats after a certain amount of damage and starts to glow. In this state, he swirls waves of fire around the room. He stops for a moment before he does so and emits a loud charging sound. It's best to hide behind a wall when you hear it. Shoot the weak spot on his back whenever you can during this phase as well.
It will cool down and heat up again several times during the fight. So just repeat the procedure until he explodes.
Reward: Complex Mechanical Heart
Heisenberg's Stronghold
This tunnel is filled with gigantic diamonds & crystals. You can't take the big chunks, but you can pick up the smaller crystals.
The following treasures can be found in this tunnel:
- 4 Crystal Fragments (stuck on the giant diamond).
- 1 Viviante (stuck on the ceiling)
- 1 Large Crystal (stuck on a square diamond)
- 1 Yellow Quartz (stuck on a giant diamond)
The Goat of Warding is standing right next to the buckets.
(The goat is not visible in the screenshot because Goats of Warding
that have already found do not spawn again on subsequent playthroughs.)
Tips for the fight: The battle area is quite narrow - therefore it is even more important to keep a distance of several meters between you and him. He will lash out with his hammer and constantly move towards you. Sometimes he will also launch a jump attack - you can recognize this because he will drop to his knees for a short moment before jumping.
Once you've inflicted enough damage on him, Uriaș will call in a few Lycans. Other than that, though, he's not a particularly difficult boss. His attack patterns are similar to those of the optional Uriaș Drac bosses. Just keep moving and shooting at his oversized head with everything you've got.
Reward: Crystal Hammer
Castle Dimitrescu
The Azure Eye lies inside a large coffin, but it is blocked by a grid. You have to solve a very easy puzzle to get it:
Destroy the wall on the left side and then set one of the bowls on fire by pushing it against the torch - this works with a pistol as well as with a knife. Meanwhile, Moroaice keep spawning in the room. Lure a Moroaică into one of the burning bowls. Afterwards, lure the burning Moroaică to the second bowl to set it on fire. Voilà, the "puzzle" is solved!
The "Azure Eye" can be combined with the "Silver Ring"
Tips for the fight: shoot at the windows to stun Bela with the cold wind. Keep enough distance to her so that you can block or dodge in time. On the "Easy" and "Normal" difficulty levels, Bela can be easily killed with a pistol - on the "Veteran" and "Village of Shadows" difficulty levels, the shotgun works wonders.
Tips for the fight: Keep enough distance so that you can dodge or block her attacks quickly. However, Cassandra is a lot easier to fight than the first and third daughters.
There is a golden lever on one of the wooden pillars in the middle of the library. Pull it to open the skylight and let cold air flow into the room. Cassandra will be stunned for a short time. After that, she runs a few rounds around the shelves until the skylight closes automatically. Repeat the process a few times.
The last crystallized torso. This time Daniela has to die - the last daughter of Lady Dimitrescu.
Tips for the fight: Collect the pipe bombs on the table, and then move the cabinet with the yellow tape away from the hole in the wall. After that, throw a pipe bomb at the wall.
Cold air will enter the armory after the bomb explodes, and Daniela will become vulnerable at last. Since this fight takes place in a very confined space, we advise you to go straight for the shotgun. Don't be afraid to use more pipe bombs either - you'll find plenty of them later on.
The metallic ball for the Castle Dimitrescu Ball Labyrinth. It's placed in the open case.
By the way, the parasites in the illustrations have nothing to do with the Las Plagas from Resident Evil 4 - they only happen to look similar.
This goat is standing on the crate behind the stairs. You will hear it as soon as you climb up the ladder.
(The goat is not visible in the screenshot because Goats of Warding that have already found do not spawn again on subsequent playthroughs.)You can hardly miss this goat - it stands right between the burning candles, to the left of the toppled chair.
(The goat is not visible in the screenshot because Goats of Warding that
have already found do not spawn again on subsequent playthroughs.)
You need this key to enter the library on the 1st floor. However, you can use this key to unlock a lot of optional doors - both in Castle Dimitrescu and in the village.
Warning: You can't return to the castle once you've left it! So open all the iron gates before you insert the masks in the "Hall of the Four".
The ball labyrinth of Castle Dimitrescu. You will need the Flower Swords Ball.
Reward: Crimson Skull (worth 8000 Lei)
Attention: the doors to Dimitrescu's bathroom will only open after you have escaped Lady Dimitrescu on the 2nd basement floor. After that, go back to her chambers on the second floor. The doors to the bathroom are now unlocked.
Tips for the fight: Alcina has turned into a dragon - but she can't spit fire or acid, at least. The fight is staged in a cool way, but the gameplay is quite simple. Lady Dimitrescu grows out of the dragon's back - concentrate your fire on her at all times. Don't waste ammo on the dragon itself. The dragon has two main attacks. It will either try to ram you - before that it will light up red - or it will release a swarm of flesh-eating flies. Hide in one of the lookout towers at the corners when she releases the flies. Although they are technically open, the flies can't get inside.
After you have fired enough lead at her, you will see a cutscene where Ethan is dragged to the upper tower. All you have to do now is shooting Lady Dimitrescu until she suffers a gruesome death.
Reward: Crystal Dimitrescu
The recoil compensator for the LEMI pistol lies inside the silver case.
Increases the firepower by +30
The Silver Ring is stored inside the wooden drawer.
The "Silver Ring" can be combined with the "Azure Eye".
Content: Wooden Angel Statue
Content: 6 Sniper Rifle Bullets
S4G Premium: Support us!
Such an interactive map consumes a lot of (free) time and money. Please sign up for a subscription if you like our work. This will allow you to use the map in full-screen mode, and you will also get ad-free access to the whole website. You will also have access to premium articles.
In the future, we plan to allow you to create your own personal markers and notes on the maps.