Where are the best spots for mining? How does FPS mining work? Which resources bring profit? How do mining heads and mining consumables work? Our tips & tricks will definitely help you.
Note (18.12.2020): This guide is currently being updated for 3.12.
In this article we answer the following questions:
- What do I have to consider with FPS mining?
- How do I handle the mining spaceship MISC Prospector perfectly?
- Which mining heads are worth it?
- Which mining consumables should I take with me?
- How do I successfully operate with the Argo MOLE?
- Which spots in the universe are particularly lucrative?
- How can I distinguish good from bad resource deposits?
- Which materials are particularly worthwhile and how do I handle Quantainium??
- How does asteroid mining work?
- What will the future of the mining profession be like in Star Citizen?
- Which production chains should be possible in Star Citizen?
In this guide we will introduce you to mining in detail and show you how to become a professional miner – in a spaceship and on foot. We will also explain what is planned for mining and what an extensive production chains could look like in Star Citizen in the future.
If you don’t feel like details, here is a short summary for you.
Attention: Star Citizen is still in its alpha phase. Changes are normal with every patch. Therefore, data in this guide may sometimes differ from practice. We try to incorporate changes immediately and keep the guide up to date at all times, but if you notice significant differences, please let us know on Discord.
Header text
Header text
Dec 18, 2020 – Update for Star Citizen 3.12
- general updates
- Adjustments because of new refinery mechanics
- Prices adjusted everywhere as far asknown to me
- Updates in the following sections:
- Short Guide
- Mining Spots
- Resources that require a spaceship – Raw material and Ore prices separated
- Refining raw materials & selling ores – incl. Refinery positions
- Mining Lasers / Mining Heads Overview – all data adjusted, as far as known to me
- Mining Consumables Overview – all data adjusted, as far as known to me
still to come:
- Chart with refinery specializations per material
- Chart with refinement methods
- List of Trading-Terminals, where you can sell refined Ore
General Performance and Mining
Star Citizen is still in the alpha phase. Update 3.11 plays well, but still has lots of bugs. Our guide to performance in Star Citizen shows how you can squeeze out some more FPS, if necessary.
Short guide: How do I get rich quickly with mining?
How much you earn depends on what resources you find. But a considerable part also depends on skills and strategy.
- Buy the Greycat Pyro RYT Multitool, the Ore Bit Mining-Attachement and a MacFlex Arms Orange “Rucksack” Core.
- Search for caves on a planet or moon and use the multitool to mine gems, preferably Hadanite.
- Alternatively, you can search for gemstone deposits for FPS mining in the Aaron Halo Asteroid Belt. Those deposits can be found by scanning asteroids.
- Sell the stuff and repeat this until you can afford to rent a Prospector.
- Alternatively, you can do delivery missions with a small cargo ship, for example the Avenger Titan, until you have collected the money.
- Rent a MISC Prospector (e.g. in Loreville at Vantage Rentals or at the Refineries) for 3 days. Costs: 135,253 aUEC. Please note that no other mining heads, consumables or weapons can be attached to rented spaceships.
- Fly to the Aaron Halo Asteroid Belt.
- Use Prospector in mining mode (key “M”) to mine all resource depots with a maximum resistance of 0.25.
- Refine the raw materials at a Refinery and sell the Ore.
- Continue mining until you have saved 172,000 aUEC.
- Buy the vehicle Greycat ROC (for example at New Deal in Lorville).
- Fly to a moon of your choice (for extremely cold or hot places you might need another space suit, like Novikov or Pembroke), preferably to a Mining Outpost.
- Summon the ROC at the vehicle terminal and go gemstone farming, preferably Hadanite.
- Sell the stuff at the trading console of the Mining Outpost.
- Do this until you have saved 2,066,075 aUEC.
- Buy the Prospector (e.g. from New Deal, Lorville – 2,061,000 aUEC) and a Hofstede S1 Mining Laser (Tammany and Sons, Lorville or Refineries – 6,375 aUEC)
- At the Aaron Halo Belt mine resource depots with a maximum resistance of 0.40.
- Refine the raw materials at a Refinery and sell the Ore.
- Keep mining until you have saved 54.000 aUEC.
- Buy a Helix 1 Mining Laser.
Now you can go ahead and take full advantage of rich and valuable resources like Quantainium and by following the detailed tips in this guide you can earn a lot of money, for example for an Argo MOLE.
Requirements for Mining in Star Citizen
What do I need for FPS mining?
Small resource deposits in caves can be extracted with the Pyro RYT Multitool. For this you also need the right attachment, an Ore Bit Mining-Attachement.
A few gems will fit into your standard inventory, but not a lot. Therefore I recommend to buy the MacFlex Arms Orange “Rucksack” Core. You get the equipment for example at Tammany and Sons in Loreville (Hurston) or in the Mining Support Centers of Refineries. This increases your inventory significantly, which means longer mining trips and more profit. However, for particularly cold or hot environments you should choose the Novikov or Pembroke suit.
You should definitely invest in the following for FPS or hand mining:
| Description | Price in aUEC | Location |
|---|---|---|
| Greycat Pyro RYT Multitool | 425 | Tammany and Sons, Lorville; Rafineries |
| Ore Bit Mining-Attachement | 340 | Tammany and Sons, Lorville: Rafineries |
| MacFlex Arms Orange “Rucksack” Core | 3,100 | Tammany and Sons, Lorville; Rafineries |
| Novikov Armor | – | – , Port Tressler, microTech; Rafineries |
| Pembroke Armor | 5,165 | Tammany and Sons, Lorville; Rafineries |
You can also take so-called QuikFlares (25 aUEC each) with you to mark your way in labyrinthine caves and find your way out more quickly.
Which spaceships and Vehicles can be used for Mining in Star Citizen?
Mining vehicle for one player: Greycat ROC
The Greycat ROC is a mining vehicle for surfaces of moons or planets. It can break up large deposits of gemstones and absorb the resources. The ROC can be bought in-game for 172.000 aUEC in Lorville (New Deal). At the Plegde Store the vehicle costs 63,80 Dollars.
The Greycat ROC can be summoned at outposts with landing pads. Alternatively, you can transport it with larger cargo ships, such as the Cuttlass, Freelancer or Mercury Starrunner.
Mining ship for one player: MISC Prospector
The MISC Prospector is a one-seater mining ship.
The Prospector can currently be purchased for 185 $ on the official website of developer Cloud Imperium Games (CIG). But you can also earn it in the game: In Lorville and Levski the Prospector is for sale for 2.061.000 aUEC. Rental for one, three or 30 days is also possible, for example at Vantage Rentals in Lorville.
Mining ship for three players: ARGO Mole
The ARGO Mole is a multi-crew mining ship operated by three crew members with three independent mining turrets. With 96 SCU it also has three times the loading capacity of the Prospector.
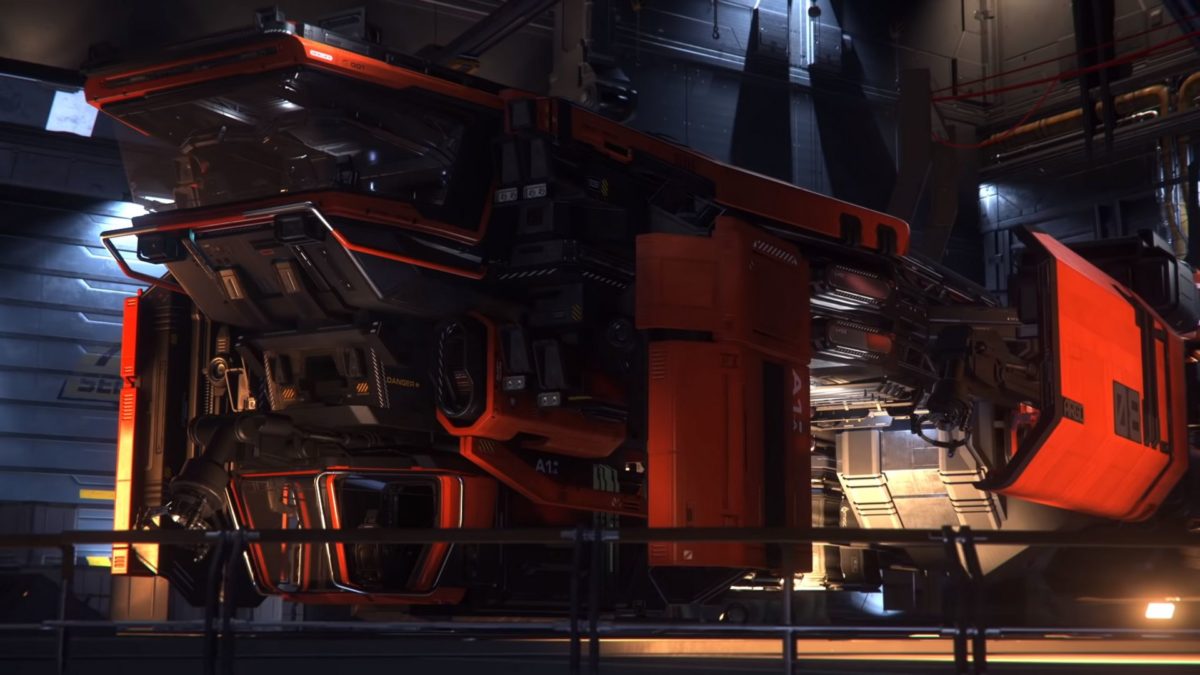
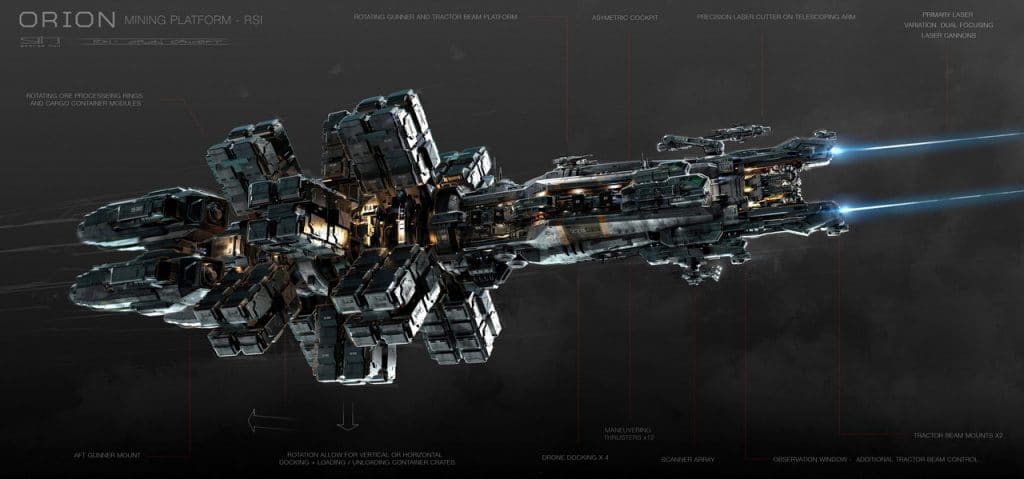
Mining platform for four to seven players: Orion
The Orion mining platform comes into the game later. We have summarized all information about it later in this article.
Mining in Star Citizen: Finding the best Resources
How and where can I find mineable rocks / resources?
Surface scan with a spaceship
Resources can be found in rocks on moons, in caves or on asteroids. Once we reach the surface, we switch to scanning mode with the TAB-button. Keep the left mouse button pressed to fully charge the scan (at level 1x) and release the button to trigger the ping.
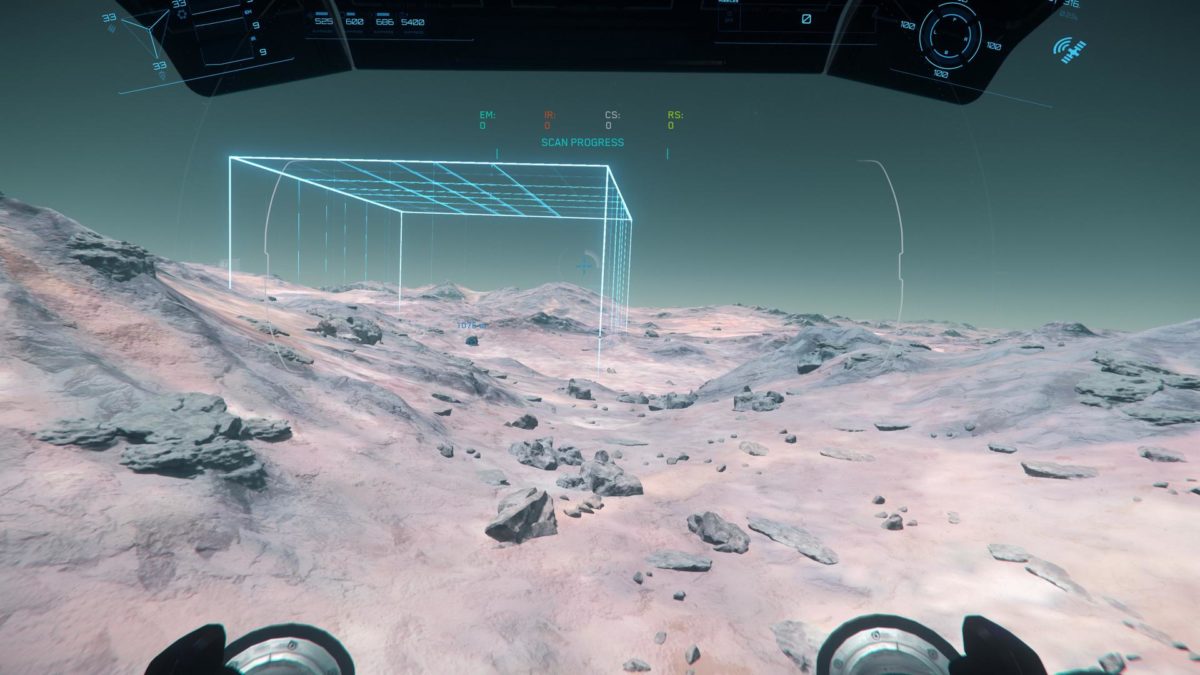
Potential mining resources are indicated by large cuboid grids as in the screenshot above.
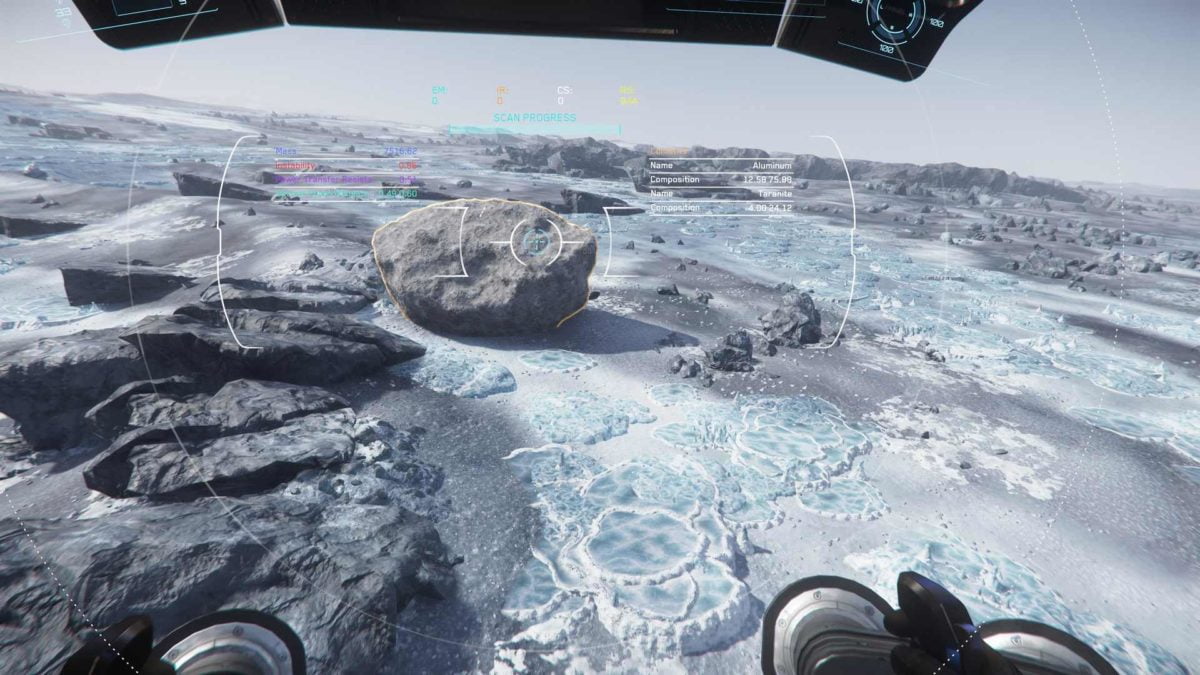
Fly into such an area and repeat the scan to find resource deposits. Use the “C” and “V” buttons to change the scan radius to 2x or even 4x. This reduces the radius, but increases the accuracy and displays more resource deposits. You can also visually search for mineable rocks, as they have their own texture. You can see an example in the following screenshot.
Finding gemstone deposits for FPS mining
First – and despite the risk of player killers lurking there – you should search for caves and mine gems with the Multitool. I’ll explain how this works in the section Mining guide on foot: This is how FPS or hand mining works.
Where do I find caves?
There are a few marked caves that can be found via the StarMap in the mobiGlas or via the “B” key in the orbit of a planet / moon.
| Planet / Moon | Marked Cave | Unmarked Caves |
|---|---|---|
| Hurston | HDMO-Calthrope | 4 |
| microTech | 5 | |
| Aberdeen | HDMO-Dobbs | 4 |
| Calliope | 5 | |
| Clio | 5 | |
| Daymar | Kudre Ore Mine (Closed) | 4 |
| Euterpe | 5 |
Other caves are difficult to find because they are not marked. There are currently these known ways to find unmarked caves:
- Very complicated and hardly promising: Fly with a spaceship over moons and planets and find with zoom or on sight the rock formations which mark the cave entrance.
- Simple: In the orbit of the planets or moons accept the investigation missions (Looking for Missing Persons) in your mobiGlas, they lead directly into caves.
How do I identify gemstone deposits?
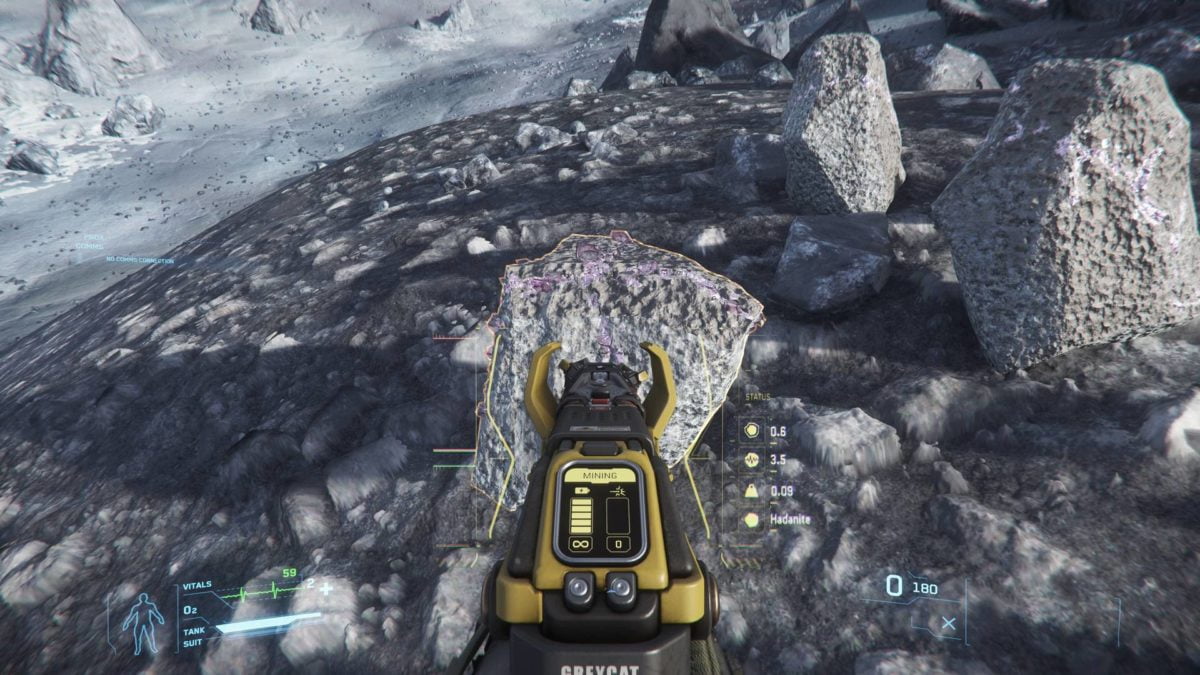
Resource depots for Hadanite, Aphorite and Dolivine have a colored grain, veins run through the stone and pieces of gemstone stick out. Veins from Hadanite deposits are pink to light purple, Aphorite is purple and Dolivine is green. But Hadanite and Aphorite can hardly be distinguished in the game, so you have to scan them with your multitool (more about this below).
What are the risks of caves?
Currently, caves are often populated by trigger-happy player killers. So it’s possible that your mining tour will be quickly terminated by sneaky criminals. Make sure to bring friends with you as escorts.
Mining Resources in Star Citizen: Mining Spots and Mineral Prices
Where can I find the best mining locations / mining spots?
Mining in the Aaron Halo Astroid Belt – How to find it
The asteroid belt Aaron Halo is not visible on the map in mobiGlas. There are also none of the iconic gateways there that we could jump to. According to CIG, they won’t come until the rest of Stanton is built.
The Aaron Halo is a massive ring of asteroids that extends between ArcCorp and Hurston, among others. This is also the easiest way to find it in the game. Fly from Hurston to ArcCorp or vice versa using quantum jump. Switch off quantum drive at the following distance markers (press or hold down the default button “B” again):
| Departure Point | Destination | QDrive | Stop QA at km | Distance Belt – Destination in km |
|---|---|---|---|---|
| ArcCorp | Hurston | Goliath (Prospector, Standard) | 15 Mio. | 12,5 Mio. |
| Atlas | 17,5 Mio. | 12,5 Mio. | ||
| Hurston | ArcCorp | Goliath (Prospector, Standard) | 12,5 Mio. | 10 Mio. |
| Atlas | 16 Mio. | 10 Mio. |
When you exit quantum jump, a giant asteroid field of thousands of kilometres builds up around you. Inside are tons of mineable asteroids, some of them even with gemstone deposits for FPS mining.
Mining on moon surfaces & chart of mining spots
In the past, profitable deposits could be found near mining outposts. Meanwhile, the deposits are much more widespread. We can only say with confidence that it is a matter of chance which resources occur in which quantities. You can’t avoid a proper search.
However, some resources only appear in certain areas. The following list tells you where to expect which resources and how long it will take approximately from the landing zones and stations where mining resources can be sold to the destinations.
Note regarding the chart: The travel time indicates the average time between landing zone and destination, here the respective planet or asteroid belt. This is based on experience. The time span refers to the fact that sometimes you start from a landing zone, fly into the atmosphere and jump directly to a destination. But you may also have to fly far out or jump to orbital markers first, because the destination is hidden.
| Stanton- System | Next Refinery | Raw Materials |
|---|---|---|
| Aaron Halo Asteroid Belt | – | Aluminium, Aphorite, Beryl, Borase, Copper, Corundum, Diamond, Dolivine, Gold, Hadanite, Hephaestanite, Laranite, Quantainium, Quartz, Titanium, Tungsten |
| ArcCorp | ARC L1 | The city planet offers no mining spots |
| Lyria | ARC L1 | Agricium, Aluminium, Aphorite, Bexalite, Copper, Corundum, Diamond, Dolivine, Hadanite, Hephaestanite, Taranite, Tungsten |
| Wala | ARC L1 | Agricium, Aphorite, Beryl, Copper, Corundum, Diamond, Dolivine, Gold, Hadanite, Taranite, Titanium, Tungsten |
| ARC L1 – L4 Asteroid Fields | ARC L1 | Aluminium, Aphorite, Borase, Copper, Corundum, Diamond, Dolivine, Gold, Hadanite, Laranite, Quantainium (L3), Titanium, Tungsten |
| Crusader | CRU L1 | The gas giant cannot currently be explored |
| Cellin | CRU L1 | Aluminium, Aphorite, Beryl, Bexalite, Corundum, Dolivine, Gold, Hadanite, Titanium |
| Daymar | CRU L1 | Agricium, Aphorite, Beryl, Copper, Corundum, Diamond, Dolivine, Gold, Hadanite, Quantainium, Quartz, Taranite, Titanium, Tungsten |
| Yela | CRU L1 | Agricium, Aphorite, Aluminium, Beryl, Corundum, Diamond, Dolivine, Gold, Hadanite, Laranite, Quantainium, Tungsten |
| CRU L1 – L5 Asteroid Fields | CRU L1 | Aluminium, Aphorite, Borase, Copper, Corundum, Diamond, Dolivine, Gold, Hadanite, Laranite, Quantainium (L3), Titanium, Tungsten |
| Delamar | CRU L1 | Mining is not possible on the planetoid itself |
| Asteroid Fields | CRU L1 | Aluminium, Borase, Copper, Corundum, Diamond, Dolivine, Gold, Hadanite, Laranite, Titanium, Tungsten |
| Hurston | HUR L1 HUR L2 | Aphorite, Hadanite, Dolivine |
| Aberdeen | HUR L1 HUR L2 | Aphorite, Beryl, Bexalite, Corundum, Diamond, Dolivine, Hadanite, Hephaestanite, Gold, Titanium |
| Arial | HUR L1 HUR L2 | Aphorite, Bexalite, Dolivine, Hadanite, Hephaestanite, Quartz |
| Ita | HUR L1 HUR L2 | Agricium, Aluminium, Aphorite, Beryl, Copper, Diamond, Dolivine, Gold, Hadanite, Quartz, Titanium, Tungsten |
| Magda | HUR L1 HUR L2 | Agricium, Aluminium, Aphorite, Beryl, Copper, Diamond, Dolivine, Gold, Hadanite, Hephaestanite, Taranite, Quartz, Titanium, Tungsten |
| HUR L1 – L4 Asteroid Fields | HUR L1 HUR L2 | Aluminium, Aphorite, Borase, Copper, Corundum, Diamond, Dolivine, Gold, Hadanite, Laranite, Quantainium (L3), Titanium, Tungsten |
| microTech | MIC L1 | Aluminium, Aphorite, Beryl, Copper, Corundum, Diamond, Dolivine, Gold, Hadanite, Laranite, Quartz, Taranite, Titanium, Tungsten |
| Calliope | MIC L1 | Agricium, Aluminium, Aphorite, Beryl, Diamond, Dolivine, Gold, Hadanite, Hephaestanite, Quantainium, Quartz, Titanium, Tungsten |
| Clio | MIC L1 | Agricium, Aluminium, Aphorite, Beryl, Copper, Corundum, Diamond, Dolivine, Gold, Hadanite, Laranite, Quantainium, Quartz, Taranite, Titanium, Tungsten |
| Euterpe | MIC L1 | Agricium, Aluminium, Aphorite, Beryl, Bexalite, Copper, Corundum, Diamond, Dolivine, Gold, Hadanite, Hephaestanite, Laranite, Quantainium, Quartz, Tungsten |
| MIC L1 Asteroid Field | MIC L1 | Aluminium, Aphorite, Borase, Copper, Corundum, Diamond, Gold, Hadanite, Laranite, Titanium, Tungsten |
Which raw materials are particularly valuable and which prices can be achieved?
Last updated: December 2020 (data is up to date for 3.12)
Note: Prices may vary slightly depending on where you sell. The data is the average of the last five yields in units (1 SCU = 100 units) we have been able to obtain. The percentage recommendations are indicative.
Resources that require a spaceship
| Last Update: 18.12.2020 | aUEC pro Unit (RAW) (100 Units = 1 SCU) | aUEC pro Unit (ORE) (100 Units = 1 SCU) |
|---|---|---|
| Quantainium* | 44,04 | 88,09 |
| Bexalite | 20,24 | 40,48 |
| Taranite | 16,22 | 32,44 |
| Borase | 16,22 | 32,45 |
| Laranite | 15,12 | 30,42 |
| Agricium | 13,44 | 26,88 |
| Hephaestanite | 7,33 | 14,66 |
| Titanium | 4,33 | 8,66 |
| Diamond | 3,59 | 7,18 |
| Gold | 3,16 | 6,32 |
| Copper | 2,85 | 5,70 |
| Beryl | 2,15 | 4,30 |
| Tungsten | 2,0 | 4,01 |
| Corundum | 1,33 | 2,66 |
| Quartz | 0,75 | 1,50 |
| Aluminium | 0,64 | 1,28 |
| Key: At what percentage should I mine? |
|---|
| From 2.5% onwards always mine, but only pick up chunks with very low share of inert materials |
| From 20 percent (Exception: Hephaestanite from 10%) |
| At least 35 percent |
| Ignore |
*Attention: Quantainium is a volatile raw material that explodes after about 15 minutes. Read more about this in the section How to handle Quantainium properly.
Resources for which the multitool (FPS mining) is needed
| Ressource | Deposit | % | aUEC |
|---|---|---|---|
| Hadanite | n.a. | 1 | 275 |
| Aphorite | n.a. | 1 | 150 |
| Dolivine | n.a. | 1 | 130 |
What should I pay attention to when it comes to resources?
If you take a closer look at a deposit, pay particular attention to the percentages. The higher the percentage, the more profit! For example, an 18% Copper deposit is more lucrative than a 0.4% Taranite deposit. However, two percent Taranite is most likely worth more than 18 percent Copper.
After scanning a rock, you should calculate how much mass of the rock is really valuable raw material and then compare it with the table above. Good is low mass and high percentages, e.g. 2,500 mass and a total of 60% of valuable raw material.
Take your time to find a lucrative resource depot. You will ultimately save time and earn more money.
How to handle Quantainium properly
Quantainium is a new volatile and lucrative raw material that came into the game with update 3.9 and will later be required for the production of Quantum fuel, among other things. You can mine the substance as normal, but this raw material will start working in your containers: Quantainium will become more and more volatile and eventually disintegrate in a fat explosion. It’s only logical and consistent that your ship will also “disintegrate” partially or completely. How much damage the ship takes depends on the amount of Quantainium loaded.
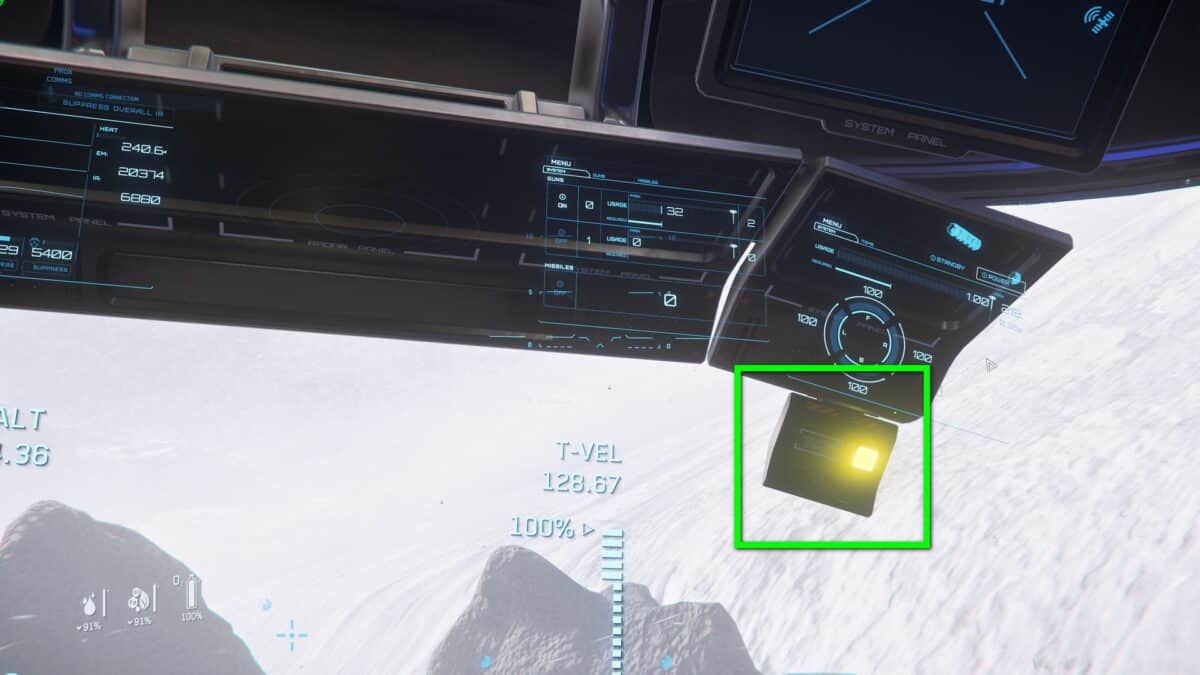
The state of the Quantainium is shown in the Prospector (top right) and in the MOLE via the new panel. At some point it starts to glow and flash, then glows and flashes faster and faster – you know where this leads to. But to make sure that you can still get your ( huge financial ) benefit out of the explosive raw material, the following chart shows the times we measured until your ship turns into fireworks.
Degradation times of Quantainium
| Quantainium Status | Display | Duration of the Stage in min. | Note |
|---|---|---|---|
| Stage 1 | Yellow flashing | 8 | |
| Stage 2 | Fast orange flashing | 6 | |
| Stage 3 | Fast red flashing | 2 | By now you should get rid of the Quantainium (“Jettison”) |
| Stage 4 | Very fast red flashing | 0,25 | This stage sometimes doesn’t even occur, the cargo can explode already after stage 3. |
| Total | | approx. 15 Min. |
Quantainium depots can sometimes be highly resistant. Torpid Consumables can be helpful here, alternatively you can push the Rock Energy Level with Surge. Read more about this in the section Mining Consumables Overview.
Refining Raw Materials & Selling Ore
When you have reached the maximum SCU of your ship (see the Cargo Capacity display on the right in the middle of the screen in Mining Mode) and your backpack or the ROC is eventually filled with gems, it is time to sell.
Refineries can be found in certain asteroid fields. Refineries are located in certain asteroid fields and are sometimes attached to the Rest & Relax Stations.
Refineries in Star Citizen
| Type | Name | Position | Notes |
|---|---|---|---|
| Raffinerie | Ambitious Dream Station | CRU L1 | |
| Raffinerie | Faithful Dream Station | HUR L2 | |
| Raffinerie | Green Glade Station | HUR L1 | |
| Raffinerie | Shallow Frontier Station | MIC L1 | |
| Raffinerie | Wide Forest Station | ARC L1 |
Refinement & Selling
In the station, look for the elevator that will take you to the refinery. Look for the “Refinement Processing” office there and go to the terminals of the same name to start the refining process. Note: Refineries have different material specializations, which can lead to a better or worse yield.
Once you have refined the raw material, you can sell it at trading terminals in landing zones. We will list the appropriate terminals here soon.
Mining Guide for the spaceships MISC Prospector & Argo MOLE
The general mining mechanics for the Prospector and the MOLE are the same. Therefore the following explanations are relevant for both ships. I will explain some differences at this point, special features of the MOLE will follow in the section Guide to solo and multicrew mining with the Argo MOLE.
Once you’ve found a suitable resource deposit, fly nearby and point the ship and target cursor at the rock for a depth scan.
Depth scan via spaceship
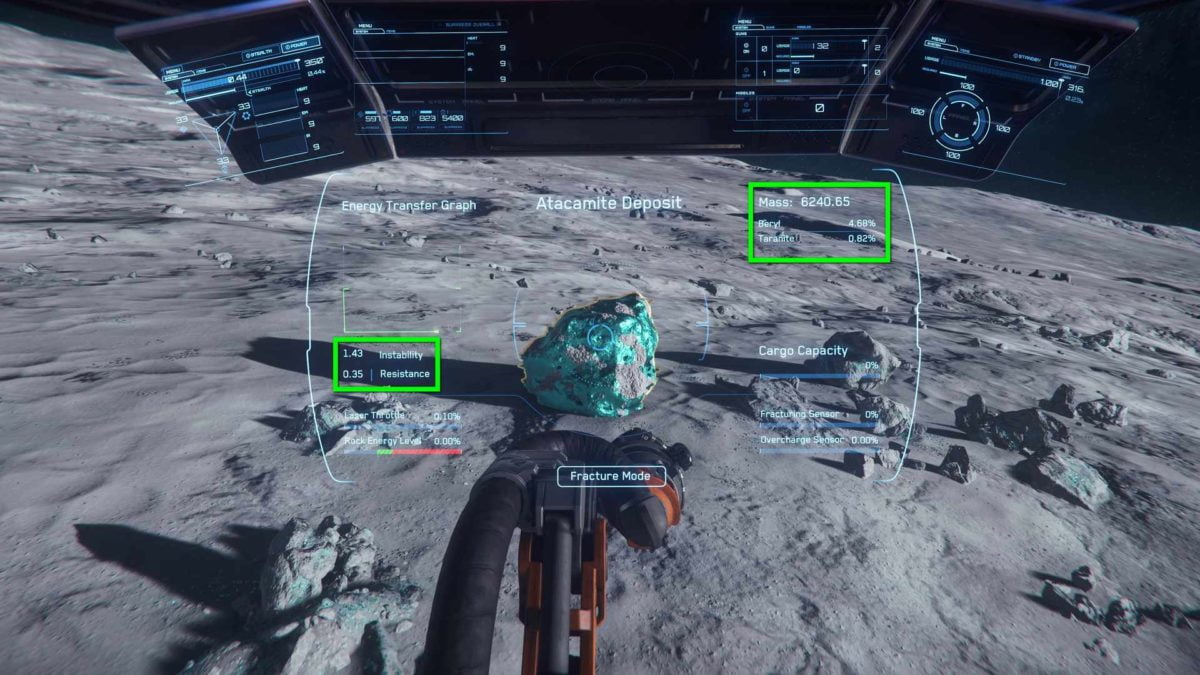
A resource node can be examined both by scan and in mining mode (“M” key). The depth scan displays the following data:
Mass
On the top right of the mining interface of the Prospector you will find the mass of the rock. The higher the mass, the more energy you need to crack the rock.
Composition
For the most part, the rocks consist of so-called “inert materials”, i.e. worthless components of the stone (rock, dust, etc.). We also find more valuable materials such as Bexalite, Agricium or Gold. The composition is presented to us below the mass display of the rock. The material quantity is given as a percentage.
Instability
The instability of the rock is displayed to the left below the energy transfer graph. The higher the instability, the higher the fluctuations in the energy feed. This can lead quickly to energy spikes and thus to overloading of the stone.
Resistance
The resistance of a rock indicates how hard it is for our mining laser to crack it. The closer the value aproaches 1, the more resistant the stone is and the more difficult will the injection of energy be. For example, at a value of 0.8, the energy level theoretically remains constant at 80% energy input. Here, however, instability has its part to play.
Alignment of the spaceship before mining
If you are too far away from the rock, you may not be able to inject enough energy into rocks with a high resistance level. You can fly relatively close to rocks.
The pilot of the MOLE has to communicate constantly with the players in the mining turrets, so that everyone can use their Mining Lasers in the best possible way. If the miners notice that the energy injection is stagnating, they have to give the pilot instructions to fly the MOLE closer to the target, for example. While doing so, the pilot needs to take into account the limited radius of movement of the mining towers (they cannot be directed downwards at a 90-degree angle, for example).
Due to unstable atmospheric flight or bad weather conditions it may also make sense to land the spaceship to break a rock without any trouble. In some areas, such as Calliope, a storm can be so strong that the ship is constantly being pushed away if we don’t keep steering against it. With the MOLE this is not necessarily a problem because the pilot can focus solely on keeping the ship roughly in position.
But if you have to constantly strafe with the Prospector besides controlling the mining laser, this can be a bit too much, especially with challenging rocks. In this case simply land the Prospector at a suitable distance.
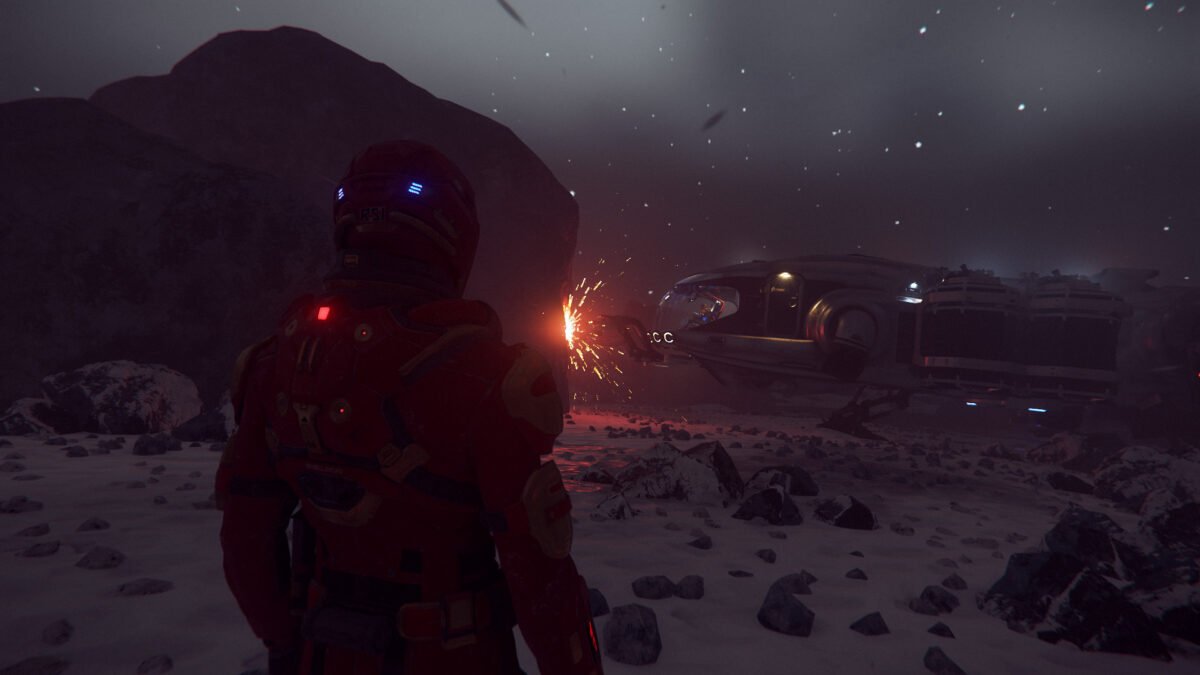
When mining asteroids, the pilot has to be careful whether the laser is moved away from the stone by any movement of the spaceship. Adjust carefully using the strafing keys.
How to mine a resource deposit
Injecting energy with a mining laser
When you are in Mining Mode (“M), activate the mining laser with the left mouse button. The goal is to completely fill the fracturing sensor on the right side. To do this, the energy level of the stone (Rock Energy Level, the indicator to the left below the laser strength indicator, Laser Throttle) must be kept inside the green zone. This area can be quite small and it takes some practice to keep the laser energy there long enough until the fracturing sensor is completely filled.
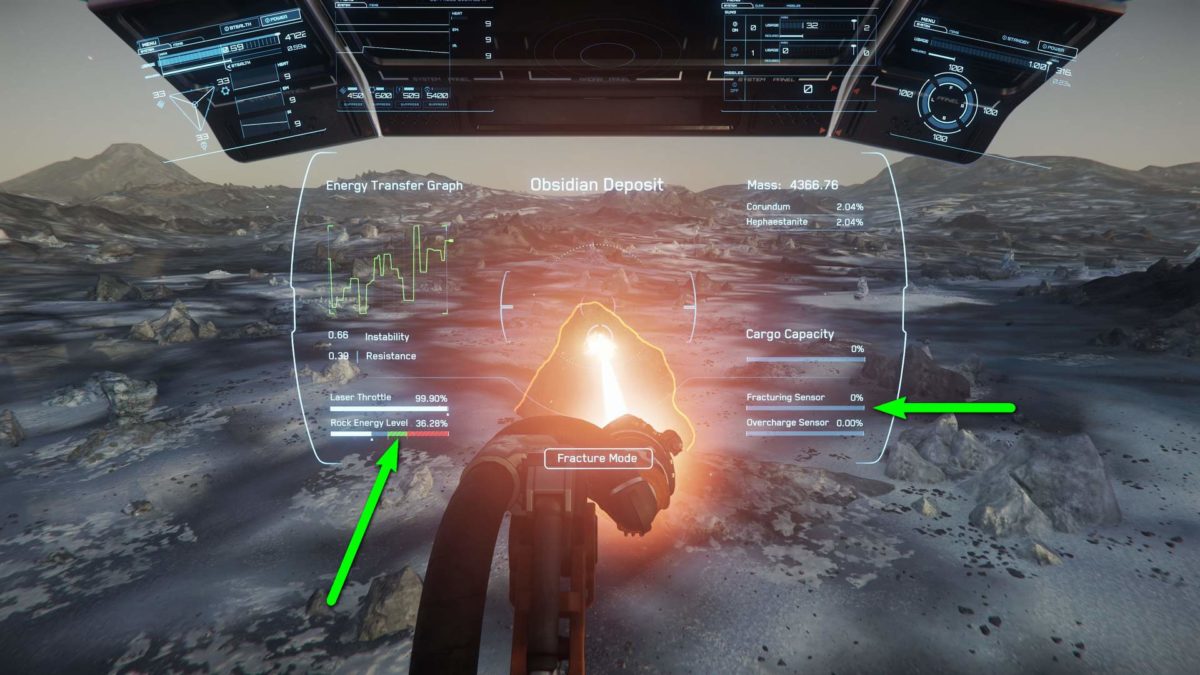
Tips for using the Mining Throttle
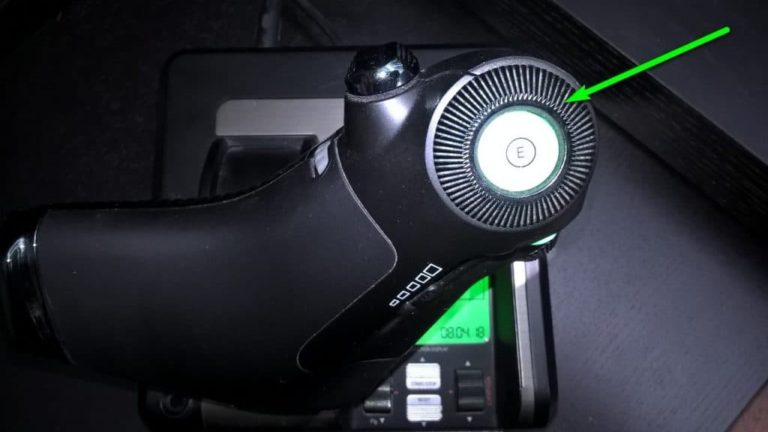
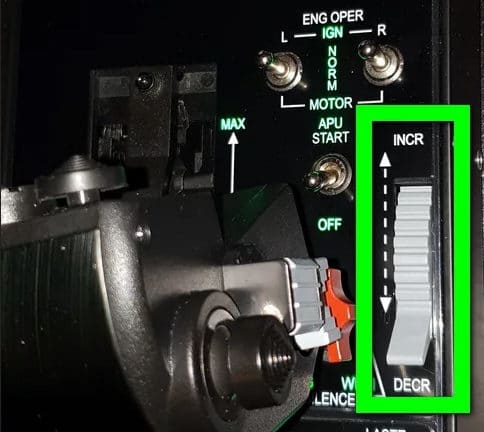
You can change the strength of the mining laser by turning the mouse wheel. Alternatively (and this is also our recommendation) you can put the mining laser in the key configurations for HOTAS under Mining –> Mining Throttle on a throttle axis. In the picture you can see two solutions, which I like very much.
Keeping an eye on the Energy Transfer Graph
As a beginner you should first get a feel for the laser. Slowly increase the energy input until the Energy Transfer Graph on the left in the user interface begins to rise. The higher the energy level of the rock rises, the faster the energy rises. This means that at a certain point little additional energy is sufficient to significantly increase the energy level.
You can imagine it a bit like one of these model cars with swing drive: As soon as you have pushed the car, its swing drive will accelerate it forward by itself.
Adjusting the energy feed
Especially with a very small green area this can lead to difficulties, because when we get into the red area, the overcharge sensor (displayed on the right below the fracturing sensor) rises. At the same time, the fracturing sensor sinks rapidly. When the overcharge sensor is completely filled, the rock explodes immediately and can seriously damage or even destroy the ship.
This means that we have to readjust the energy supply constantly – there is rarely a perfect setting. The energy in the rock either rises or sinks. The trick is to develop a feeling for how much energy you need to supply or take away when energy is in the green zone.
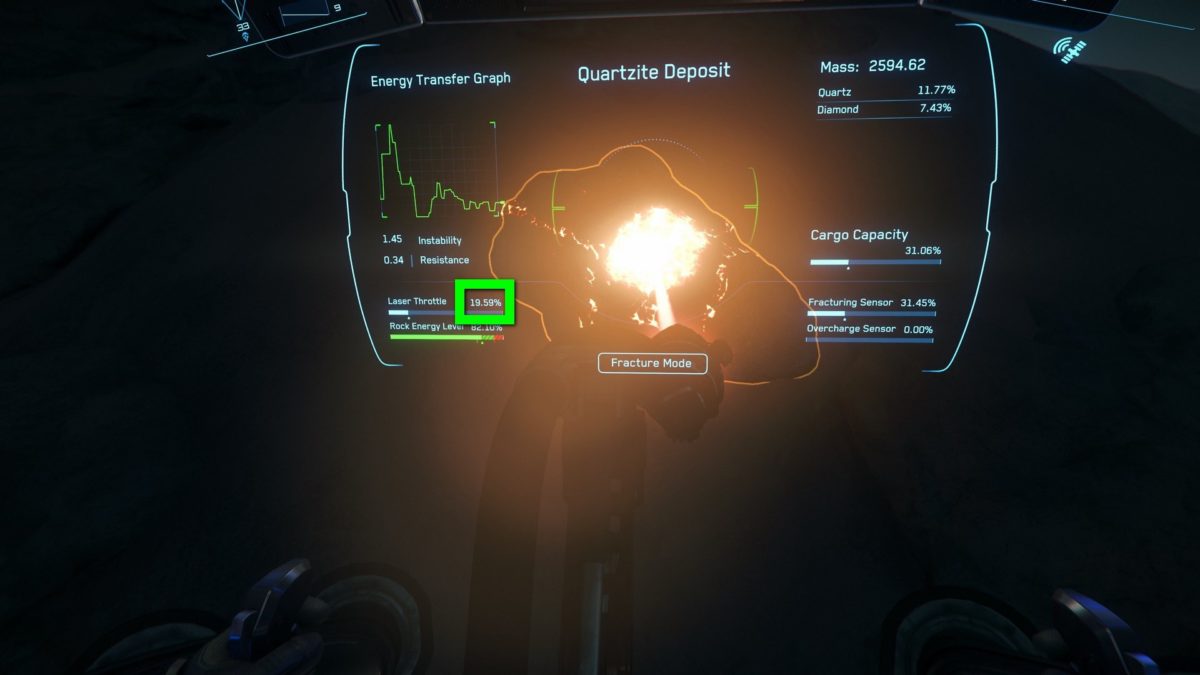
Pay attention to the percentage display on the left above the Rock Energy Level and regulate the energy accordingly, for example from 12 percent with a single turn of the mouse wheel to 4-5 percent and vice versa. Watch the behavior of the energy closely and try to spot regularities. Very helpful here is the sound, which tells a lot about the condition of the stone. So listen carefully.
Also watch the ratio of the rock mass against the energy level increase. The instability and resistance of the rock also play a role here. This ratio quickly shows you, that there are certain percentages or ranges of percentages that you can follow. This is helpful for future mining on rocks of similar or equal mass.
In the case of the Argo MOLE, you’ll have to communicate a lot with your fellow miners. I will explain how to do this later in the section What do I have to pay attention to when mining with the MOLE?.
Reference values for energy input according to mass
In the following table we have compiled a few empirical values in this regard. Please consider them only as rough guidelines, for practice you must absolutely also make your own experiences. These values can also vary depending on how far away the ship is located from the rock. The values refer to the standard lasers.
| Mass / kg | Charging % | Green Zone: Max. % | Green Zone: Min. % |
|---|---|---|---|
| 5.000 — 8.000 | 90-100 | 60 | 30 |
| 2.000 — 5.000 | 70-80 | 40 | 20 |
| 250 — 800 | 15-20 | 12 | 3 |
So in order to keep the energy supply in the green range, we have to switch between high and low values at the right moments. As soon as you feel that the energy is about to jump into the red area, switch to the low value. Before the energy drops out of the green area, switch up again.
Below the green area the fracturing sensor sinks again, which can make the whole thing a bit hectic. Keep calm and start all over again (remove the laser from the rock and wait until the rock has cooled down) before destroying your spaceship.
When mining with a MOLE, the Mining Leader must promptly tell the other players when to increase or decrease energy output. More about it later in this guide in the section What do I have to pay attention to when mining with the MOLE?.
Exit Strategy
If you can’t control the energy and are about to overload the rock completely, switch off the laser with left click or move it away from the rock. If you do this in time, the energy level will drop slowly and you can try again after a few minutes.
The pilot should also always always be able to move the ship quickly backwards. If the overcharge sensor is above zero when the rock breaks, the overcharge energy is released in a more or less powerful explosion. Getting a little distance in time can prevent the worst.
Cracking particularly tough stones
Is your mining laser already at 100 percent, but you still can’t get into the green area? Then you have to fly closer to the stone.
Still not working? Another possibility is the overclocking of the mining laser. Go to the “Items” menu item on one of the multi function displays (MFD). Search for the Mining Laser you currently have installed (for example “Hofstede S1 Mining Laser”) and click on “Overclock”. Now more power is fed into the Mining Laser, but this also increases the heat development and thus the risk of possible subsequent damage to the mining head.
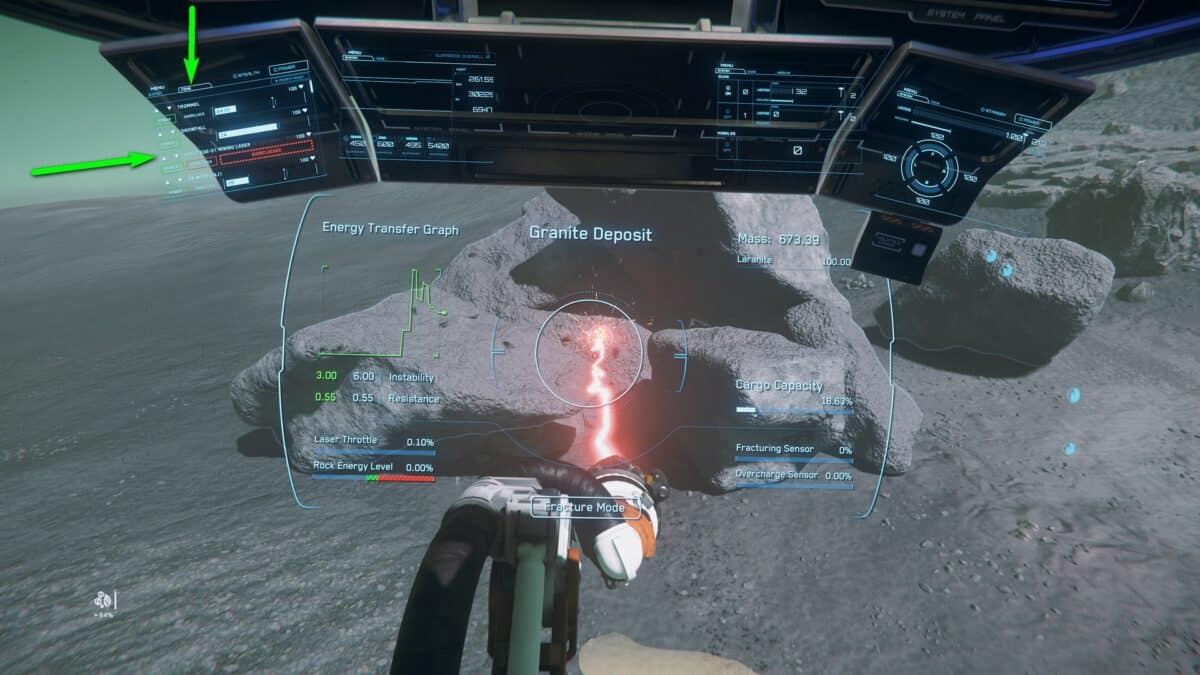
The new Mining Consumables (read also the section All about Mining Consumables in Star Citizen) can also help you, for example by using Surge. This will immediately raise the energy level of the stone by 30 percent. If you did it right, this was the necessary push to get the energy level up.
Still not working? Then it’s time for a new Mining Head. You can find all information about Mining Heads and their advantages and disadvantages in our guide to Mining Heads / Mining Lasers.
Another possibility is to get a buddy with a second Prospector and crack the stone together. However, this requires good communication in order to successfully coordinate the double energy supply.
The MOLE should be able to crack just about any rock using all three mining lasers. If you can’t crack certain stones, you will need better mining lasers / mining heads.
How do I extract resources / raw materials from the boulders?
The Prospector has four mining containers, each of which can hold eight standard cargo units (SCU, the unit of measure for cargo in Star Citizen; 1 m³, plus a 125 mm border on each side) of material. The MOLE carries eight such containers with a volume of 12 SCUs. To transport resources into the containers, right-click to switch from mining mode to extraction mode and start the tractor beam.
Rock fragments that can be placed in the containers are shown with a purple border. Align the tractor beam until the chunk has been fully picked up.
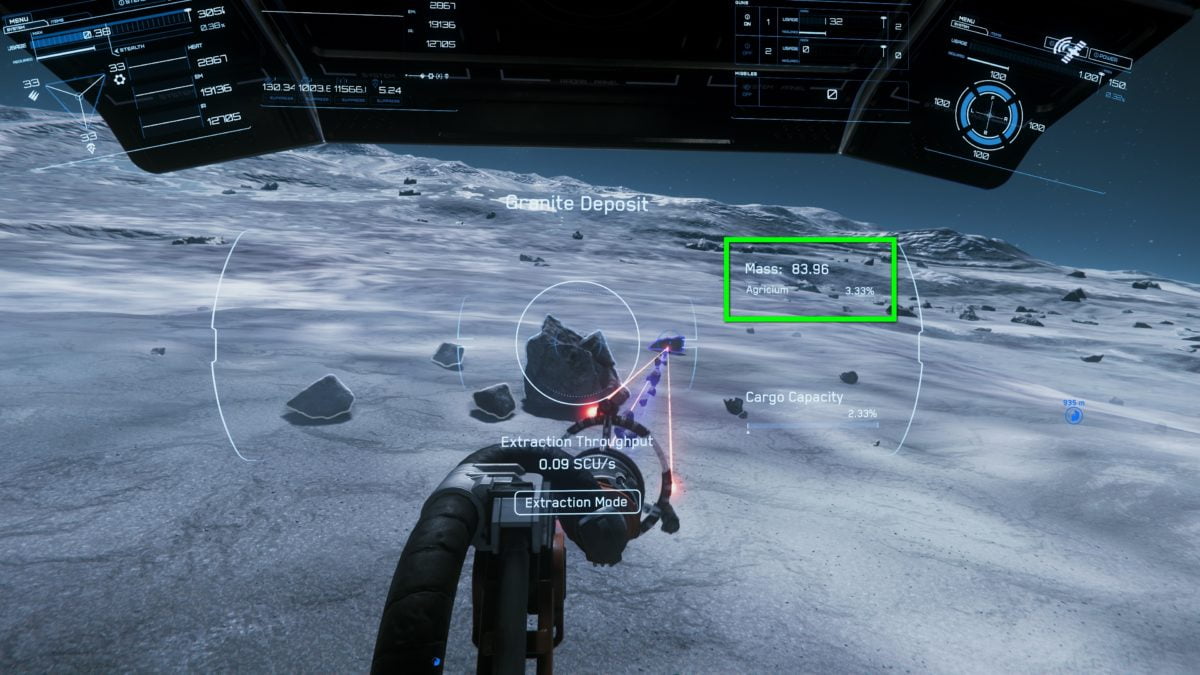
However, you also have to consider the rarity of the material. The most valuable resources from our list above should be picked up most of the time, as long as the resource level is not below the minimum value we have specified or your personal minimum value.
How can I safely pause my mining tour?
In the past, a mining tour had to end with selling the resources. Now you can simply land, go to the back of the Prospector or the MOLE and select the bunk with “F” (default setting). Lie down and then press “F” again. Lie down and then press “F” again. The “Log Out” option appears.
The next time you log in you will wake up in your bunk again, press “F”, look to the left and select “Get Up”. You can now continue your mining tour.
Guide to solo and multicrew mining with the Argo MOLE
Compared to the Prospector, the MOLE is a rather massive ship with a crew of up to five people and a total of three mining turrets. There is one centrally under the cockpit and one each on the right and left side of the ship.
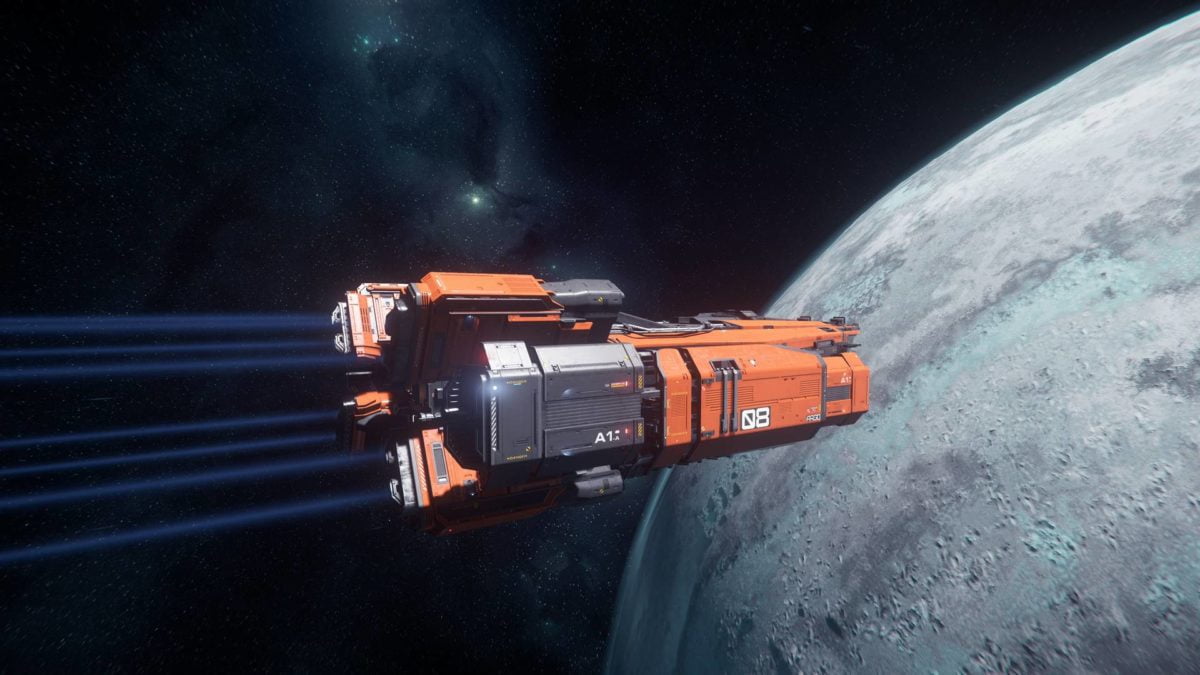
Can I do solo mining with the Argo MOLE?
Requirements
The requirements for a reasonably frustration-free mining run with the MOLE is a Helix II mining laser or – if the appropriate funds aren’t yet available – at least a Hofstede-S2. See also our guide to Mining Heads.
Only the Helix II has enough power to crack massive resource depots – and even here you’ll occasionally come across rocks that can only be cracked with the aid of mining consumables or two or more Lasers. Most rocks don’t require a second laser though, you only need to set the optimal distance of the Helix II towards the rock to about 37 meters (can only be estimated at the moment). As an alternative, the Hofstede-S2 offers a little less power and a little higher risk, but is not nearly as expensive as the Helix.
I advise not to go alone with the MOLE with the standard Mining Laser.
The advantage over the Prospector is of course the increased cargo space: With about 96 SCU you can extract three times as much material and of course you will make much more profit if you choose your targets carefully.
Each time you have to adjust the position of the spaceship perfectly so that you can use the central mining station under the cockpit. To change the position of the MOLE, you need to switch back to the cockpit. Running back and forth can be annoying and it takes some practice to position the MOLE correctly.
Also, you won’t be able to retreat in time with the ship if a rock is about to explode.
Mining with the Argo MOLE: It’s best to go with two people
Designate a Leader (Miner #1) for the mining operation who will fly and position the ship and occupy the mining turret below the cockpit. This station should be equipped with the most powerful laser you have.
Miner #2 always goes first with full power of his laser on the stone. If the energy is already increasing rapidly now, he should reduce the energy until the rock energy level is more or less constant. The communication of the values and the energy changes to Miner #1 is mandatory. Miner #1 is then responsible for the fine adjustment of the energy injection with his laser, while Miner #2 ideally does not need to change anything on his energy output anymore.
The leader has to give clear instructions if Miner #2 shall reduce the energy supply. It helps here to specify the exact percentage, for example: “Down to 50”. Miner #2 of course has to react fast and focused.
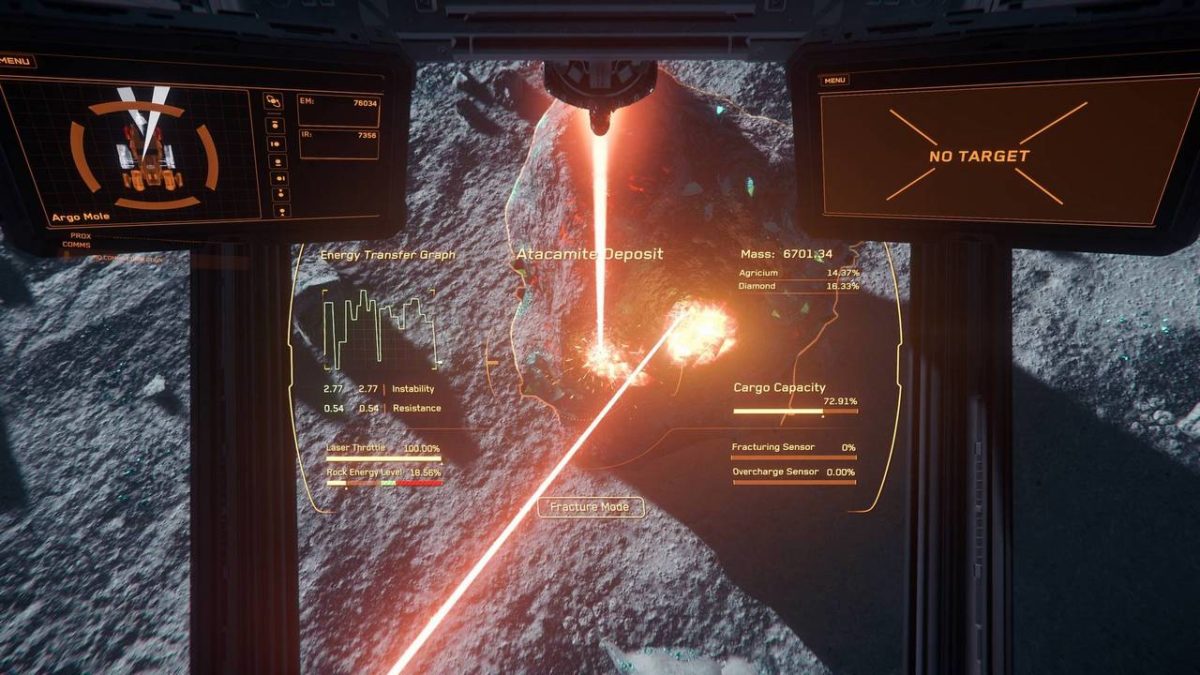
- that the MOLE is close enough (optimal distance of the standard Mining Heads is 30 meters).
- that you slowly scan the stone with your lasers: There are often spots on the rock that facilitate the injection of energy.
- that you have sufficient patience: As soon as the energy increases, let the lasers rest on the respective spots. Sometimes the energy increases very slowly until the green zone is reached.
- Inject a Surge Mining Consumable if you believe that the energy injection only needs a push to rise. Also read the section Mining Consumables Overview.
A good and inexpensive interim solution until the optional purchase of a Helix II laser is the Klein-S2 or Hofstede S2. Two Mining Heads of this type should handle most resource depots well.
What do I have to pay attention to with MOLE-Mining?
Communication is key in MOLE-Mining. A clear leader is needed to set the tone. This should be Miner #1 in the central mining turret below the cockpit. This station should also always have the strongest Mining Head available to you.
Miner #1 instructs the pilot how to position the spaceship. He also determines how the other two miners adjust the energy output of their lasers. Clear and easy to understand commands, which have already been explained in advance, are as important as focus.
After all, if a fellow miner is asleep and removes the energy from the rock too late, the pilot – assuming he hasn’t fallen asleep too – can still quickly engage reverse gear before the rock explodes.
Currently, there is no consistent and reasonable display of the scan results to all parties involved, for example when trying to decide what to extract and what to leave out. For example, if Miner #2 is targeting a piece of rock, this may overwrite the display of Miner #1, even though he is targeting another chunk.
Therefore, when extracting, let the player with the best view on all the stones figure out the percentage of resources. Either Miner #1 or all of you together decide which materials to extract. Follow my guide on the most valuable resources.
In the meantime, the others point their mining lasers somewhere where they do not generate data.
What about MOLE-Mining with four or even five people?
For the mining process itself you should proceed as described above. Miner #1 gives the commands and works on the fine tuning as soon as Miner #2 constantly supplies energy. Miner #3 is only added at direct command of Miner #1 and injects exactly as much energy as Miner #1 specifies.
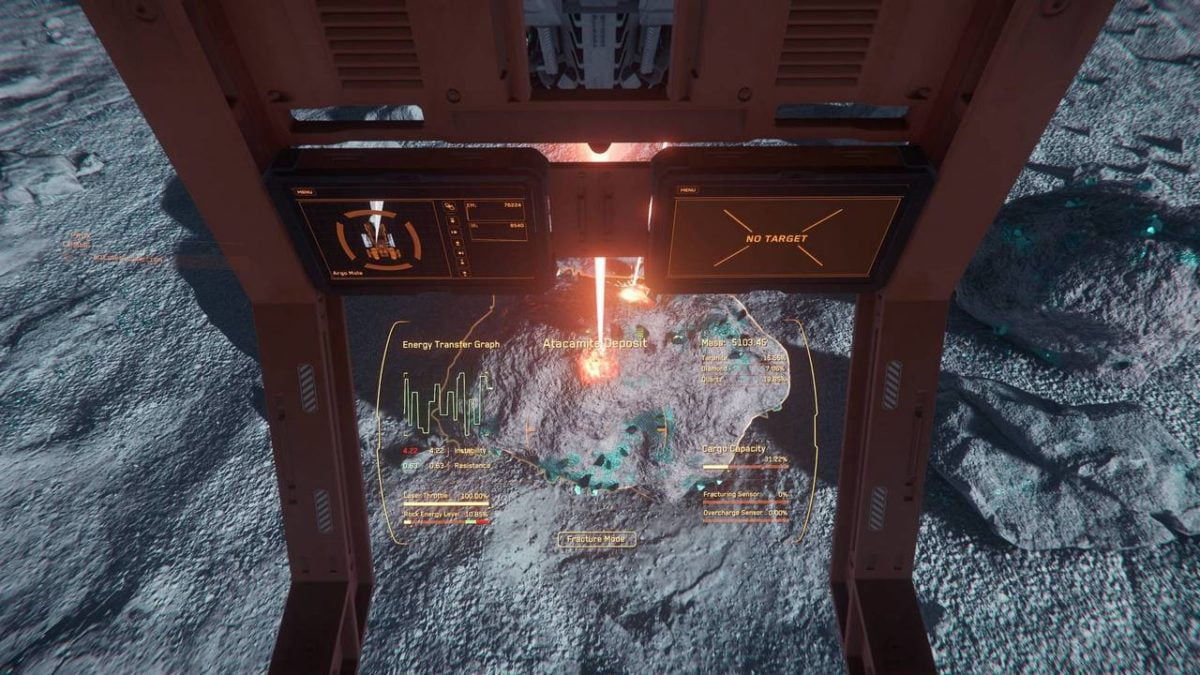
If every mining station has equipped a Helix II, every turret can try to crack its own resource deposit. Otherwise, a Helix II in the central mining turret and a Hofstede S2 on each of the other two stations is a good Mining Head configuration for three miners.
How do I transfer money from a joint mining run to fellow players?
Unfortunately, there is currently no proper method of sharing out the earned aUECs. As a workaround, we recommend creating a transport beacon to a specified destination (not the place where you are!). Only accept the colleague who is supposed to receive the money as a contractor. Should another player squeeze in between, cancel the job.
To be on the safe side, fly to a somewhat more distant location in the ship of the recipient of the wage, create a transport beacon back to the starting point and let yourself be transported there.
Guide to Mining Heads & Mining Consumables
The parameters of Mining Lasers / Mining Heads explained
The Mining Lasers or Mining Heads come with different values that affect different aspects of the mining process positively or negatively.
- Size
Determines for which mining ship the laser is suitable (as listed below). - Range
Shows the optimum and maximum range of the laser. Less important. - Ectract SCU/s.
Indicates how many material per second in SCU can be transferred into the ship via the Mining Head. The higher, the better, but is generally negligible. - Power
The amount of energy the mining laser can inject into a rock. The higher this value is, the easier it is to crack even large and resistant resource deposits. Very important value. - Instability Dampening
Heißt übersetzt soviel wie “Instabilitätsdämpfung”. The higher this value is, the lower will the instability of the respective rock be and the less frequent will sudden changes in energy level of the rock occur. Important value. - Resistance
The lower this value is, the less resistant a rock is and the easier it is to inject energy. Important value. - All Charge Rates
Increases or decreases the charging speed of the Fracturing Sensor and Overcharge Sensor. For example, a high value has a positive effect when you are in the green area of the Rock Energy Level Bar and is quite bad when you get into the red area. A low value means that you have to keep the energy level in the green area for longer, but if you get into the overcharge area, the corresponding sensor will increase more slowly. - Optimal Charge Rate
A high value will cause the Fracturing Sensor to rise faster if you keep the energy in the green area of the Rock Energy Level Bar. Very important value, because you can crack very unstable rocks faster. - Catastrophic Charge Rate
The higher the value, the faster the Overcharge Sensor Meter will increase if you overload the rock. Not so important if you stay away from the red area. - Optimal Charge Window Size
The higher the value, the larger is the green zone in the Rock Energy Level Bar. Important value. - Throttle Responsiveness Delay
High values mean that your changes in Energy injection are delayed, and the Mining Laser reacts slower to your input. Very important value, especially when mining very unstable rocks. - Consumable Slots
Mining consumables can be placed in slots of your mining laser if available. When activated, they will affect the rock or various laser stats. You can find all the information about this in the Mining Consumables Overview. - Shatter Damage
The higher the value, the higher the damage when a rock is overcharged and explodes. - Price
Do I really have to explain this?
Mining laser / Mining heads overview
Below is my chart of currently available Mining Heads in Star Citizen. You can get them for example in Lorville by using the trading console at Tammany and Sons. In New Babbage you get mining lasers at the console in front of Shubin Interstellar (Plaza). You can also currently get some Mining Heads in the Mining Support Centers at Refineries (Clothing Console). Please note which Mining Heads fit on which ship.
Ship Mining Head Size MISC Prospector S1 Argo MOLE S1, S2
| excellent | can be both positive and negative | purely negative |
For the complete chart please scroll to the side.
Special thanks for support with the mining consumables data goes to: RapidDarkVenom (Discord)
This Mining Laser / Mining Head manages these Resistances
The following values are based on my experience and indicate which of our recommended lasers can be used for what resistances in rocks. You can save a lot of time and leave out everything that has higher resistances.
| Mining Head / Mining Laser | Max. Resistance Range (approx.) |
|---|---|
| Arbor MH1 (Prospector Standard) | 0,25 |
| Hofstede-S1 | 0,35 |
| Klein-S1 | 0,40 |
| Helix I | all |
Mining Consumables Overview
The mining heads already presented above have different numbers of slots for consumables. Mining Consumables fit in these slots which have a certain influence on the mining process for a short time. For example, the currently most expensive Mining Consumable “Optimum” provides up to five times a doubling of the “Green Zone”, but also increases heat generation.
- Size
Determines for which mining ship the laser is suitable. Size 1 fits in Prospector and MOLE, Size 2 is not yet available. - Grade
Probably there will be quality grades at some point. Currently irrelevant. - Resistance
Indicates the percentage by which the resistance of a rock is increased or decreased. - Instability
Indicates the percentage by which the instability of a rock is increased or decreased. - Charge Window Rate
This is probably the speed at which the Rock Energy level can rise. (Needs verification) - Charge Window Level
Probably means the reached Rock Energy Level. For example, the Rime Consumable can immediately reduce this level by 50 percent if we have gone too far into the red. - Optimal Charge Window Size
Indicates the size of the Green Zone, i.e. the green colored area that positively influences the Fracture Sensor. - Heat Generation
This probably refers to the heat development which leads to higher wear of the mining head. (Needs verification) - Signature Size
The larger the ships signature, the easier it is to detect a Miner. (Needs Verification) - Catastrophical Charge Rate
Indicates the speed at which the Overcharge Sensor fills up when we start playing in the red area again. - Shatter Damage
Indicates the increase or decrease in damage caused by an exploding rock when we overload it. - Duration
Duration of effect of the consumable. - Charges
Quantity of charges that determines how often we can use the consumable. The total price has to be divided by the amount of charges to determine the cost-effectiveness. Or just look at our chart below.
| excellent | can be both positive and negative | purely negative |
For the complete chart please scroll to the side.
Mining guide on foot: This is how FPS or hand mining works
You have equipped your Pyro RYT Multitool with the Ore Bit Mining-Attachement via the MobiGlas (Equipment)? You bought MacFlex Arms Orange “Backpack” Core? You are on a moon or asteroid and want to loot a Hadanite deposit? Read here how the mining works on foot (in First Person Sight).
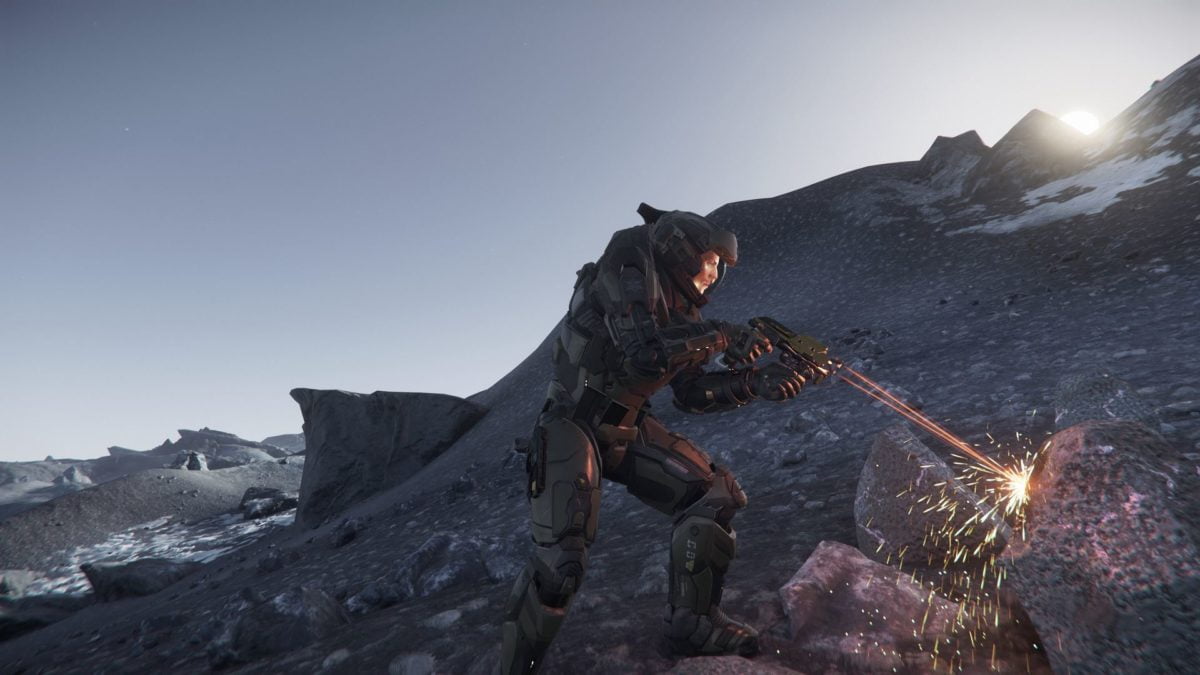
Depth scan via multitool
If you pull your multitool with the “4” key (default setting) and then right-click to switch to mining mode and aim for a resource depot, a depth scan will start which will bring you the following information (see green box in the picture below, from bottom to top):
Composition
Identifies the gemstone or ore you are trying to mine.
Mass
Specifies the quantity of raw materials to be extracted. For example, the value 0.10 indicates that 10 gems can be expected from this stone.
Instability
How much the energy feed into the stone is fluctuating is indicated here. The higher the value, the higher fluctuations can occur and the quicker you have to react by changing the energy input.
Resistance
Indicates how much energy is needed to crack the stone. If about 0.5 is displayed, the energy level of the rock remains constant at about 50%. However, this also depends on the instability of the rock.
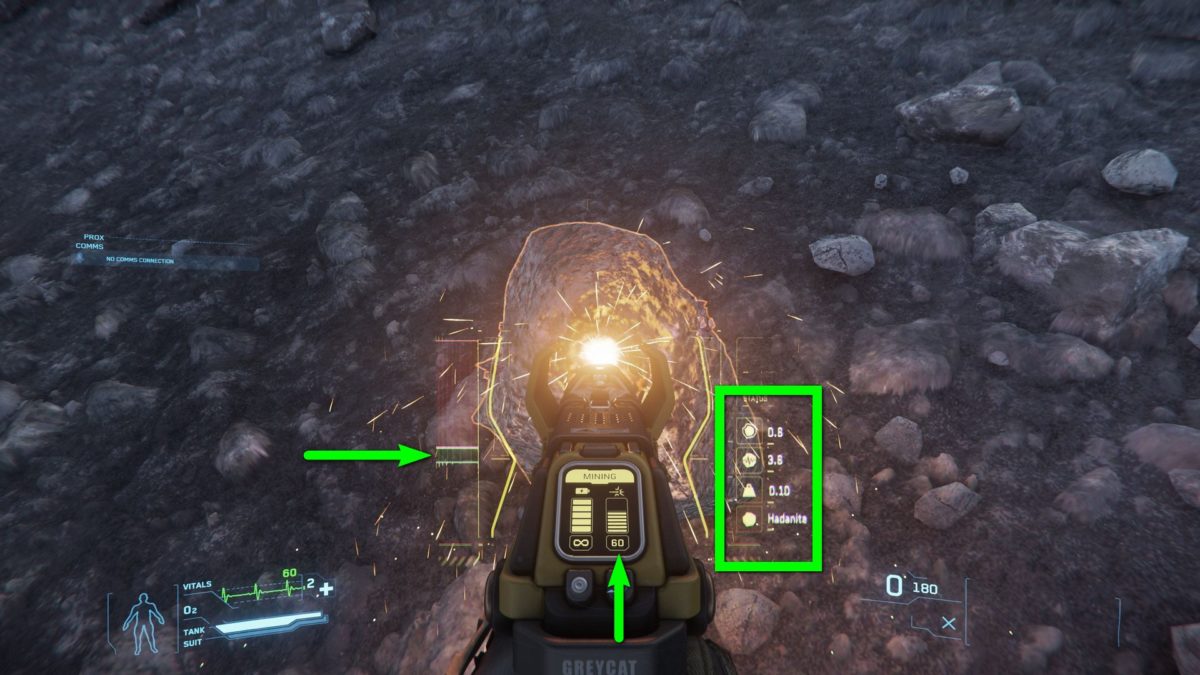
Mining resource deposits with the Multitool
Energy injection via multitool laser
When Mining Mode of the Multitool is activated (right click), energy is injected into the stone by clicking left. The right bar in the middle of the display shows you how much energy you are currently pumping into the rock. You increase the energy output using the mouse wheel. “Mouse wheel up” increases the energy output, “Mouse wheel down” reduces it. Unfortunately, you can’t put the energy supply on the HOTAS-Throttle, like with spaceship mining.
The left middle bar, the battery indicator, is currently always filled. Later you will have to recharge the tool, probably with batteries.
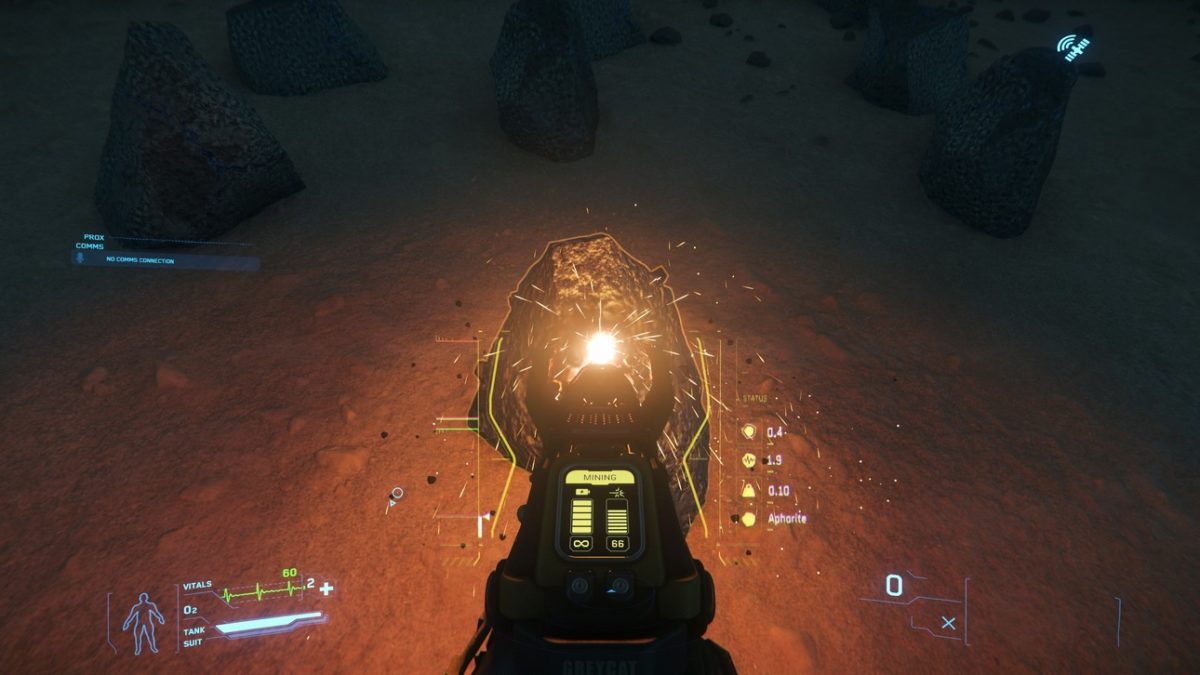
Your goal is to move and keep the white arrow, the energy level, within the sweet spot or the so-called “green zone” on the left side. The green zone is marked by the two lines in the middle. If the energy level is in between, a green bar grows. If it is filled, the rock breaks and reveals its treasures.
Sensitivity at the Multitool: Adjustment of the energy feed
You can’t really fine-tune the energy input right now, but have to work with forceful turns on the mouse wheel. Note that the higher the Energy Marker rises, the faster it rises. Nevertheless, depending on the instability level, it can be difficult to keep the energy marker in the green zone, as sudden jumps can often occur.
You can only counter these with some anticipation by turning the mouse wheel back quickly and strongly just before you expect a new jump in the energy level. If the energy level drops too quickly, you’ll have to turn the mouse wheel back up just as vigorously so that the green bar doesn’t sink too much.
Collecting the Resources / Gems
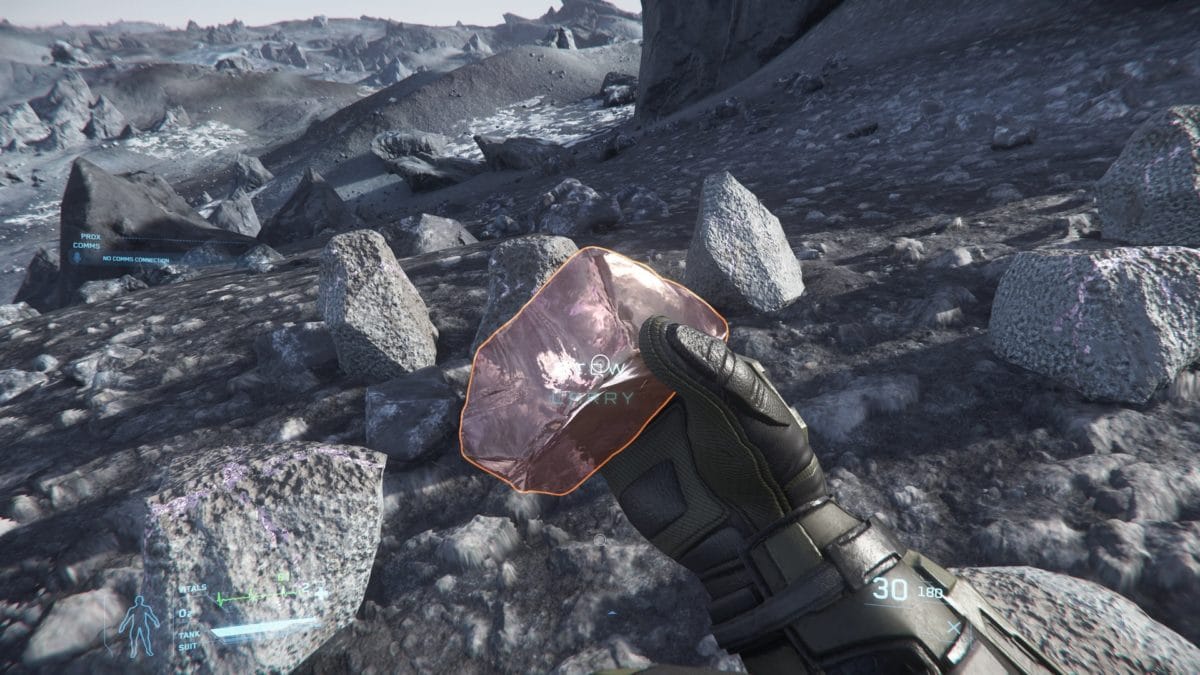
If the rock breaks as planned, it releases a number of gems that you can target. Press “F” (default setting) and select “Stow” to store the loot in your inventory.
The future of mining in Star Citizen
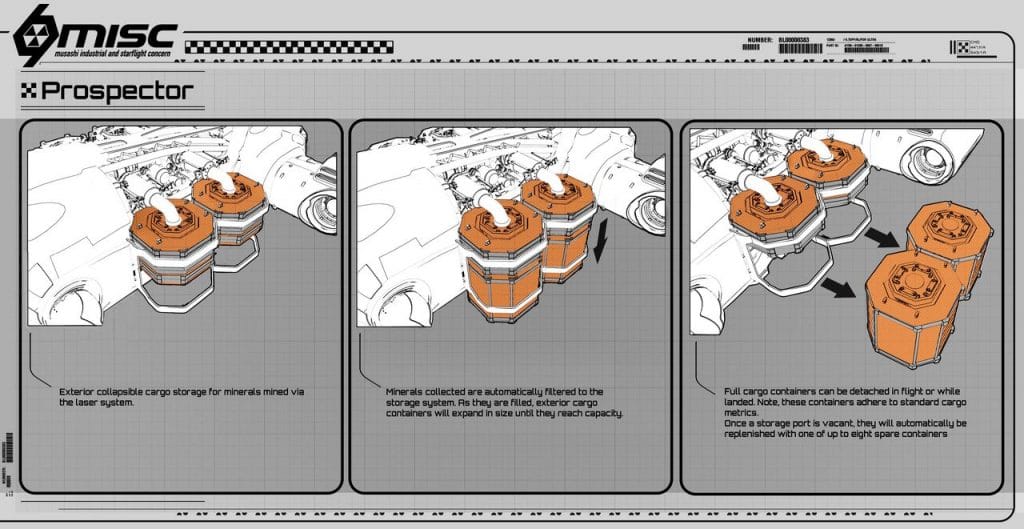
At some point in the future, the Prospector and the MOLE should be able to drop their containers. Transport ships such as the Caterpillar can load the containers into their cargo holds using a tractor beam and transport the extracted resources away, while the Mining Ships continue to mine.
Mining-Plattform Orion: From miner to industrial magnate
According to CIG, the current implementation of the mining profession is only the first and basic version. Back in February 2015, the developers published a detailed design concept for extensive mining gameplay. We will now introduce the concept briefly. Please remember, however, that the gameplay presented here may differ from the final implementation. We will update new information as soon as we receive it.
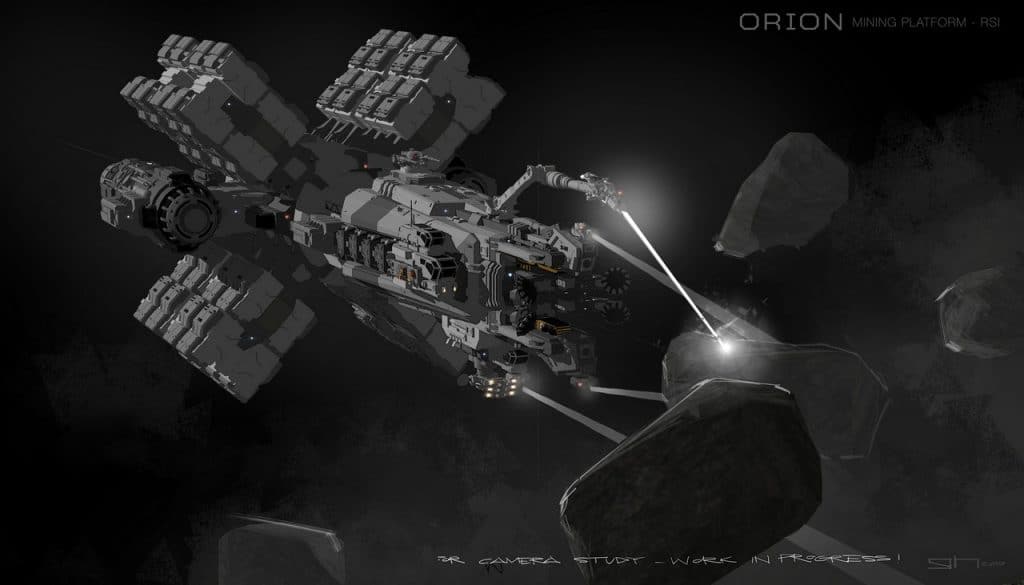
This concept includes, for example, large-scale scanning of asteroid fields in which the Orion mining platform can poach. The huge industrial ship will be about 170 meters long and capable of carrying over 16,000 SCU. It requires a crew of four to seven men to function properly. The most important roles for players (or NPCs, which will cost a lot of money) are planned as follows:
The Orion pilot of course ensures that the platform reaches a place where resources can be mined. Within asteroid fields he is responsible for navigating and positioning the ship without accidents. He will probably be able to somehow stabilize the Orion for the mining process to enable the beam operator to precisely control the mining laser. If necessary, the pilot can adjust the position of the platform so that the crew can find the best angle for the scan or mining process.
In this role, a player tries to find lucrative asteroids. For this purpose, he injects so-called RMAPs (Remote Material Analysis Packages) into the asteroids. The injection process is carried out by special rockets. To find a suitable injection point, the operator has to scan the surface of the asteroid.
Once he has found a suitable point and calculated the correct angle, a rocket is launched, which the scan operator must steer manually to the injection point. The material the asteroid is made of, the angle at which the missile strikes and the speed of impact determine whether or not an injection was successful. Successfully injected RMAPs then provide information about the composition of the asteroid.
The beam operator is responsible for controlling the mining lasers. There are several of them, which are attached to robot arms at the front of the Orion and can disassemble asteroids into handy pieces. Similar to what we know from the Prospector, the beam operator can manipulate the power of the mining lasers and control the energy supply. The player must pay extra attention to the composition of the asteroid: In addition to solid materials such as gold, copper, etc., gas inclusions or liquid resources are also supposed to be hidden in asteroids.
If the beam operator pushes massive amounts of energy into a gas pocket, the consequences can be quite explosive and therefore catastrophic. In addition to monitoring the energy supply, the beam operator also needs to be aware of seismic waves that may be triggered during the mining process and which can also lead to undesired chain reactions.
The cargo operator monitors the so-called entry port via a console on the ship’s bridge. There is a heavy crusher that shreds the fragments extracted from the asteroids and transfers them to the inside of the Orion. The fragments of rock entering the crusher are selected by the cargo operator himself using a special tractor beam system. He can identify the exact composition of the fragment and thus prioritize particularly lucrative fragments. A certain degree of skill is supposed to be necessary for the successful operation of the console and the tractor beam system.
This player serves the ship’s refinery. Raw ore is converted into refined material, which is then stored in Orion’s freight containers. Unwanted elements such as dust or worthless rock, on the other hand, can be blown out into space, which, in contrast to the current mining mechanics with the Prospector, saves considerable space and time.
The refinery operator has to guide the raw ore through a number of different processing plants. Operating errors in the finishing process can lead to equipment failures and the need for maintenance or ultimately to lower yields.
Production chains in Star Citizen: The road ahead
Mining in its small (for example with the Prospector) and large form (as planned with the Orion) should only be part of the economic cycle in Star Citizen in the future. Mining represents the beginning of a (possible!) production chain: This is where the raw material is extracted.
The mining ship itself or a transport ship takes over the first part of the logistics and delivers the material either to a refinery or (if the ship is equipped with a refinery) takes the refined materials directly to a factory that produces intermediate products (spaceship parts, weapon parts, attachments). Materials from refineries would of course also have to be delivered by transport ships to factories.
The intermediate products could then in turn be delivered to factories for end products, these end products in turn to stations or landing zones. This would create a very complex economic system in which demand and supply in each section of the production chain would enable a (at least partially) player-driven economy.
No related articles found.

